Source-Connect 4 Facility and Dolby Atmos
As of version 4.1.0, Source-Connect Facility includes an integration with the Dolby Atmos Renderer. The industry’s first remote Dolby Atmos® certification with metadata connection to the Renderer. Full beds, objects, and metadata—streamed to the Dolby specification. Not linear audio mapped to speakers.
What is Dolby Atmos?
Dolby Atmos takes Dolby’s traditional 5.1 and 7.1 surround sound setups a step further by adding a third, overhead dimension. You’re no longer constrained to a stereo system or standard six- or seven-channel arrangement. You experience an auditory atmosphere, as the name implies, and are encompassed by scenic sounds by your equipment bouncing sounds off your ceiling. The end result: an environment that more accurately represents how we experience sound.
How Dolby Atmos works with Source-Connect Facility
To enable approval of Dolby Atmos mixes with geographically separated collaborators, Source-Connect's Facility version supports streaming of Dolby Atmos mixes with up to 128 discrete channels with synced metaobjects. Source Elements has partnered with Dolby to implement a special feature in the Dolby Atmos Renderer (DAR) so we can synchronize metaobjects along with the audio.
With Source-Connect, there are always (at least) two parties involved in a connection:
- The sending side is the local party, the "Send Renderer" in the UI.
- The receiving side is the remote party, the "Receive Renderer" in the UI.
On the sending side, you would open the "Send Renderer" dropdown under General Settings, and select the IP address of your renderer. On the receiving side, you would open the "Receive Renderer" under General Settings and select the IP address of your renderer.
You may have multiple receivers, but only one sender.
The most common scenario is that the playback engine of your DAW (Pro Tools, for example) is "Dolby Audio Bridge" driver. This driver is also the audio input device in the local renderer's side so that data is sent from.
Requirements
On the sending side, you will need to connect to the Dolby Atmos Renderer and request that any Dolby Atmos-relevant data is communicated to Source-Connect Facility using the Atmos I/O settings.
You will need a Pro Tools setup with audio signals and the corresponding Dolby or Avid panning plugins to send panning metadata real-time to your Renderer that will be transmitted to the remote party via Source-Connect.
On the receiving side, you will need to connect to the Dolby Atmos Renderer and send any data that comes from the sending side.
On the sending and receiving sides, you will need an Ethernet connection to an internet connection capable of sending/receiving at least 5MB of network data without packet loss.
What you will need
- You will need a Dolby-Renderer-enabled version of Source-Connect 4 and a Source-Connect Facility subscription. You can get a free trial via the "FREE TRIALS" tab in the Products & Downloads page, or purchase a Source-Connect Facility subscription or buy-in license on the Source Elements store.
- You will need a Dolby Atmos Renderer application version 5.3.1 or higher. You can get a free trial via the Dolby Customer portal or purchase a license from them. This requires an iLok account.
- The sender will need an Atmos-compatible DAW to send audio and metaobjects to the Dolby Audio Renderer.
Source-Connect 4.1 with Dolby Atmos Quick-Start Guide for macOS
This page is a quick-start guide for macOS. You can find Windows support and the full user guide here.
Requirements
- You and your connection partner have the external Dolby Atmos Renderer.
- Your DAW playback engine is set to the Dolby Audio Bridge.
1. Installation
Download and install Source-Connect 4.1 Facility x Dolby Atmos: https://dashboard.source-elements.com/products/downloads/source-connect
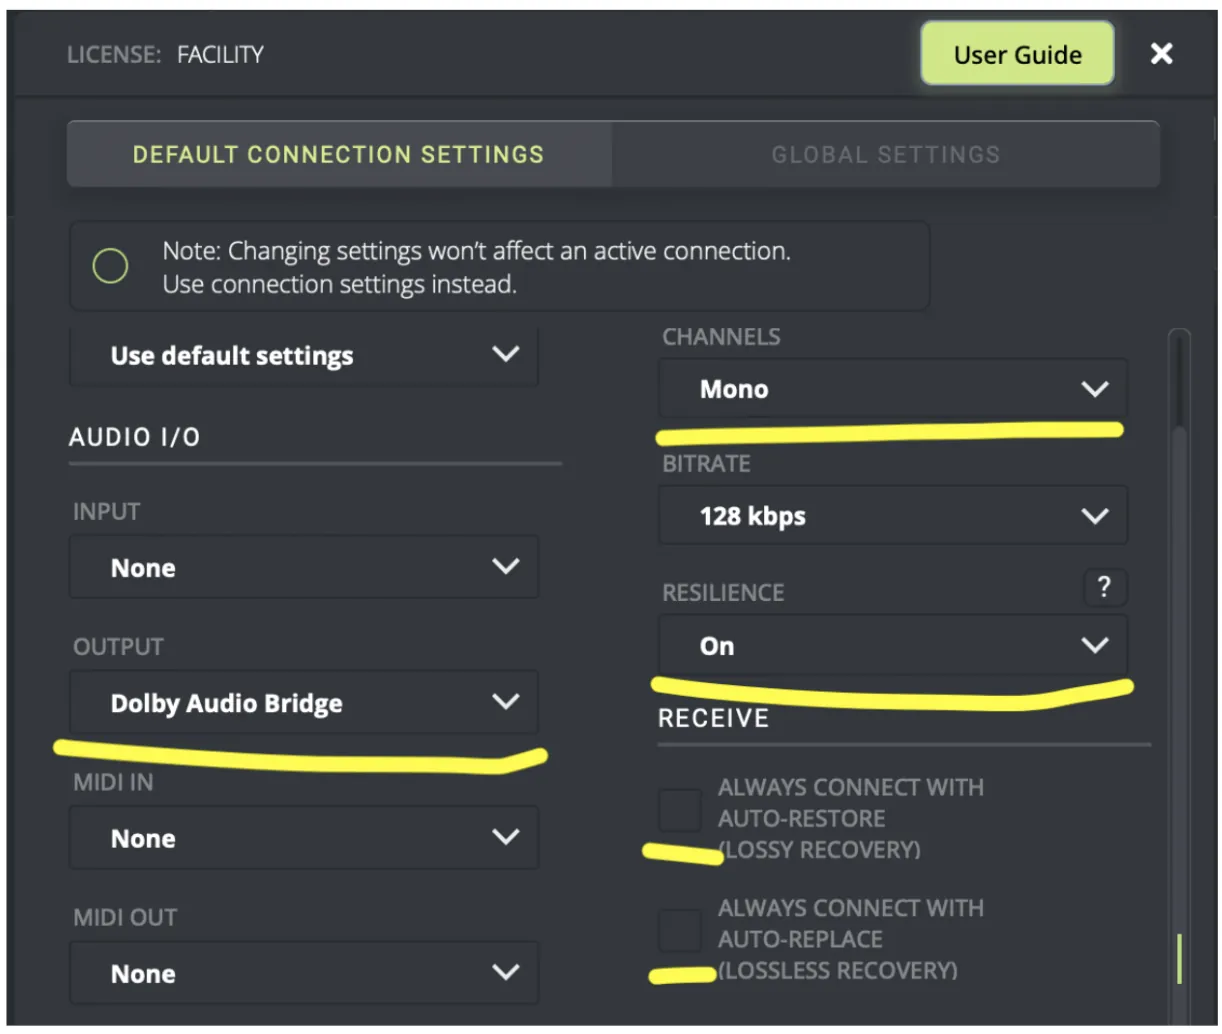
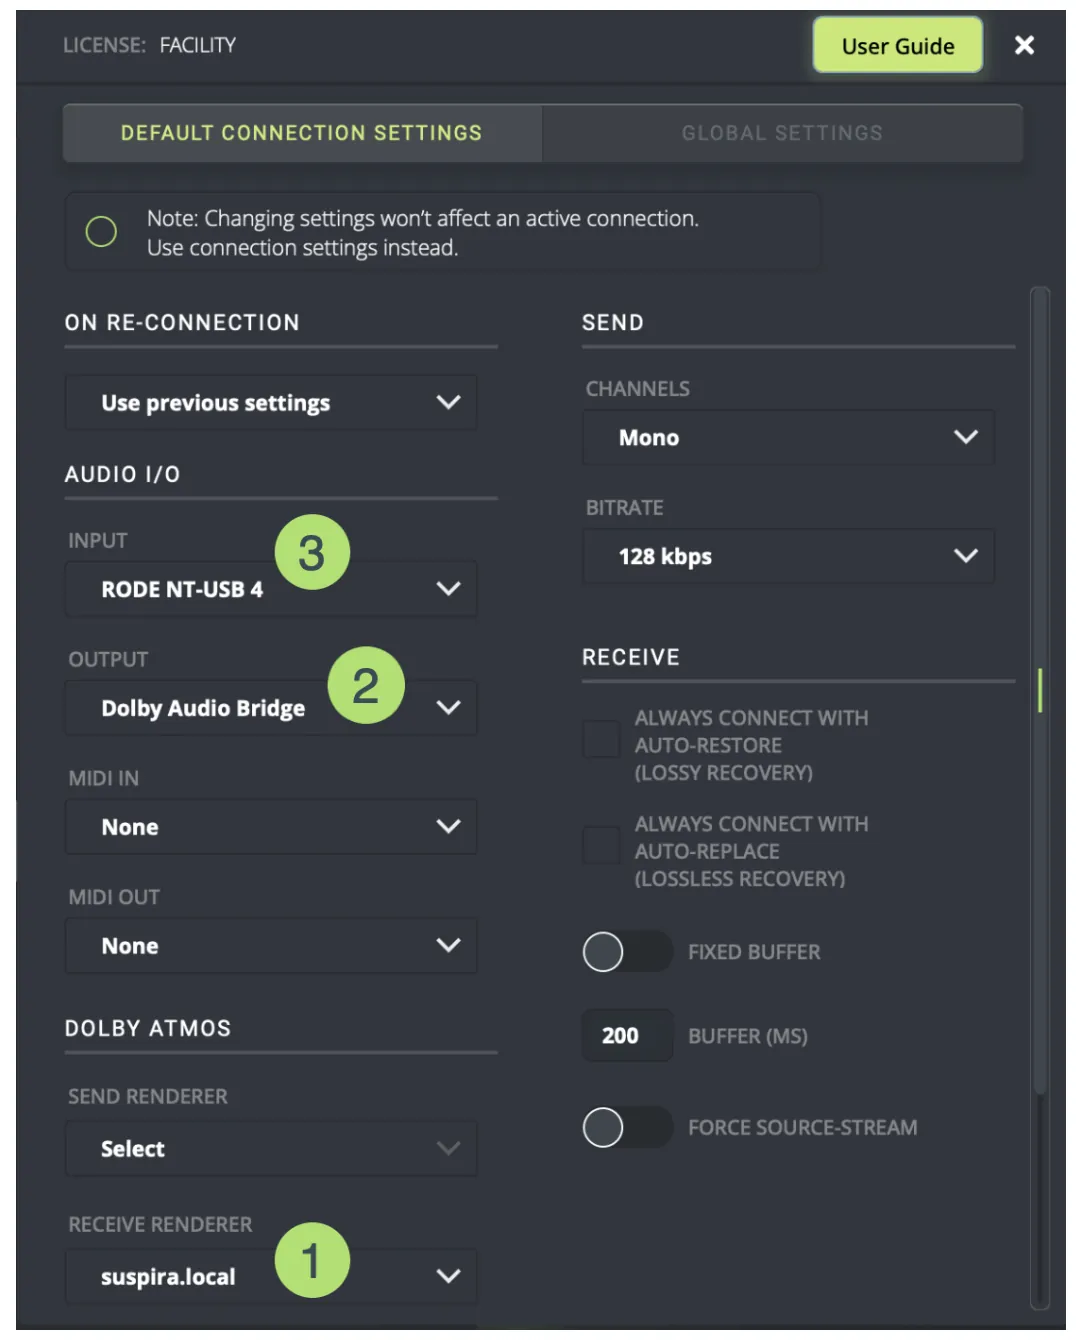
2. Set Send settings and input device
- Choose the Dolby Audio Bridge as the Input device.
- Set the highest channels you will send e.g 128.
- Set the bitrate higher or lower depending on your bandwidth: default is recommended.
- Leave Resilience to On unless you have a dedicated network between facilities.
- Disable Restore/Replace.

3. Set Receive settings and output device
- Choose the Dolby Audio Bridge as the Output device.
- Set the lowest channels you will send e.g mono. You may not be using this for communication.
- Set the bitrate higher or lower depending on your bandwidth: default is recommended.
- Leave Resilience to On unless you have a dedicated network between facilities.
- Disable Restore/Replace.
4. Select the Dolby Atmos Renderer
You MUST take this step before connecting.Launch the Dolby Atmos Renderer so you will see it in the dropdown under the Dolby Atmos settings in Source-Connect: it will look on the local computer and WAN so if you have multiple Renderers available be sure to select the right one for your session.
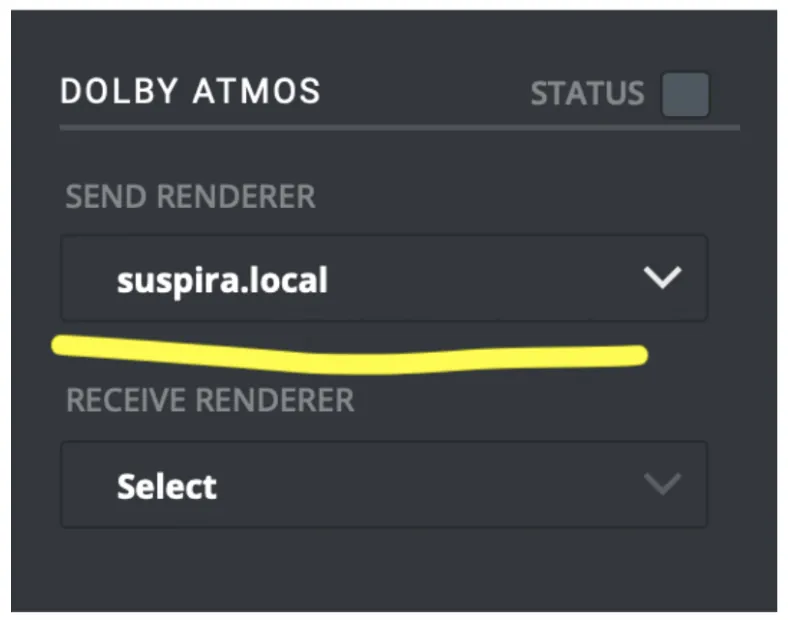
The send side selects for the Send Renderer:
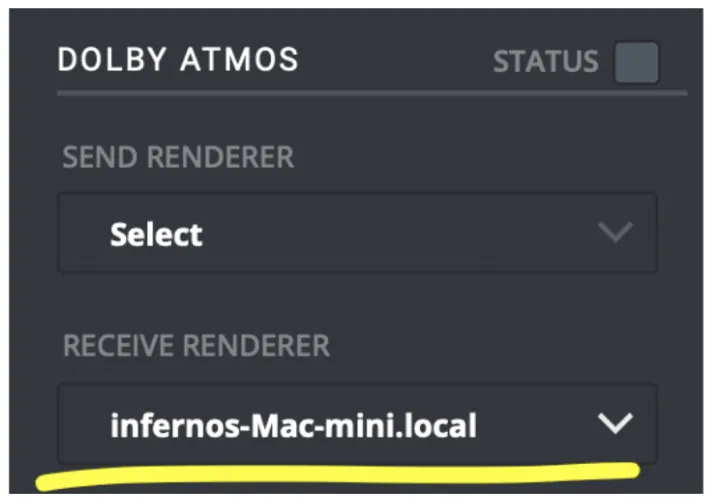
The receive side selects for the Receive Renderer:
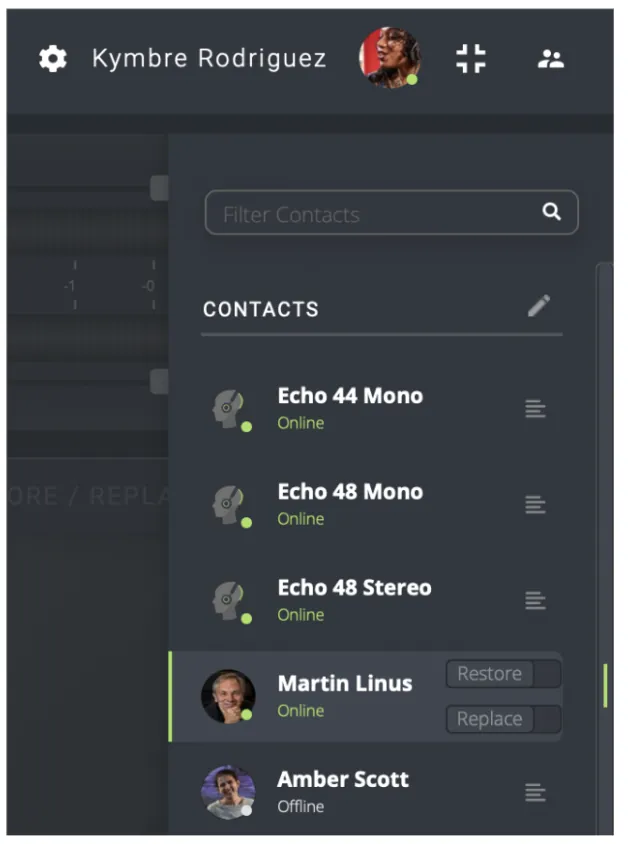
5. Connecting
Click on the user you want to connect to. We strongly recommend that you disable Restore/Replace to save disk space while testing (it’s only needed for recording, you can permanently disable it in Global Settings)
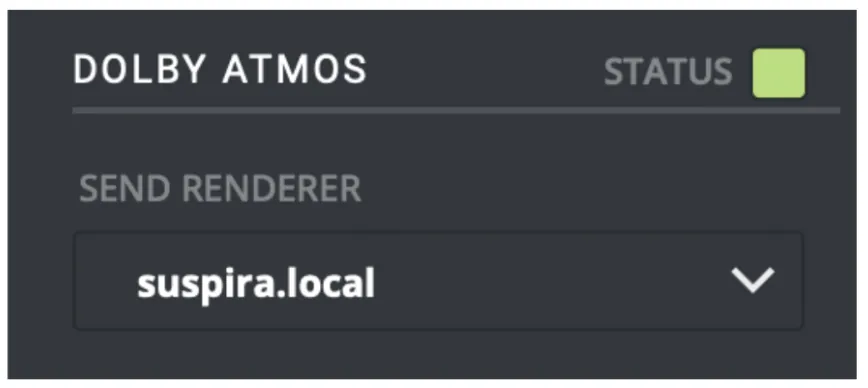
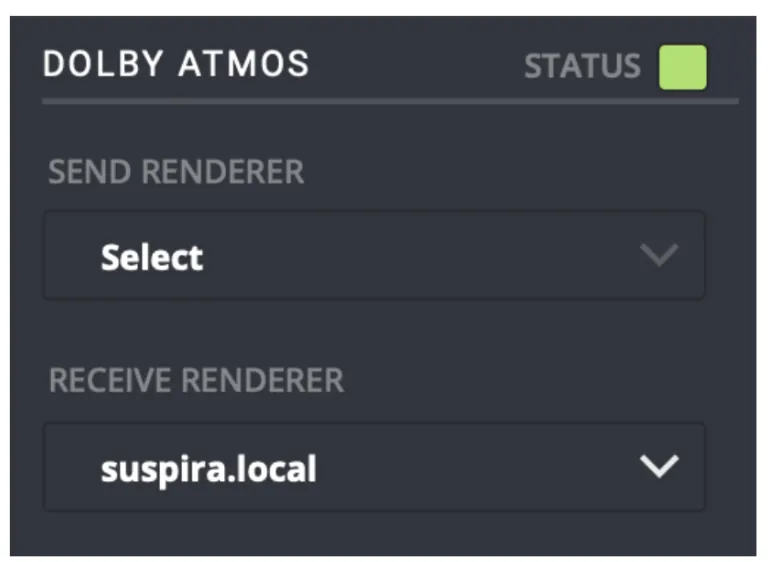
6. Verifying that the Dolby Renderer is listening
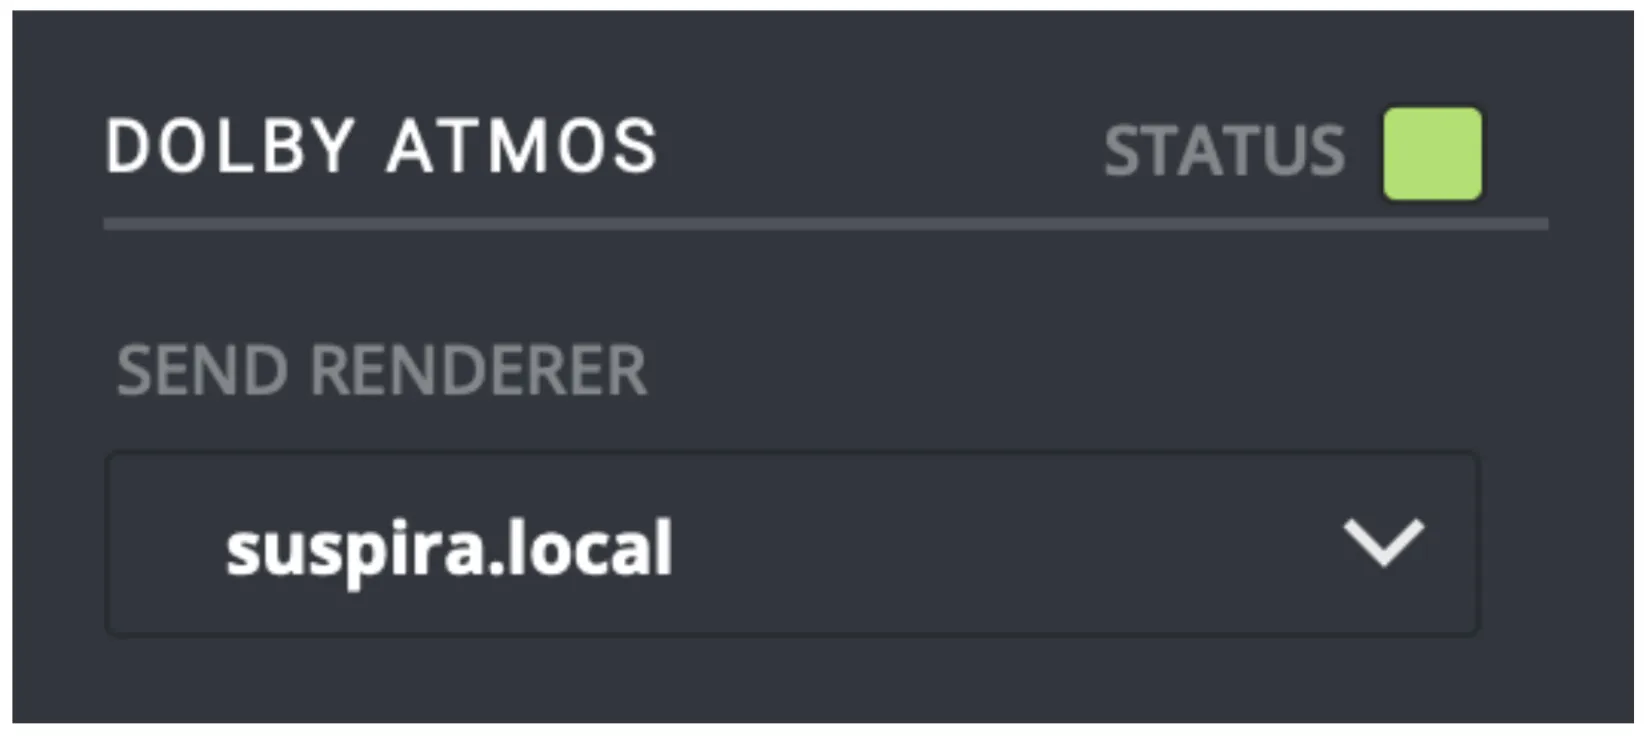
Once you are connected, you can verify that the Dolby Atmos Renderer is talking to Source-Connect as the status indicator will turn green:
Any audio you are now sending will be received by your connection partner, along with the metadata.
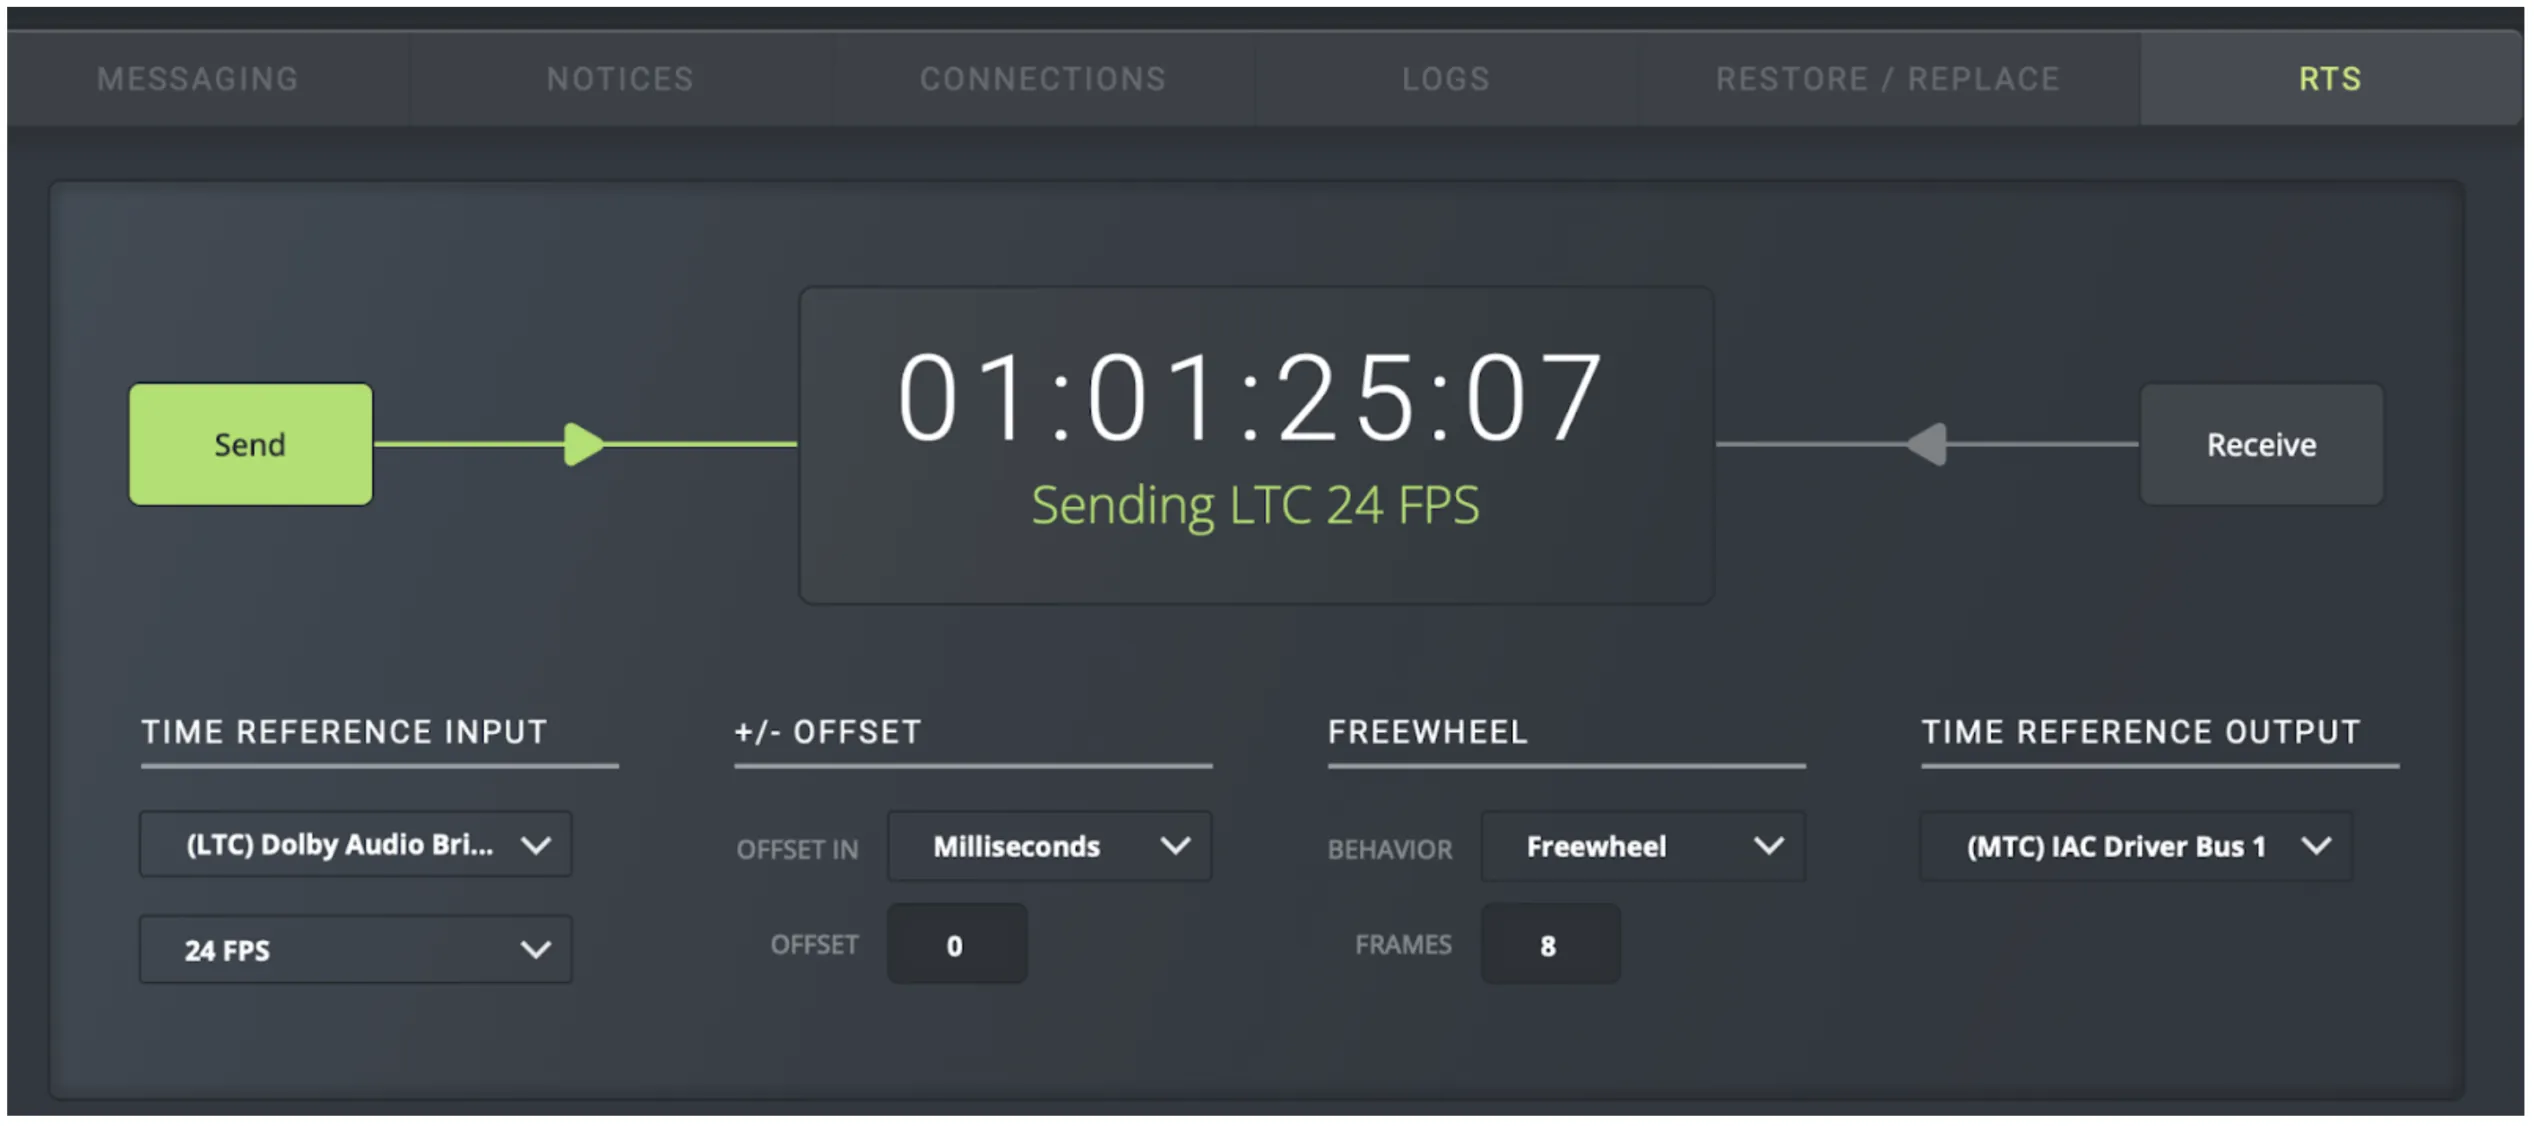
7. Using LTC correctly: via the Remote Transport Sync feature
We do not recommend sending LTC as an audio channel, for example do not use channel 128 for LTC. The correct way to use LTC is via the RTS feature on the Sync tab: this activates our special stability algorithms and will give a much better synchronization experience.
Typical RTS steps:
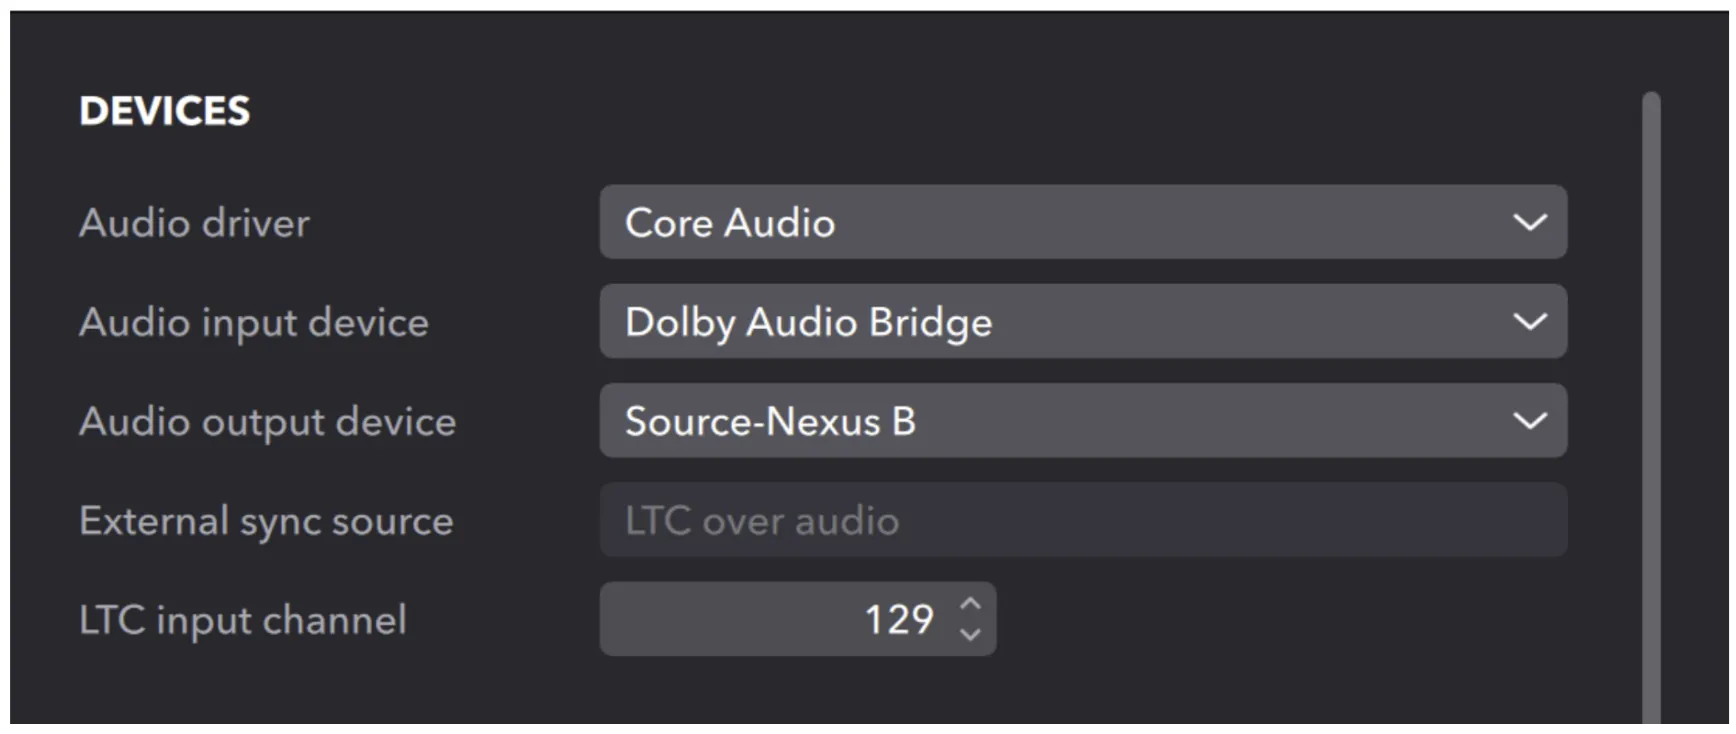
- Send the output of the Dolby LTC Generator plugin to Dolby Audio Bridge channel 129 or any channel or audio device not used. For example, you can use Source-Nexus I/O to get the Dolby LTC signal to the right Dolby Audio Bridge channel.
- In Source-Connect, select that LTC audio channel in the Time Reference Input->LTC menu.
- When you hit play in your DAW, you will see you are sending LTC at the selected frame-rate.
- The remote side will do the opposite and select their Time Reference Output (can be LTC or MTC, depending on their capabilities).
To receive, it depends on the system capabilities on the Receiving. See the documentation here about using LTC or MTC as needed:
- MTC: https://support.source-elements.com/source-connect-4-hub/how-to-configure-source-connect-4-to-receive-rts-via-mtc-and-your-daw-to-receive-mtc
- LTC: https://support.source-elements.com/source-connect-4-hub/how-to-configure-source-connect-studiofacility-to-receive-rts-via-ltc-and-pro-tools-to-receive-ltc
How to send multi-channel audio from Source-Connect into Dolby Atmos Renderer on macOS with Pro Tools
The following is an example how to configure Source-Connect Facility with the Dolby Audio Renderer and the Pro Tools DAW. Your setup may differ, contact us with any questions.
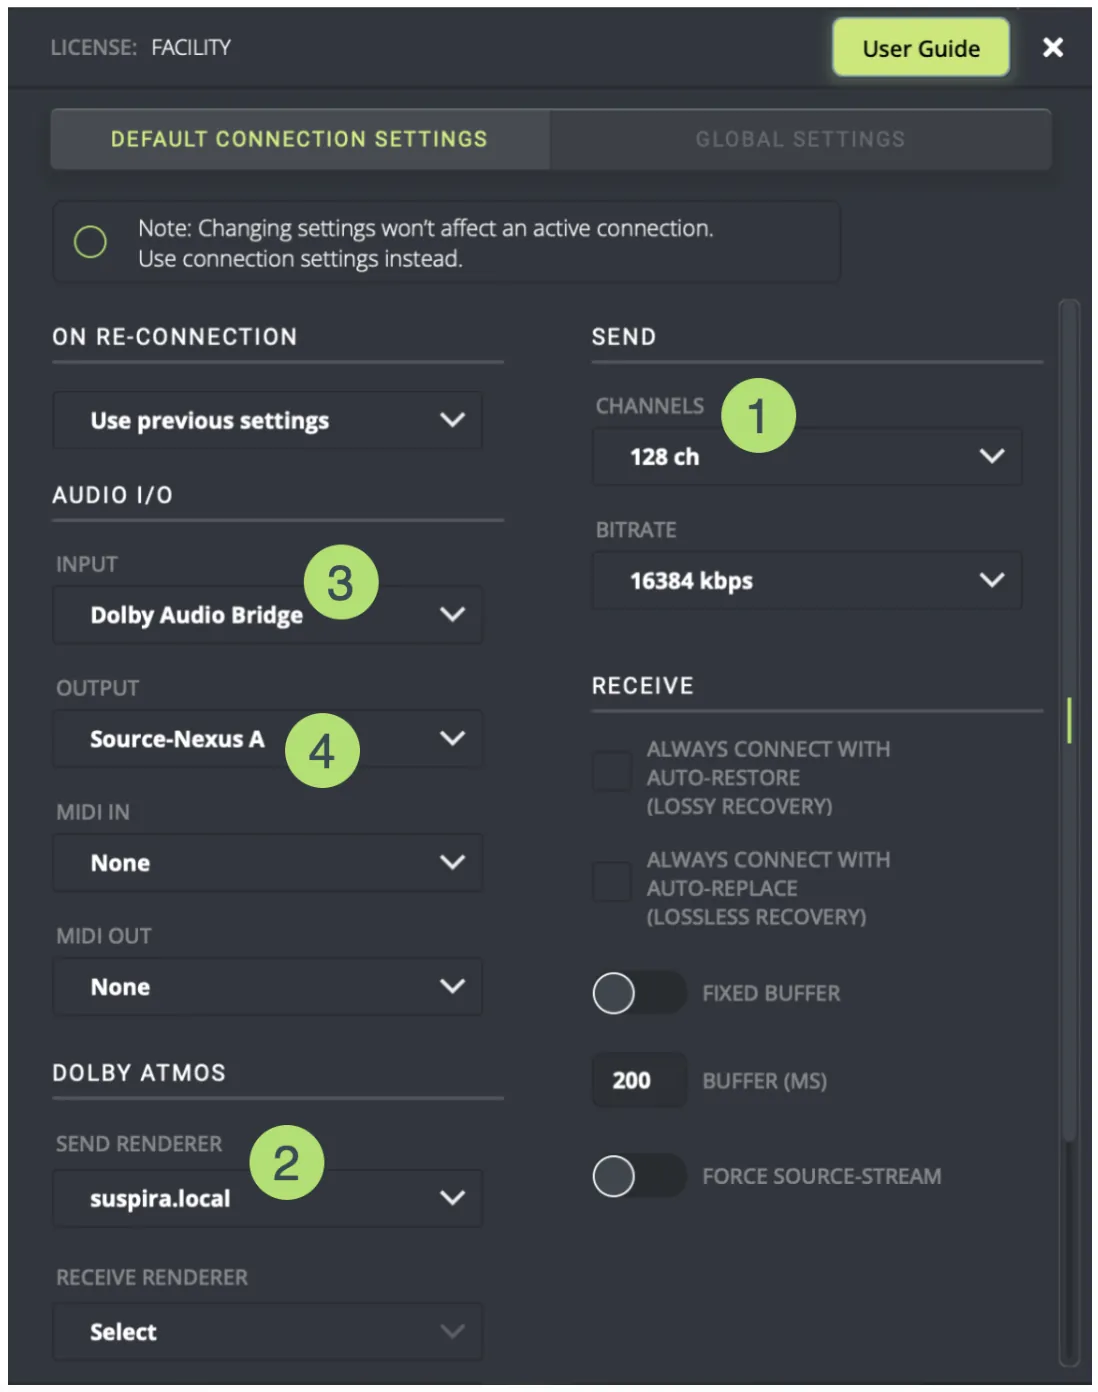
- Open the Source-Connect 4 settings panel and adjust the following settings:
- In the SEND section, select the appropriate number of channels for the connections. With a Dolby Atmos setup, you want to select 128 channels.
- Under DOLBY ATMOS, open the SEND RENDERER dropdown and select your Dolby Atmos renderer from the available options. Make sure you select the correct channel range for the renderer.
- In the AUDIO I/O dropdown, select the virtual Dolby Audio Bridge device as your input (inputs 1 – 128).
- Select the output you want to have.
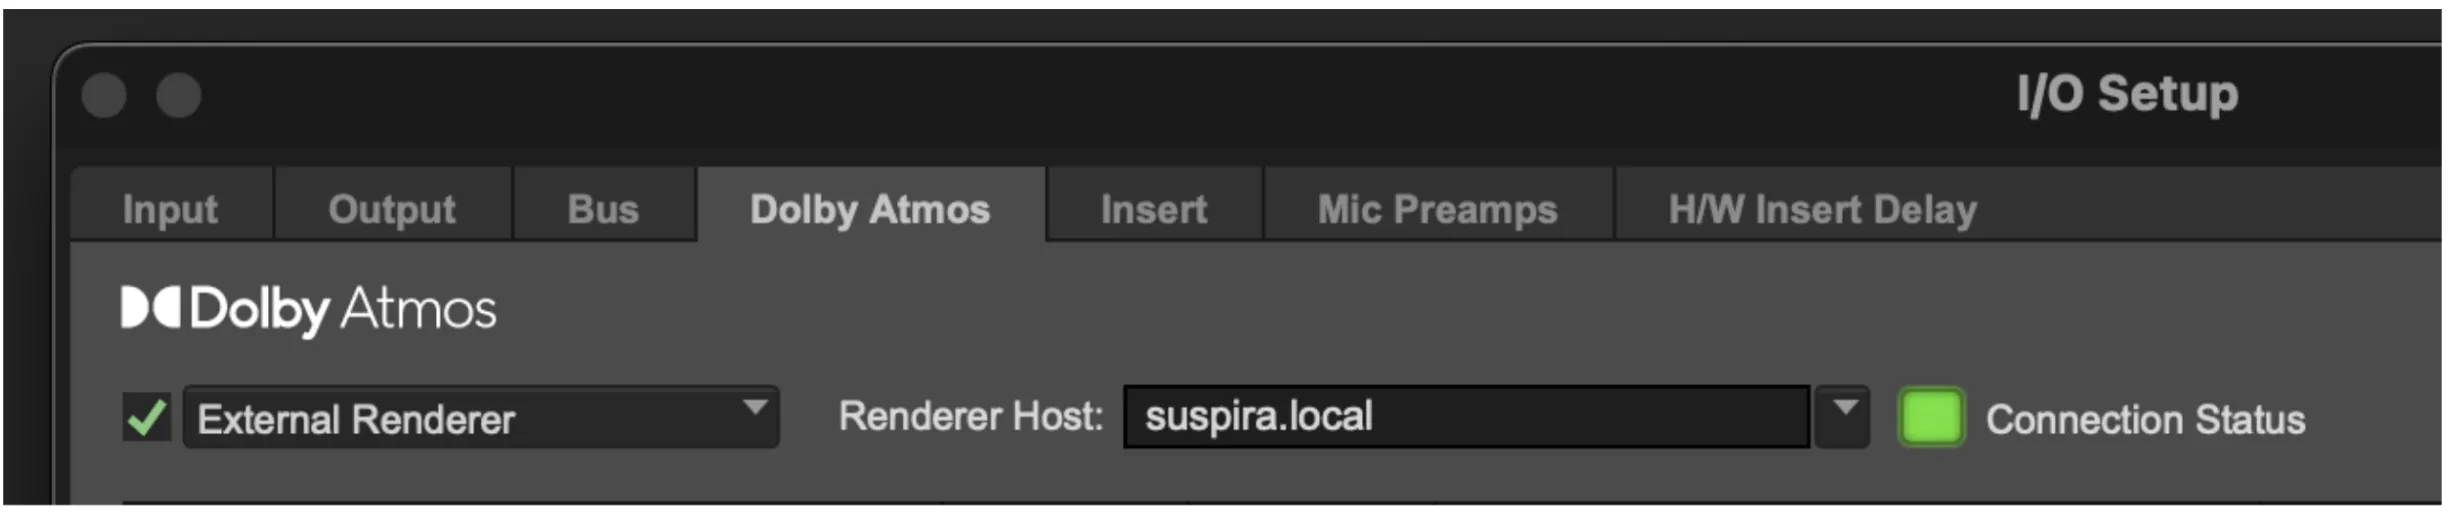
- Set your Dolby Audio Renderer host as your External Renderer under I/O Setup in Pro Tools:
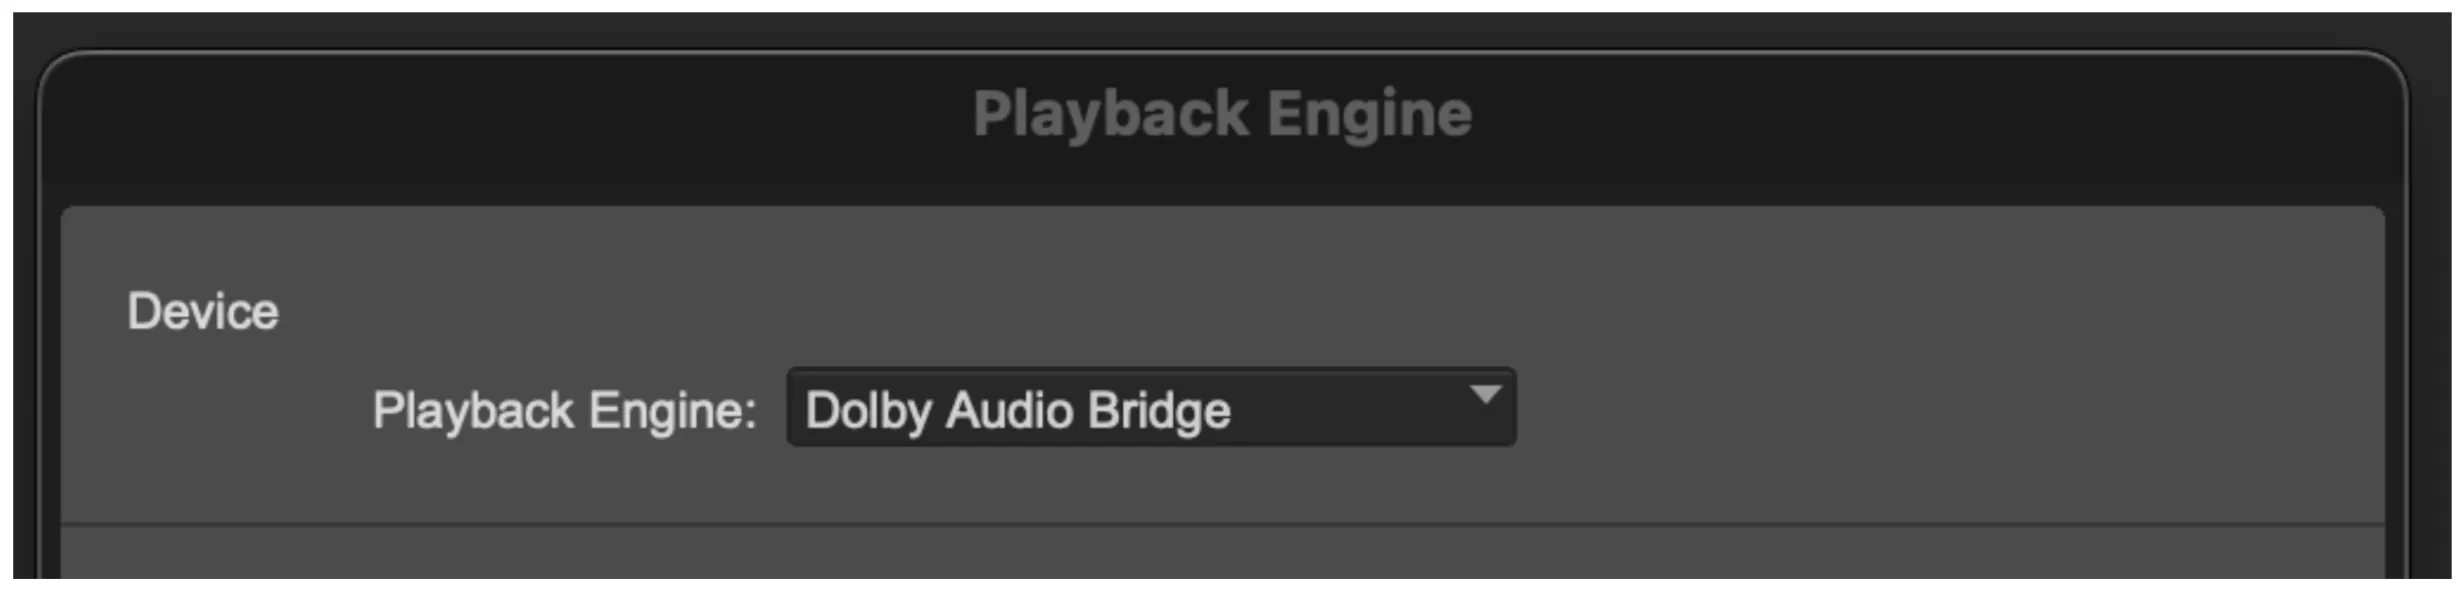
- Set the Dolby Audio Bridge device as your Playback Engine device in Pro Tools:
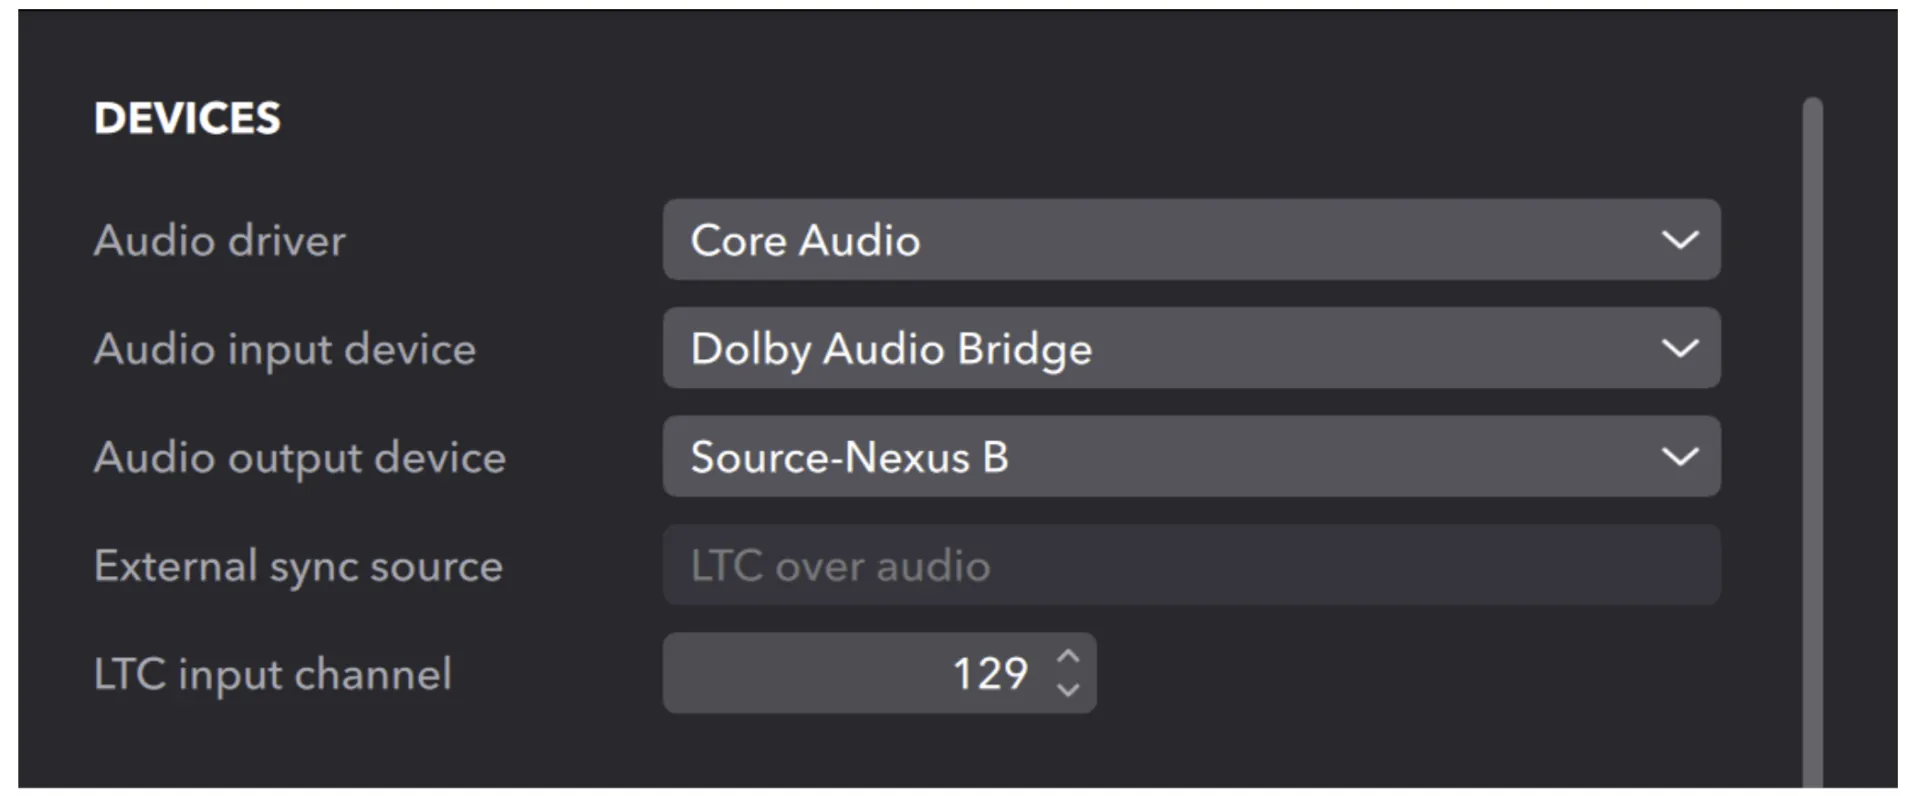
- In the Dolby Audio Renderer settings, set Dolby Audio Bridge as your Audio Input Device.
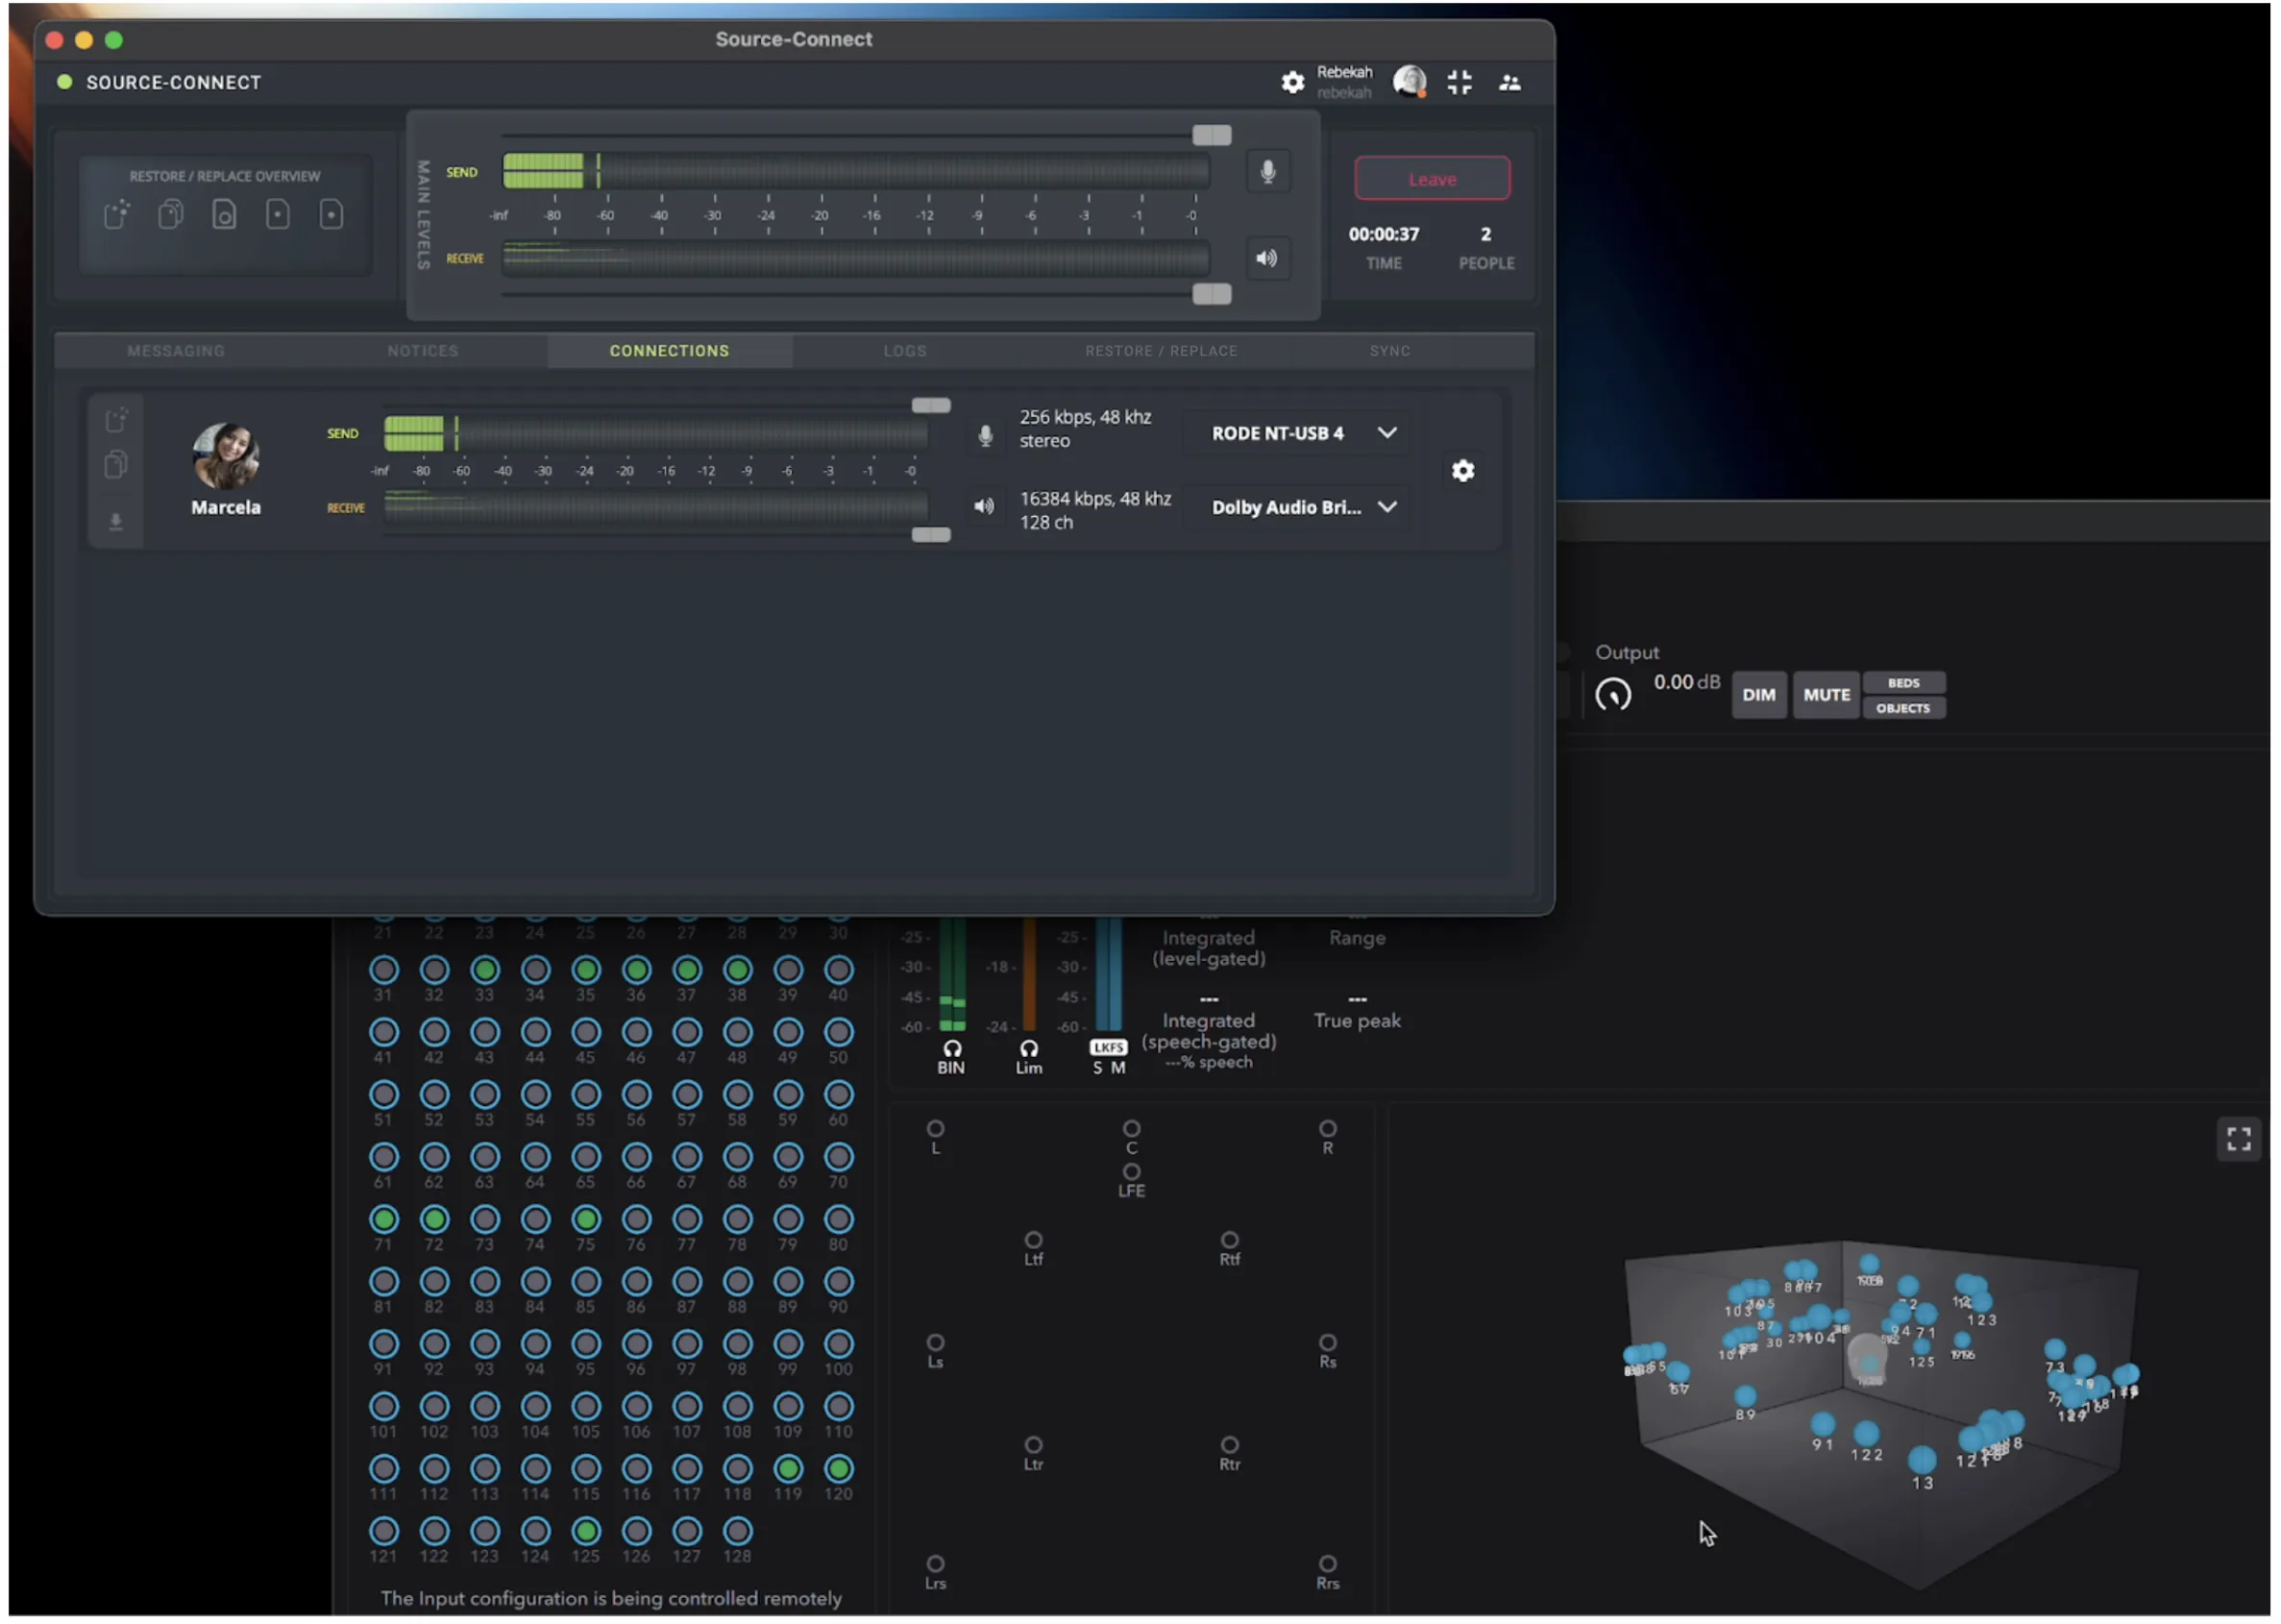
- Then, find your connection partner in the CONTACTS panel and start your session.
- Verify that the Dolby Atmos Renderer is listening:
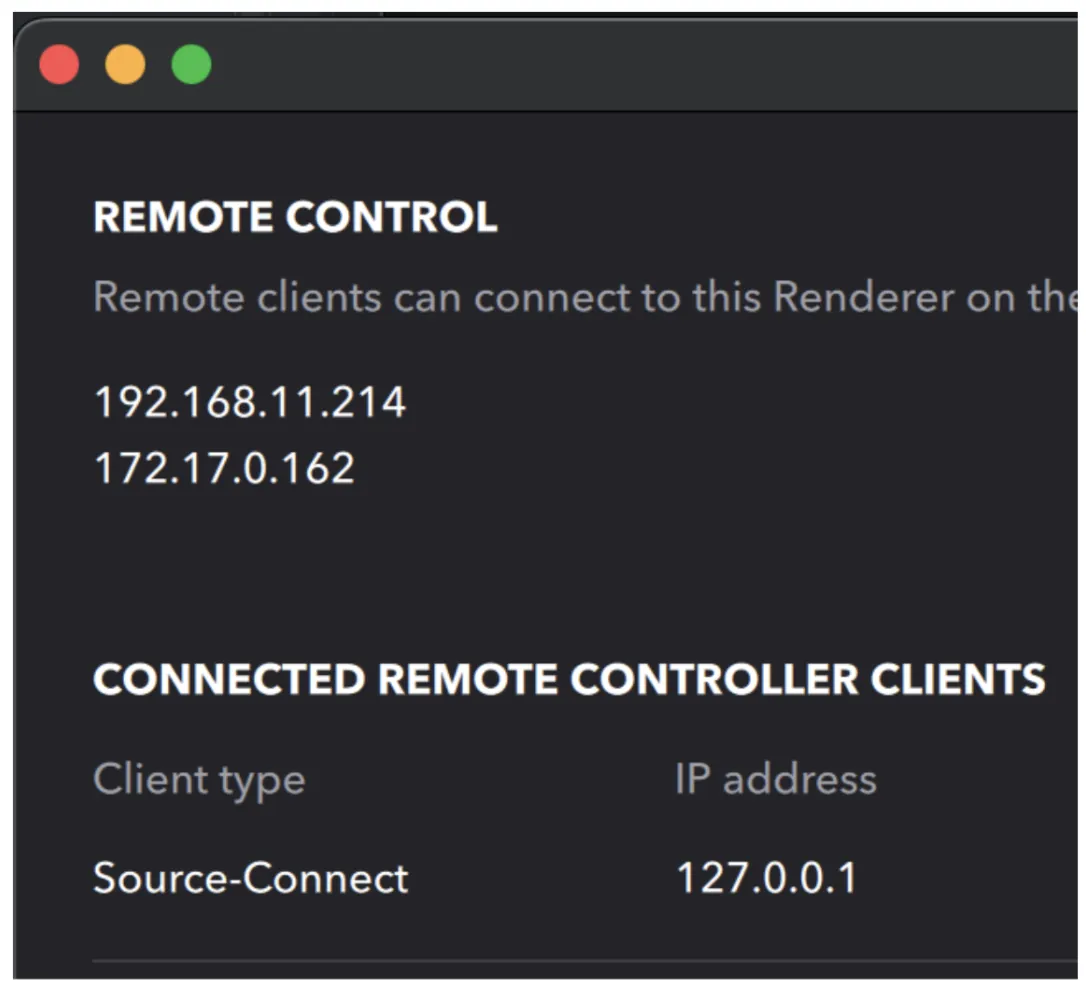
- In the Dolby Renderer, go to Setup -> Remote clients. Only once you are connected on a Source-Connect session, with the Dolby Atmos Renderer properly selected in your Global Settings BEFORE you connect, will you see Source-Connect listed under the CONNECTED REMOTE CONTROLLER CLIENTS:
- You will also see that Source-Connect is connected to the Dolby Atmos Renderer via Default Connection Settings.
How to receive multi-channel audio from Source-Connect into Dolby Atmos Renderer on macOS with Pro Tools
The following is an example of how to configure Source-Connect Facility to forward audio and metaobjects to the Dolby Audio Renderer. A DAW is not needed unless you are chasing LTC. Your setup may differ, contact us with any questions.
- Configure Source-Connect as follows:
- Under DOLBY ATMOS, open the RECEIVE RENDERER dropdown and select your Dolby Atmos renderer from the available options.
- In the AUDIO I/O dropdown, select the virtual Dolby Audio Bridge device as your output (output 1 – it will automatically expand to 128 channels once you are connected).
- Select the microphone input you want to have.
- Only send mono or stereo channels - do not set 128 channels as your return or you will use bandwidth unnecessarily.
- In the Dolby Audio Renderer settings, set Dolby Audio Bridge as your Audio Input Device
- Once you are connected on Source-Connect, and the above is correctly configured, you can verify it is connected:
- Confirm via the Dolby Audio Renderer under the Setup->Remote Clients menu.
- Confirm via Source-Connect under Default Connection Settings.
- When the SENDER starts sending audio, and their side is properly connected to their Dolby Atmos Renderer, you will receive all audio and metaobjects.
Using LTC correctly via the Source-Connect Sync feature
We do not recommend sending LTC as an audio channel - for example, do not set the connection to use 128 channels and use channel 128 for LTC. The correct way to use LTC is via the SYNC feature: this activates our special stability algorithms and will give a much better synchronization experience.
If you will be sending timecode in your session via MTC, you will need to configure Source-Connect for it as well. You can find very detailed step-by-step guides on how to configure SYNC for MTC here.
Typical SYNC steps
- Make sure you are not sending more than 128 channels in Source-Connect.
- Send the output of the Dolby LTC Generator plugin to Dolby Audio Bridge channel 128 or any channel or audio device that is not being not used. For example, you can use Source-Nexus I/O to get the Dolby LTC signal to the right Dolby Audio Bridge channel.
- In Source-Connect, select that LTC audio channel in the Time Reference Input -> LTC menu
- When you hit play in your DAW, you will see that you are sending LTC at the selected frame-rate.
- The remote side will do the opposite and select their Time Reference Output (can be LTC or MTC, depending on their capabilities).
Getting audio from Pro Tools to Source-Connect using Source-Nexus
You can use the Source-Nexus I/O plugin to send audio from Pro Tools if needed, using this template: http://downloads.source-elements.com/SC4/Dolby/Atmos%20Mix%20Template.ptx.zip
Here's how the attached template works:
- Sends audio to two 7th order ambisonics tracks.
- Source-Nexus I/O sends the first 1-64 outputs to Dolby Audio Bridge and the second 5-128 outputs to Dolby Audio Bridge.
- Select Dolby Audio Bridge as the Source-Connect input device.
Note: the aux track MUST have an output selected or Pro Tools will think it has no audio coming in (and therefore will not send all the tracks).
Supporting the Dolby Atmos feature on Windows
With thanks to The Sound Shed for their collaboration on this article.
As of version 4.1.0, Source-Connect 4 Facility introduced an integration with the Dolby Atmos Renderer to enable approval of Dolby Atmos mixes with geographically separated collaborators with up to 128 discrete channels with synced metadata for the objects spatial positions.
Traditionally, Windows users have been limited to the "internal renderer" (in compatible DAWs) by the lack of a "Dolby Audio Bridge" to connect to the Dolby Renderer application, along with other OS-level limitations with Windows. As a workaround, we have found the following third-party applications and websites to be very helpful:
- VB-Audio Matrix Coconut, a 3112x3112 real-time matrix audio router and virtual ASIO interface hub. There are other Windows audio matrix router apps available, but this has proven very successful in real world applications.
- El-Tee-See, an online Linear Timecode (LTC) generator.
Windows users can use a multi-channel-capable “Virtual” ASIO interface and make use of Source-Connect 4’s Sync/RTS feature in order to achieve the same results as on macOS. This step-by-step guide will use VB-Audio Matrix guide to send out LTC.
As of version 4.2.0, Source-Connect supports ASIO. You can download this version through the user dashboard.
Note: the screenshots used in this article are for example purposes only.
Requirements
- A Source-Connect 4 Facility license and the application installed on the Windows machine.
- A DAW of your choice - which will support you in generating and/or receiving LTC or MTC. For the purpose of this tutorial, we will use Pro Tools Ultimate.
- The external Dolby Audio Renderer application installed and a license for it. This could be installed on another computer in the same network as your Source-Connect and DAW application. We recommend the Dolby Atmos Renderer v5.4 or later.
- VB-Audio Matrix Coconut (VBAMC) or other method to route audio from Pro Tools to Source-Connect and the Dolby Audio Renderer.
Source-Connect 4, LTC and MTC
As mentioned above, Windows users can route a regular audio track to a dedicated channel and read it in Source-Connect 4 using the SYNC feature with LTC. You can find detailed information about RTS, LTC and MTC within the context of Source-Connect 4 in this article, along with a list of tutorials on how to get a basic RTS setup ready.
Note: MTC can also be used via virtual MIDI port, but it is not frame-accurate on Windows. Therefore, we recommend using LTC for this setup if precision is required.
Step 1: Creating your ASIO drivers
Some Windows audio apps using ASIO have a limitation that the same ASIO interface has to be used for input and output. This causes an issue with both Pro Tools and the Renderer, as they both have to be routed to the audio “bridge” between the DAW and Renderer, meaning that you cannot also route to monitoring.
To address this, we create three virtual ASIO interfaces in VBAMC with at least 130 channels - we’ll call them VASIO_A, VASIO_B and VASIO_C.
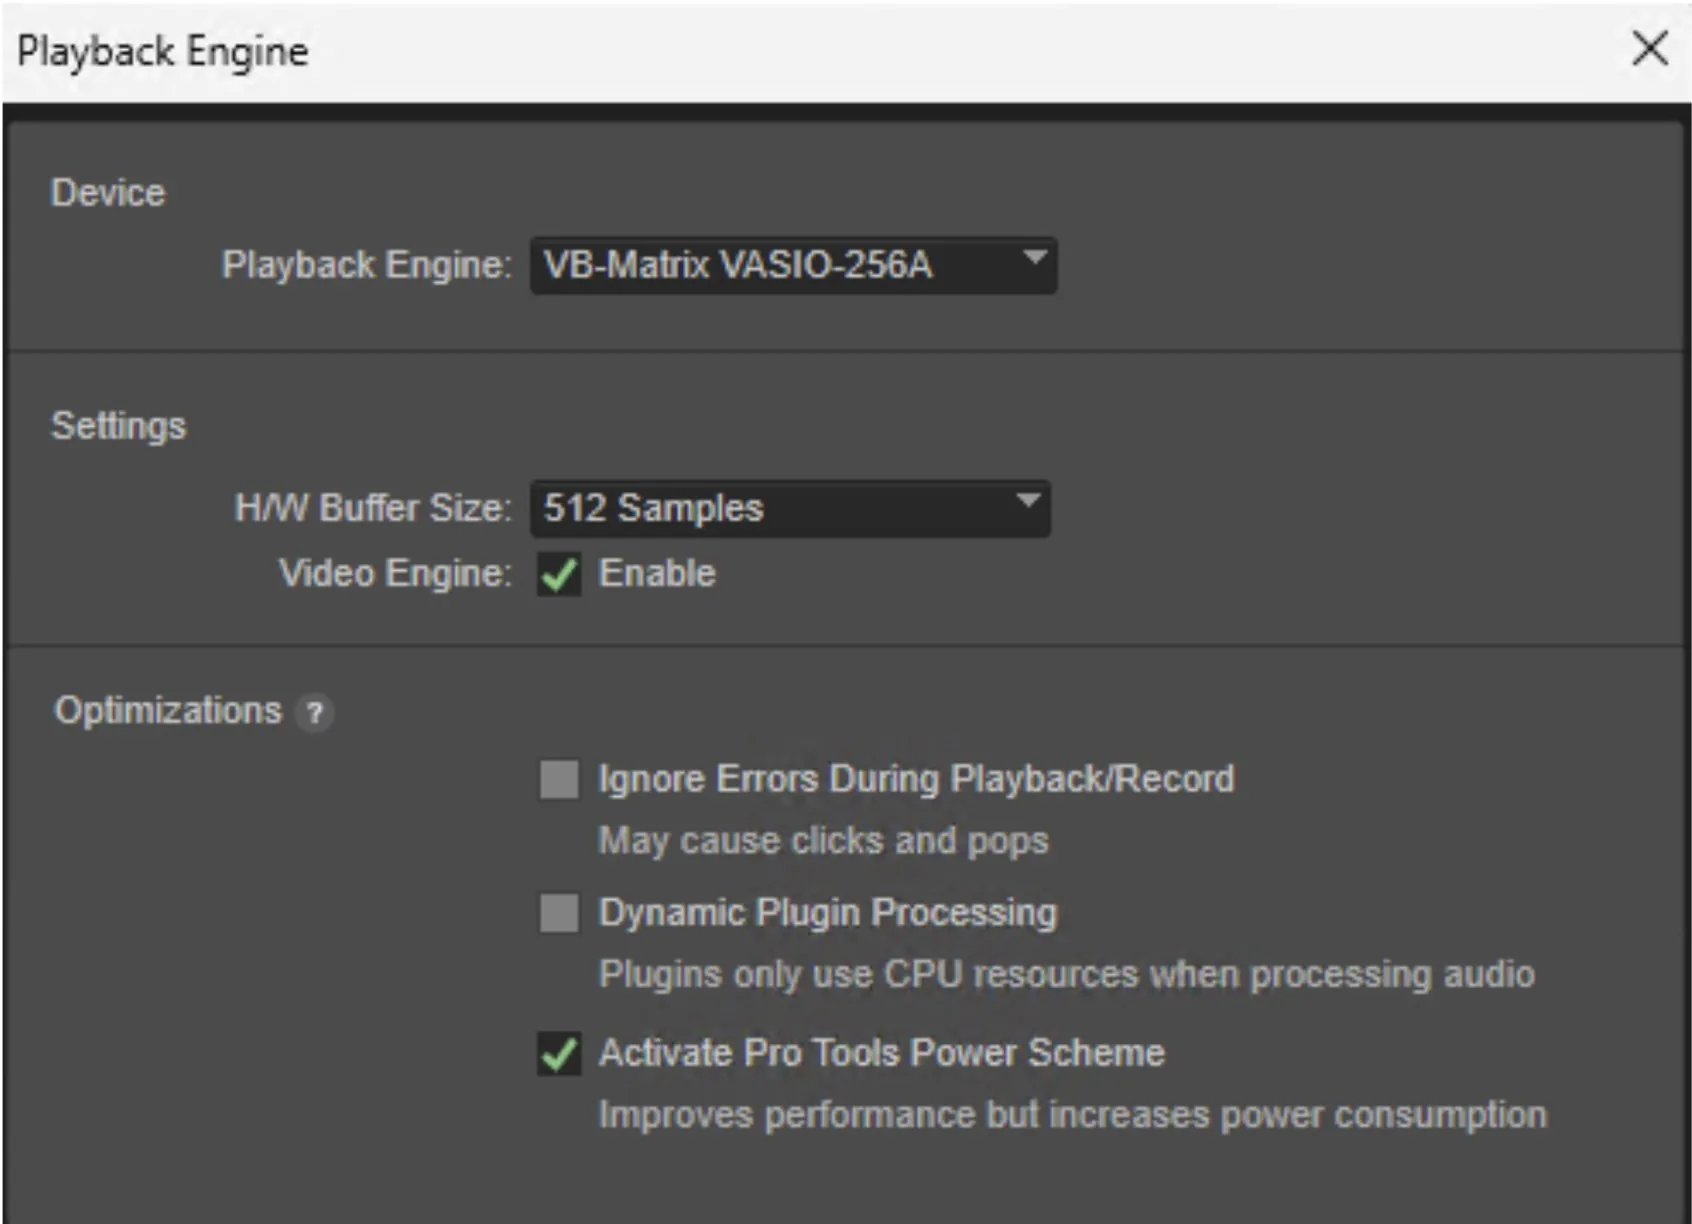
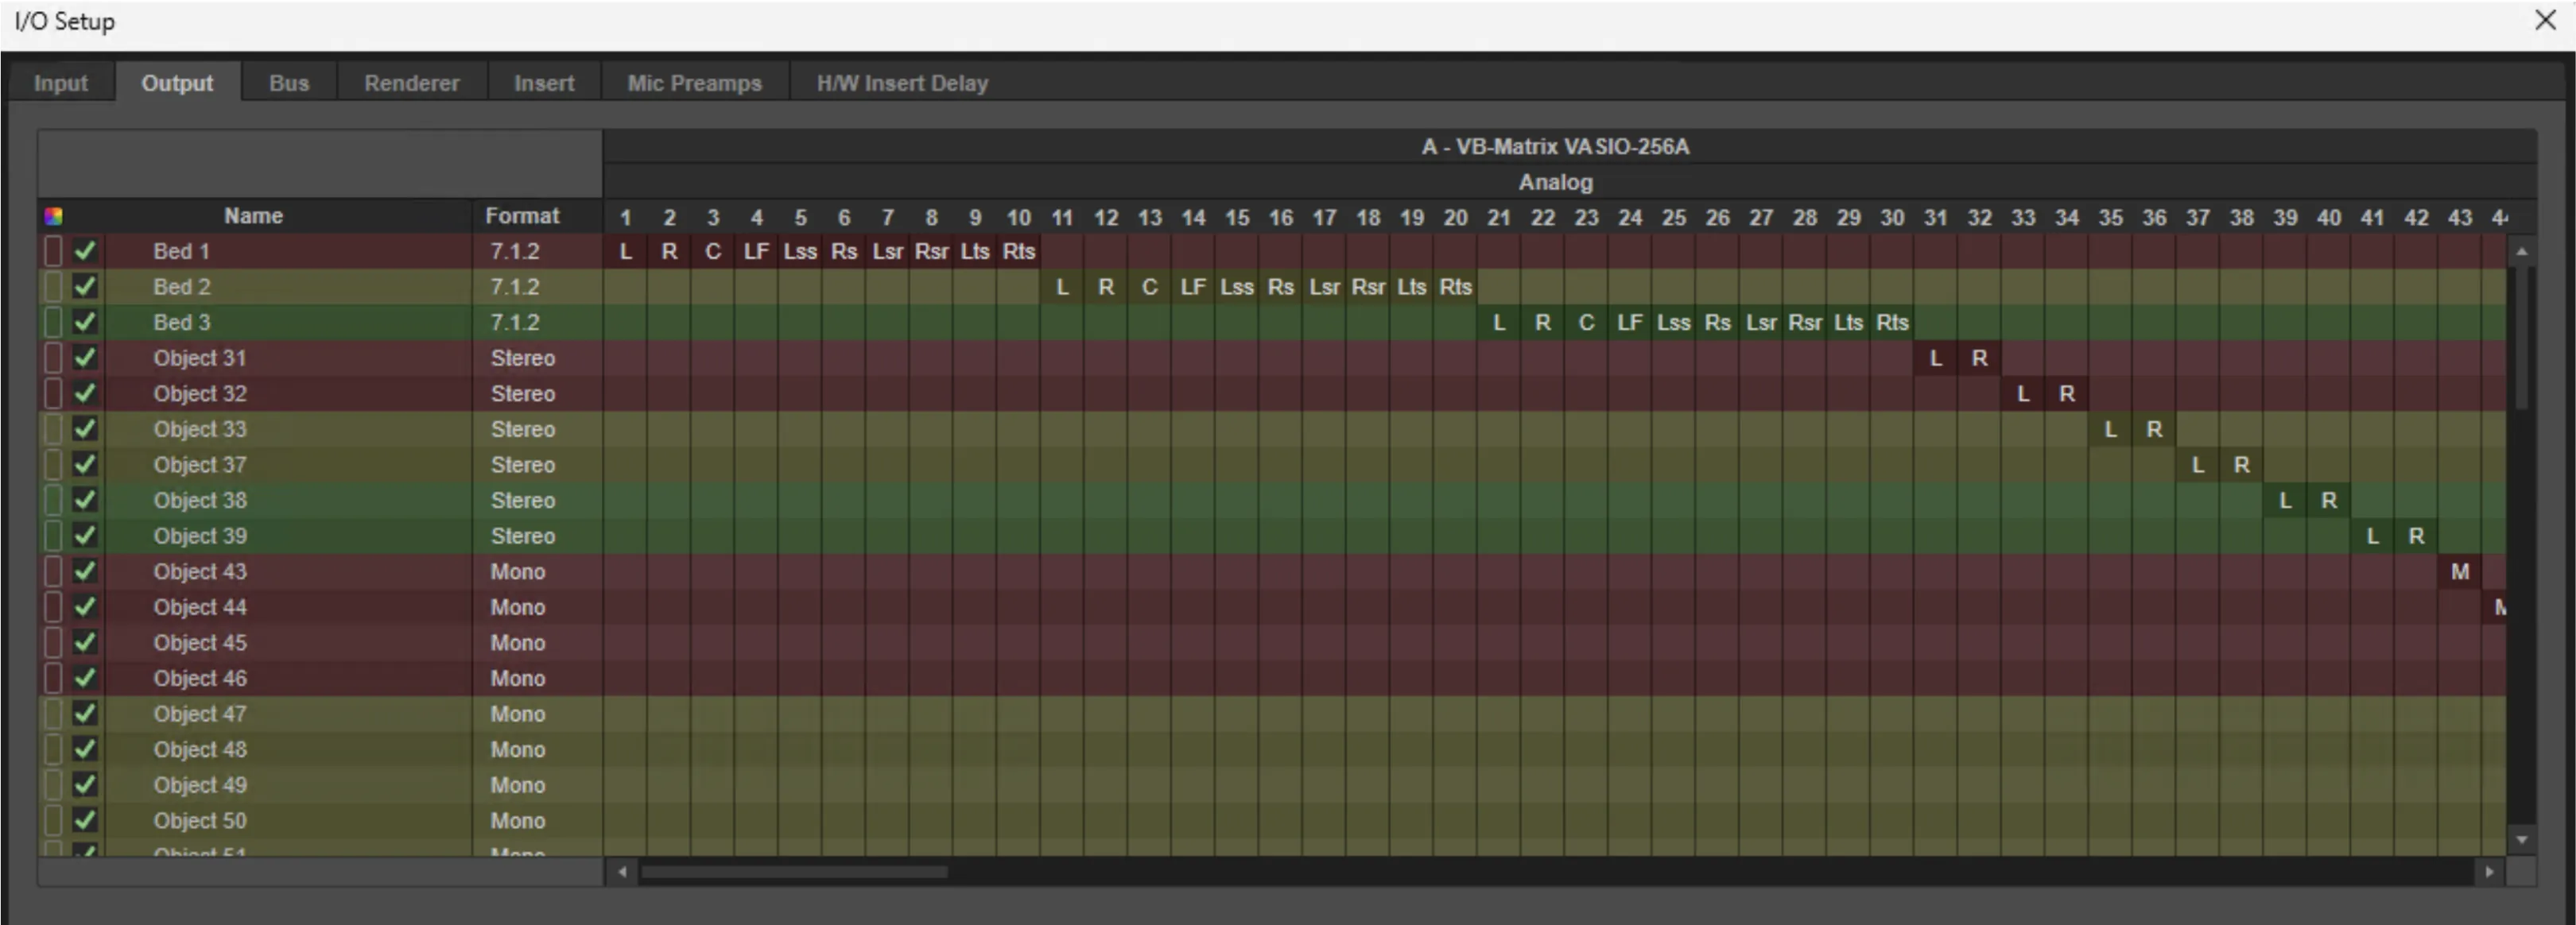
Pro Tools uses VASIO_A (in this example “VASIO-256A”) as its playback engine:
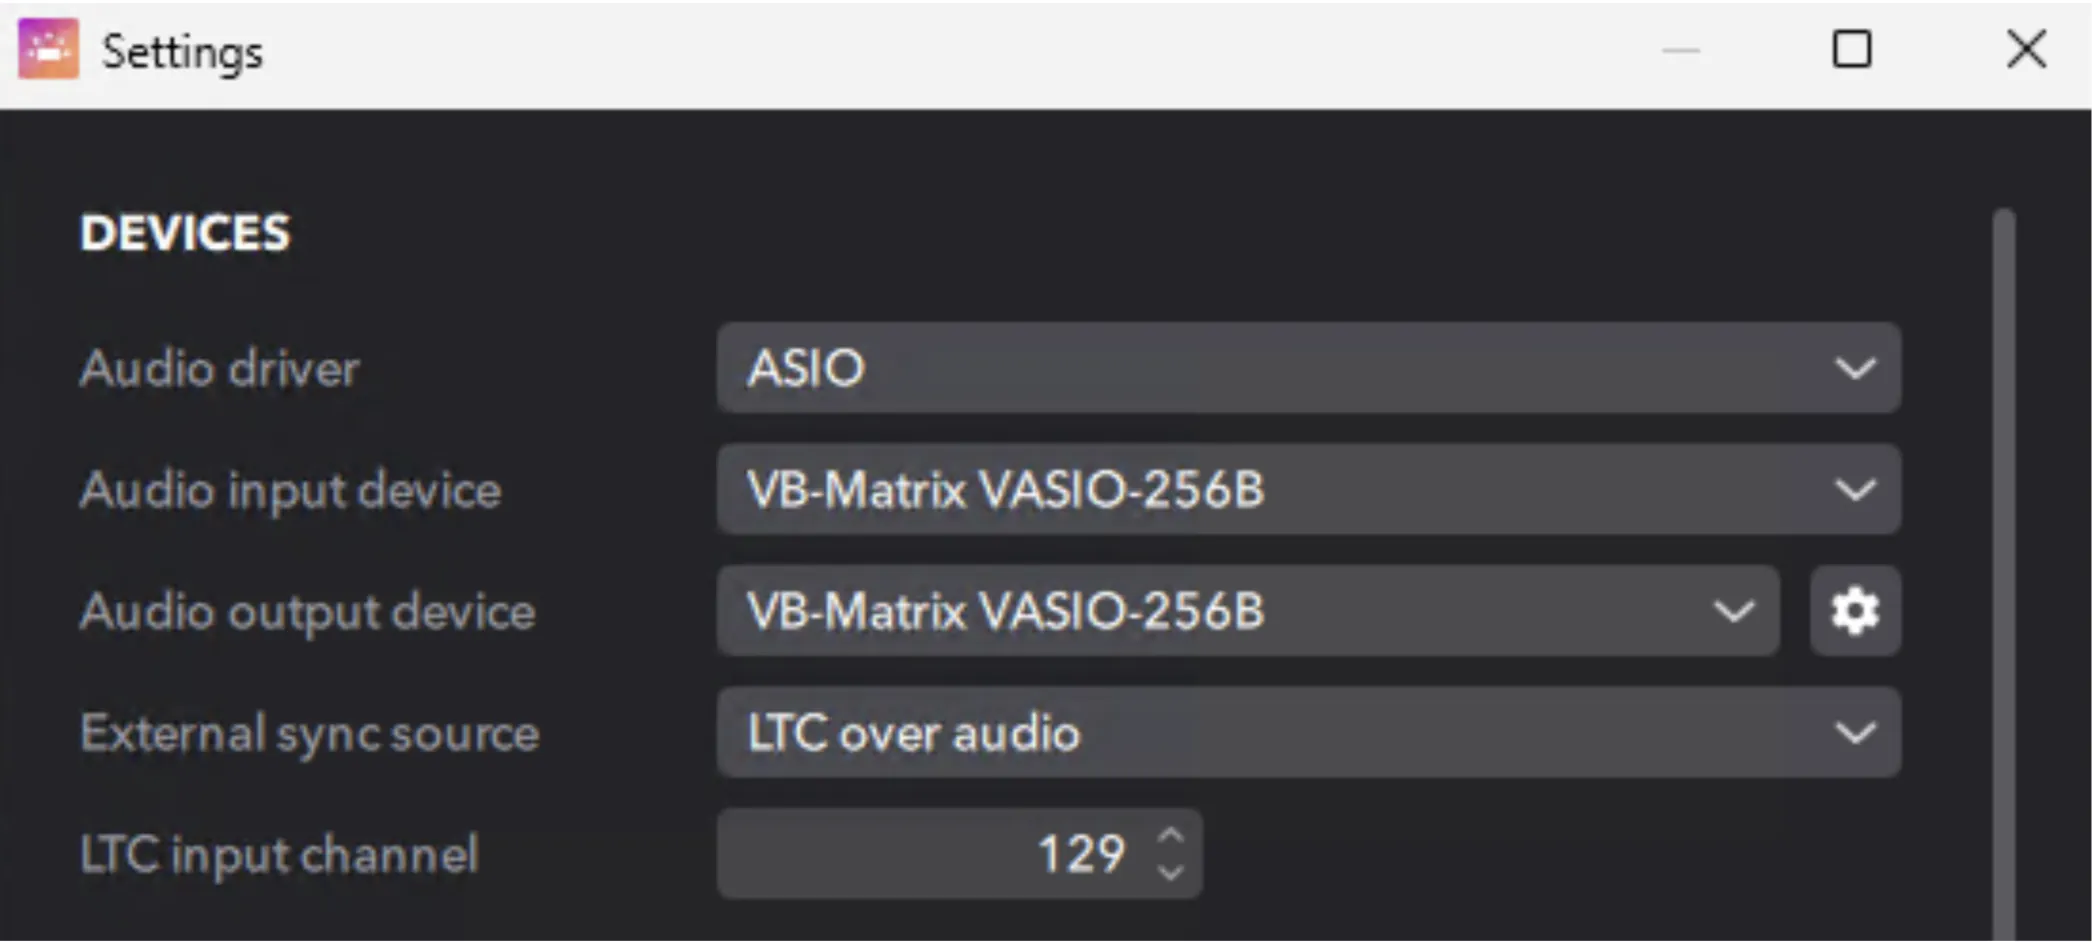
The Renderer uses VASIO_B (in this example “VASIO-256B”) as its IO engine:
Source Connect 4 Facility uses VASIO_C (in this example “VASIO-512”) as its input.
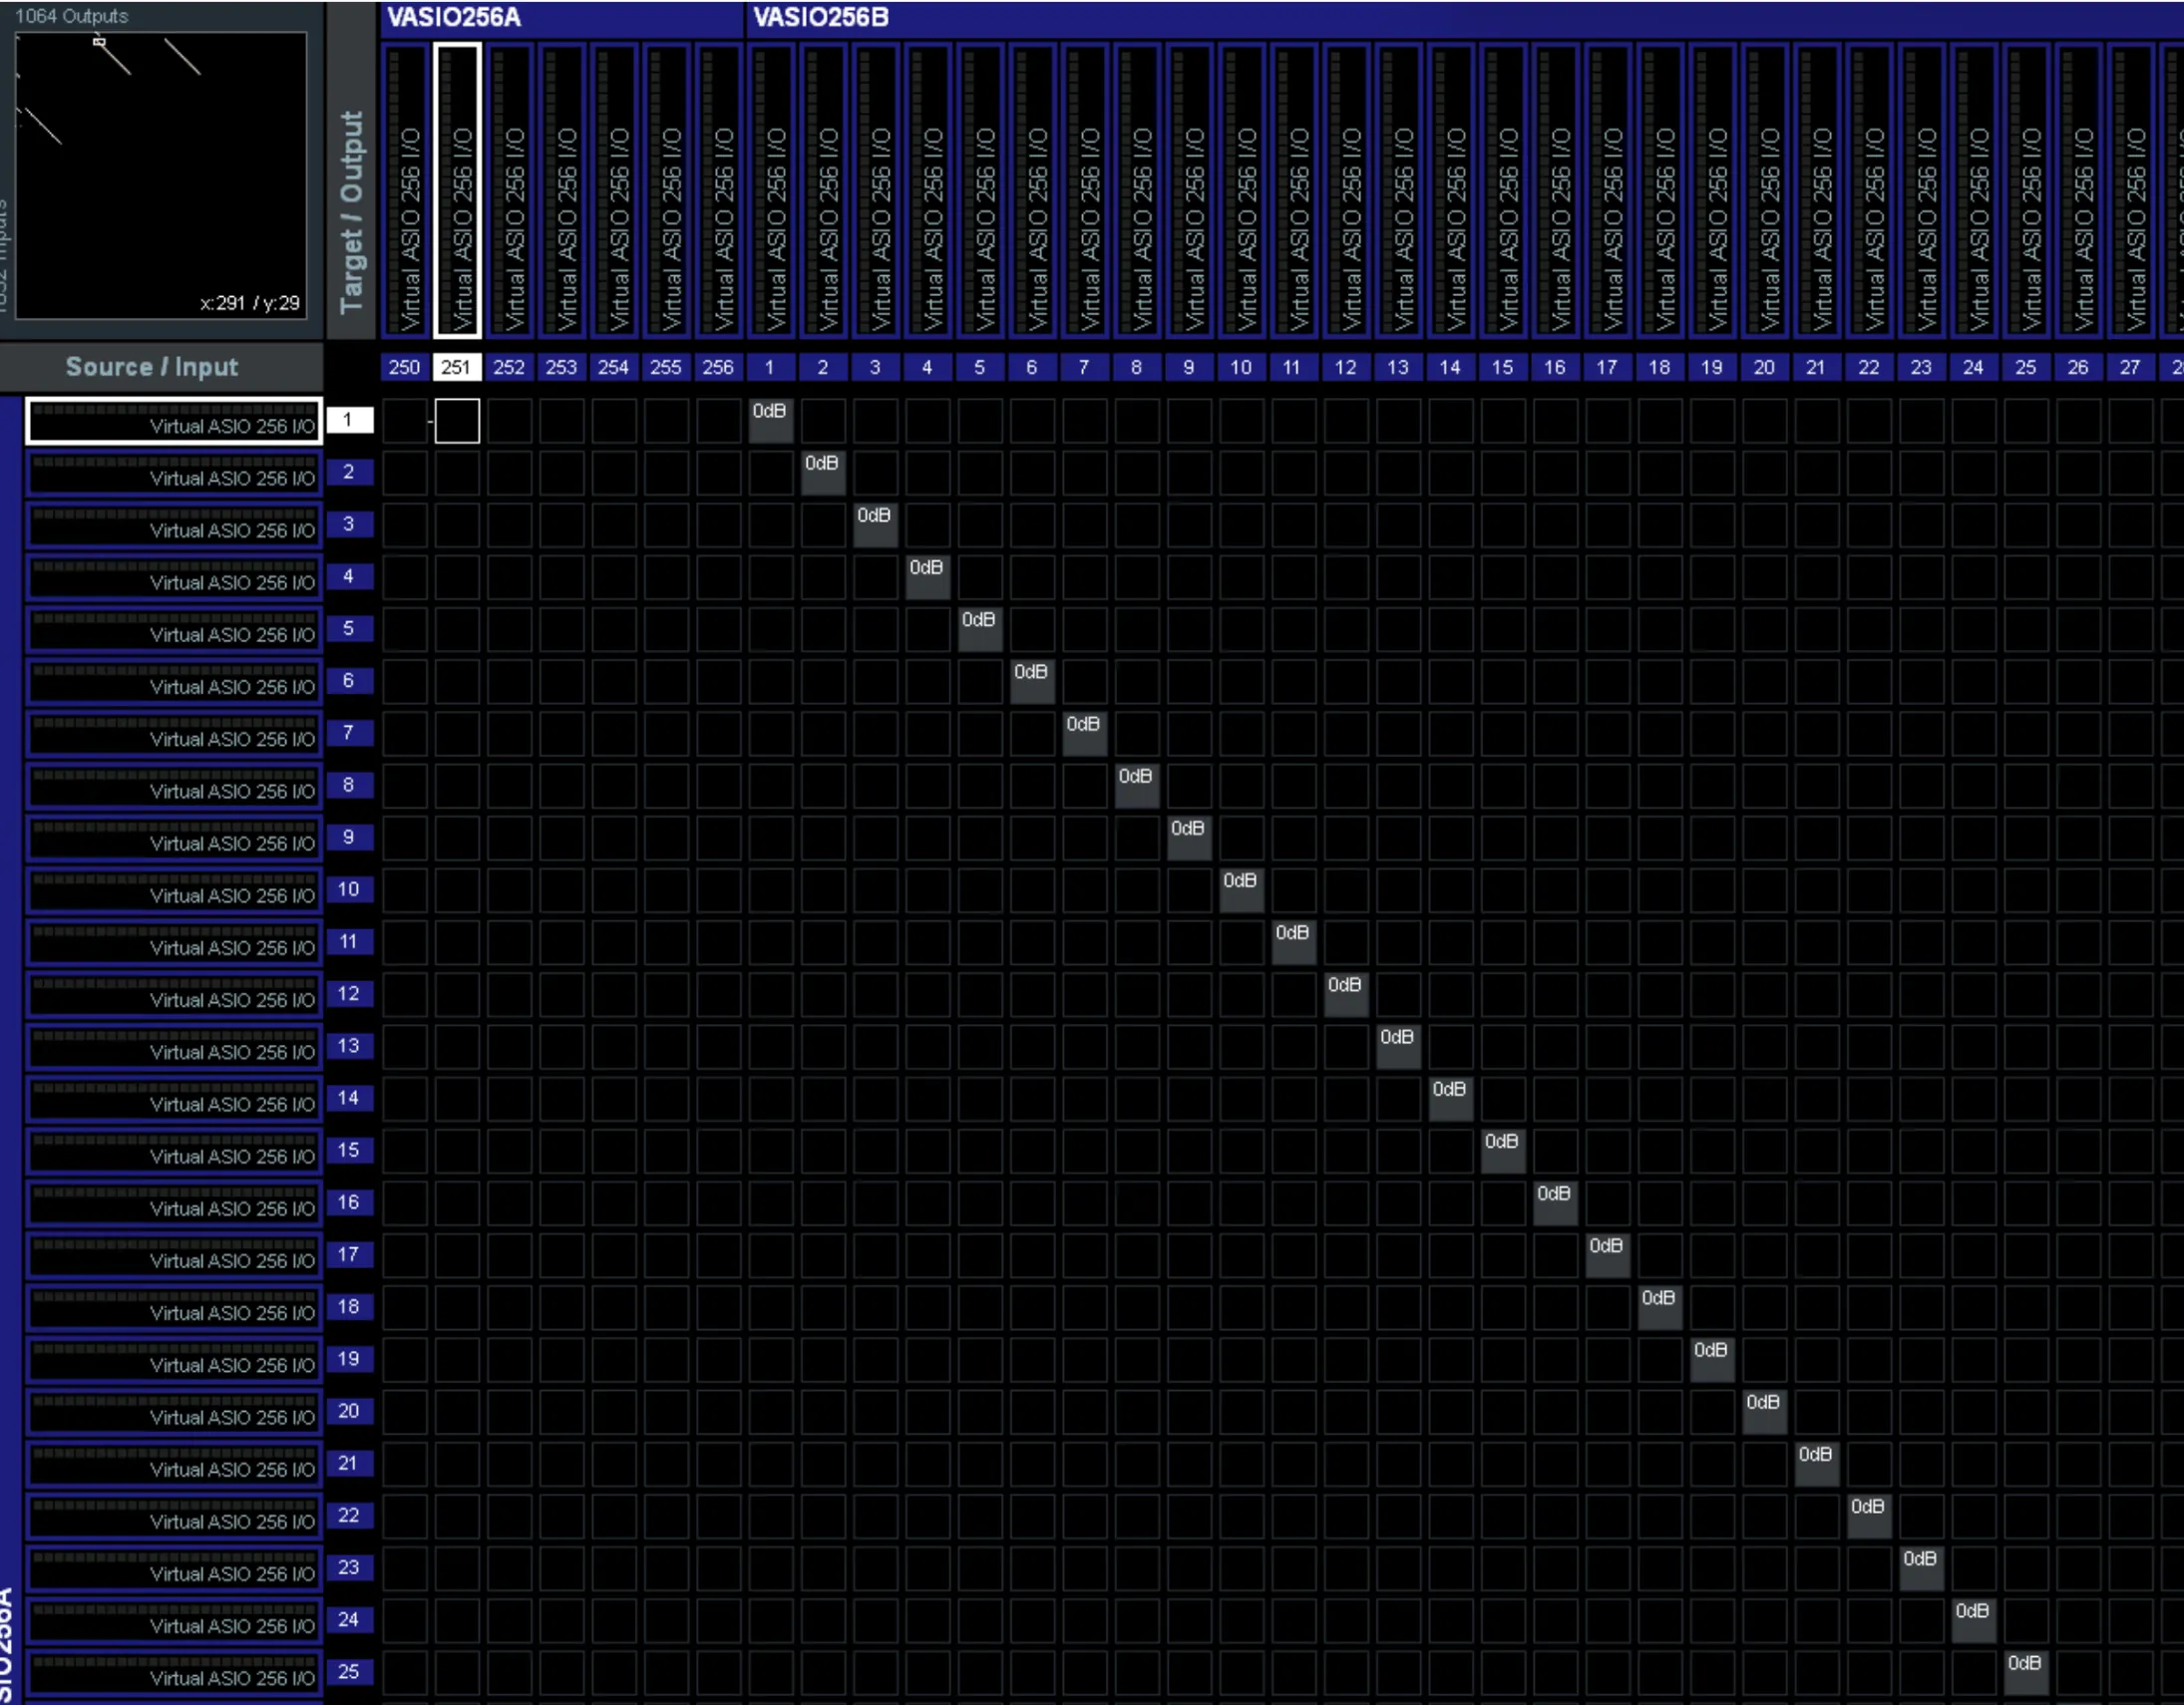
We then do a 1:1 routing between Pro Tools and the Renderer, and parallel route the output of Pro Tools to SC4F. This allows the 128 channel audio output of Pro Tools to be available to both the Renderer and SC4F.
We also route the output of the Renderer back to Pro Tools and take a parallel of the first 16 outputs (for 9.1.6) to the monitoring (in this case, an Audient Oria).
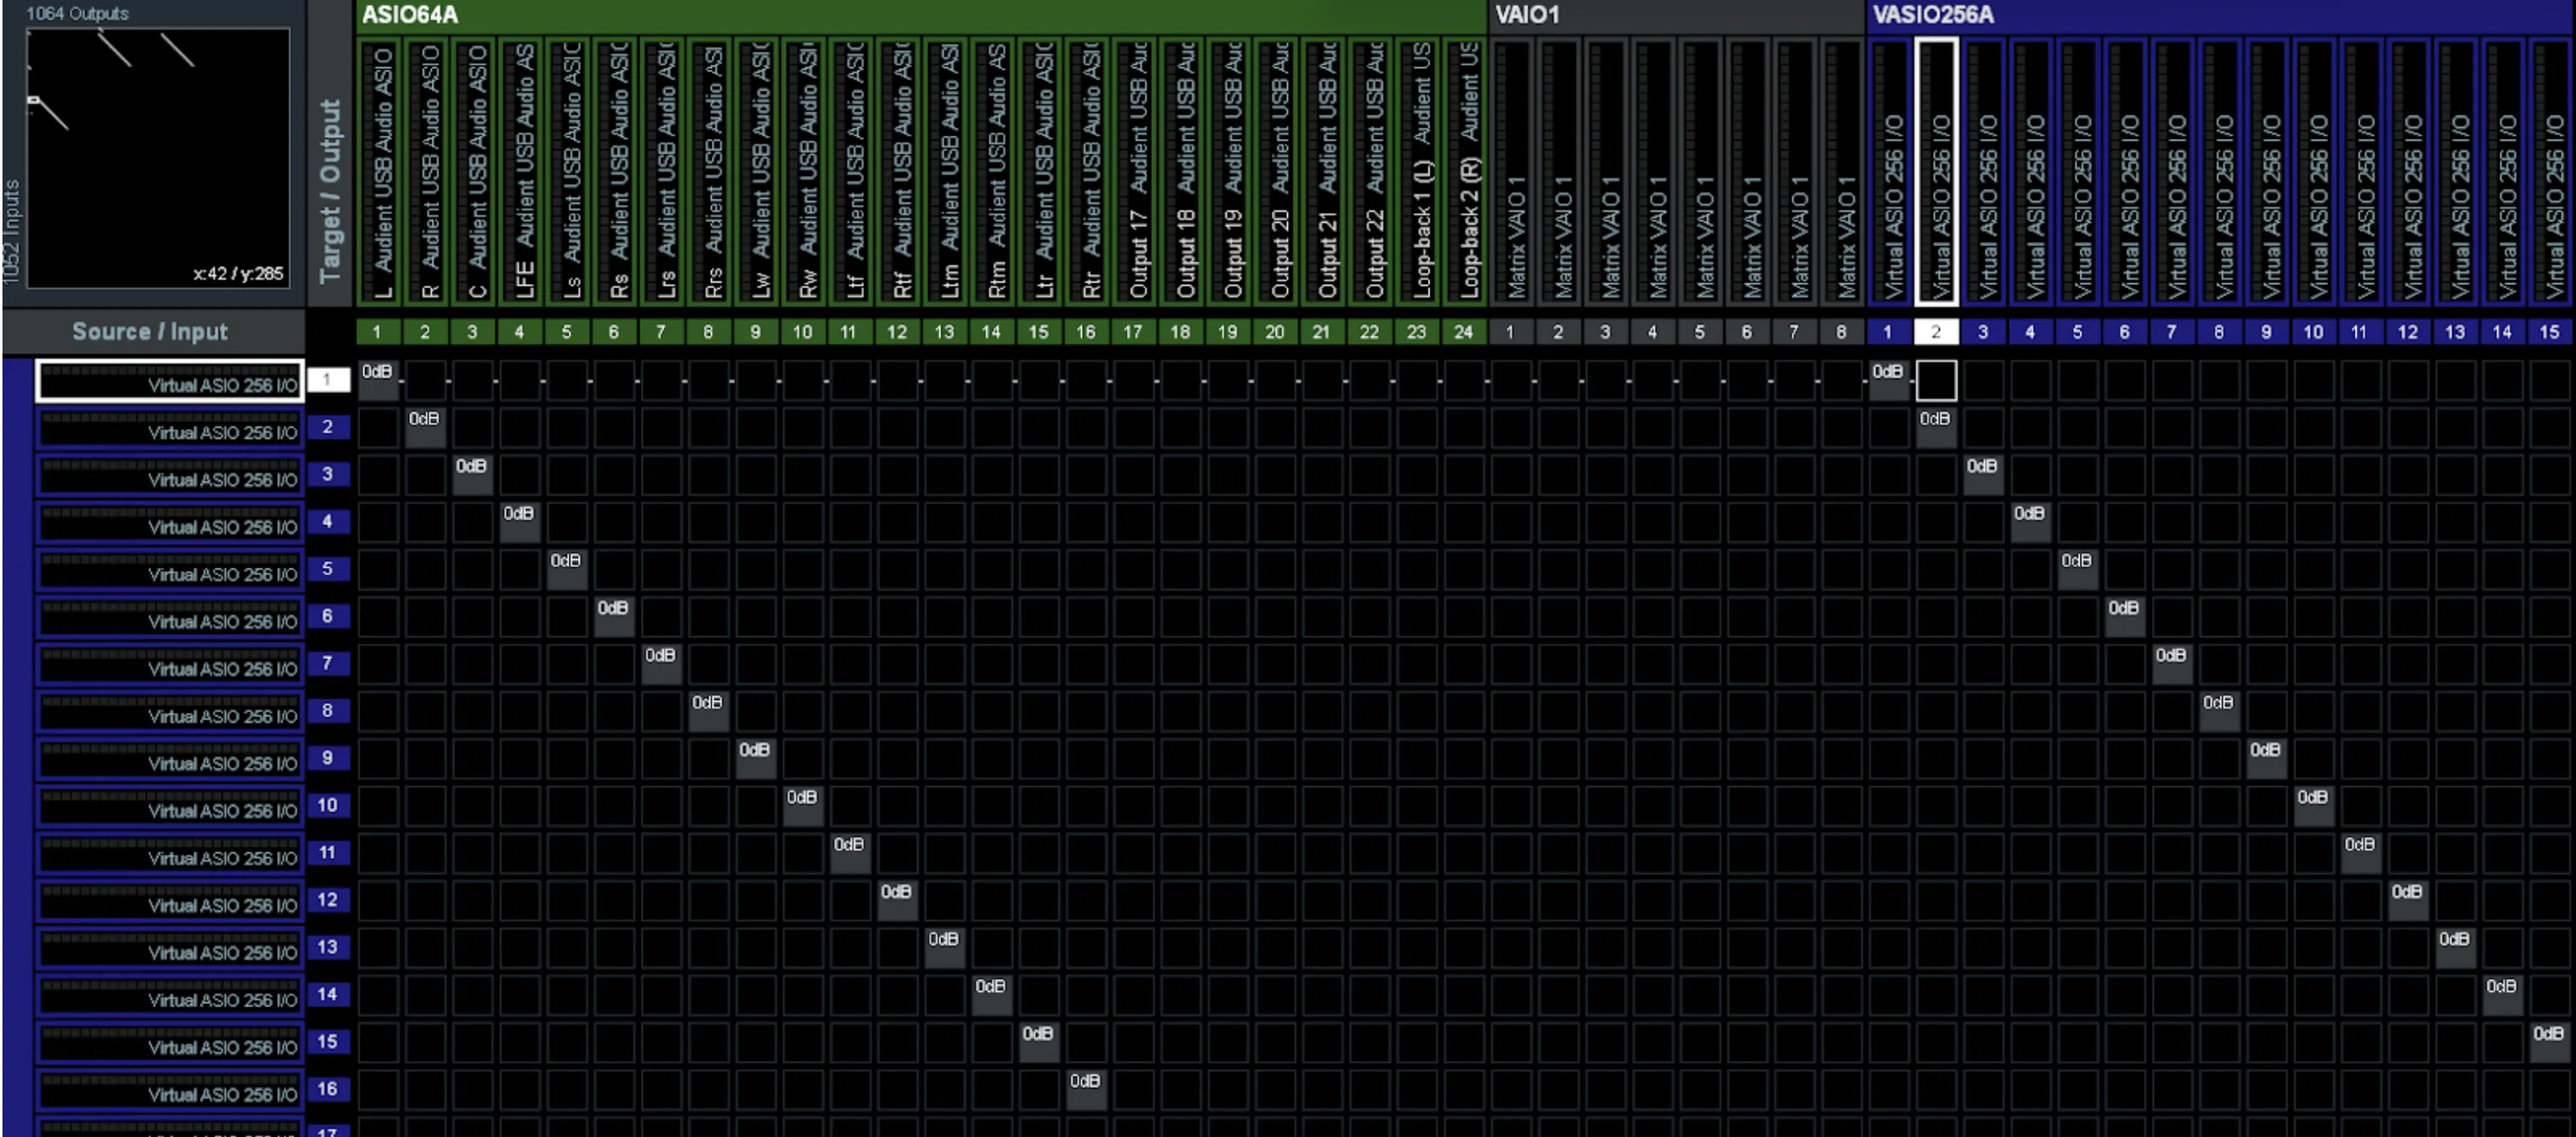
This allows us to also bring back live rerenders to Pro Tools.
Step 2: Setting your Dolby Atmos device on Source-Connect 4
- In Source-Connect 4, click the gears icon to access the Settings menu.
- In Default Connection Settings, make sure to set the “Send Renderer” or “Receive Renderer” to the ASIO device you created. Keep in mind that the internal network connection to the Renderer will not show until you have an external renderer session open in your DAW that is communicating metadata with the Renderer.
Step 3: Audio Routing in Pro Tools
- In Pro Tools output to VASIO_A.This will send all 128 channels to Source-Connect 4 and the Renderer.
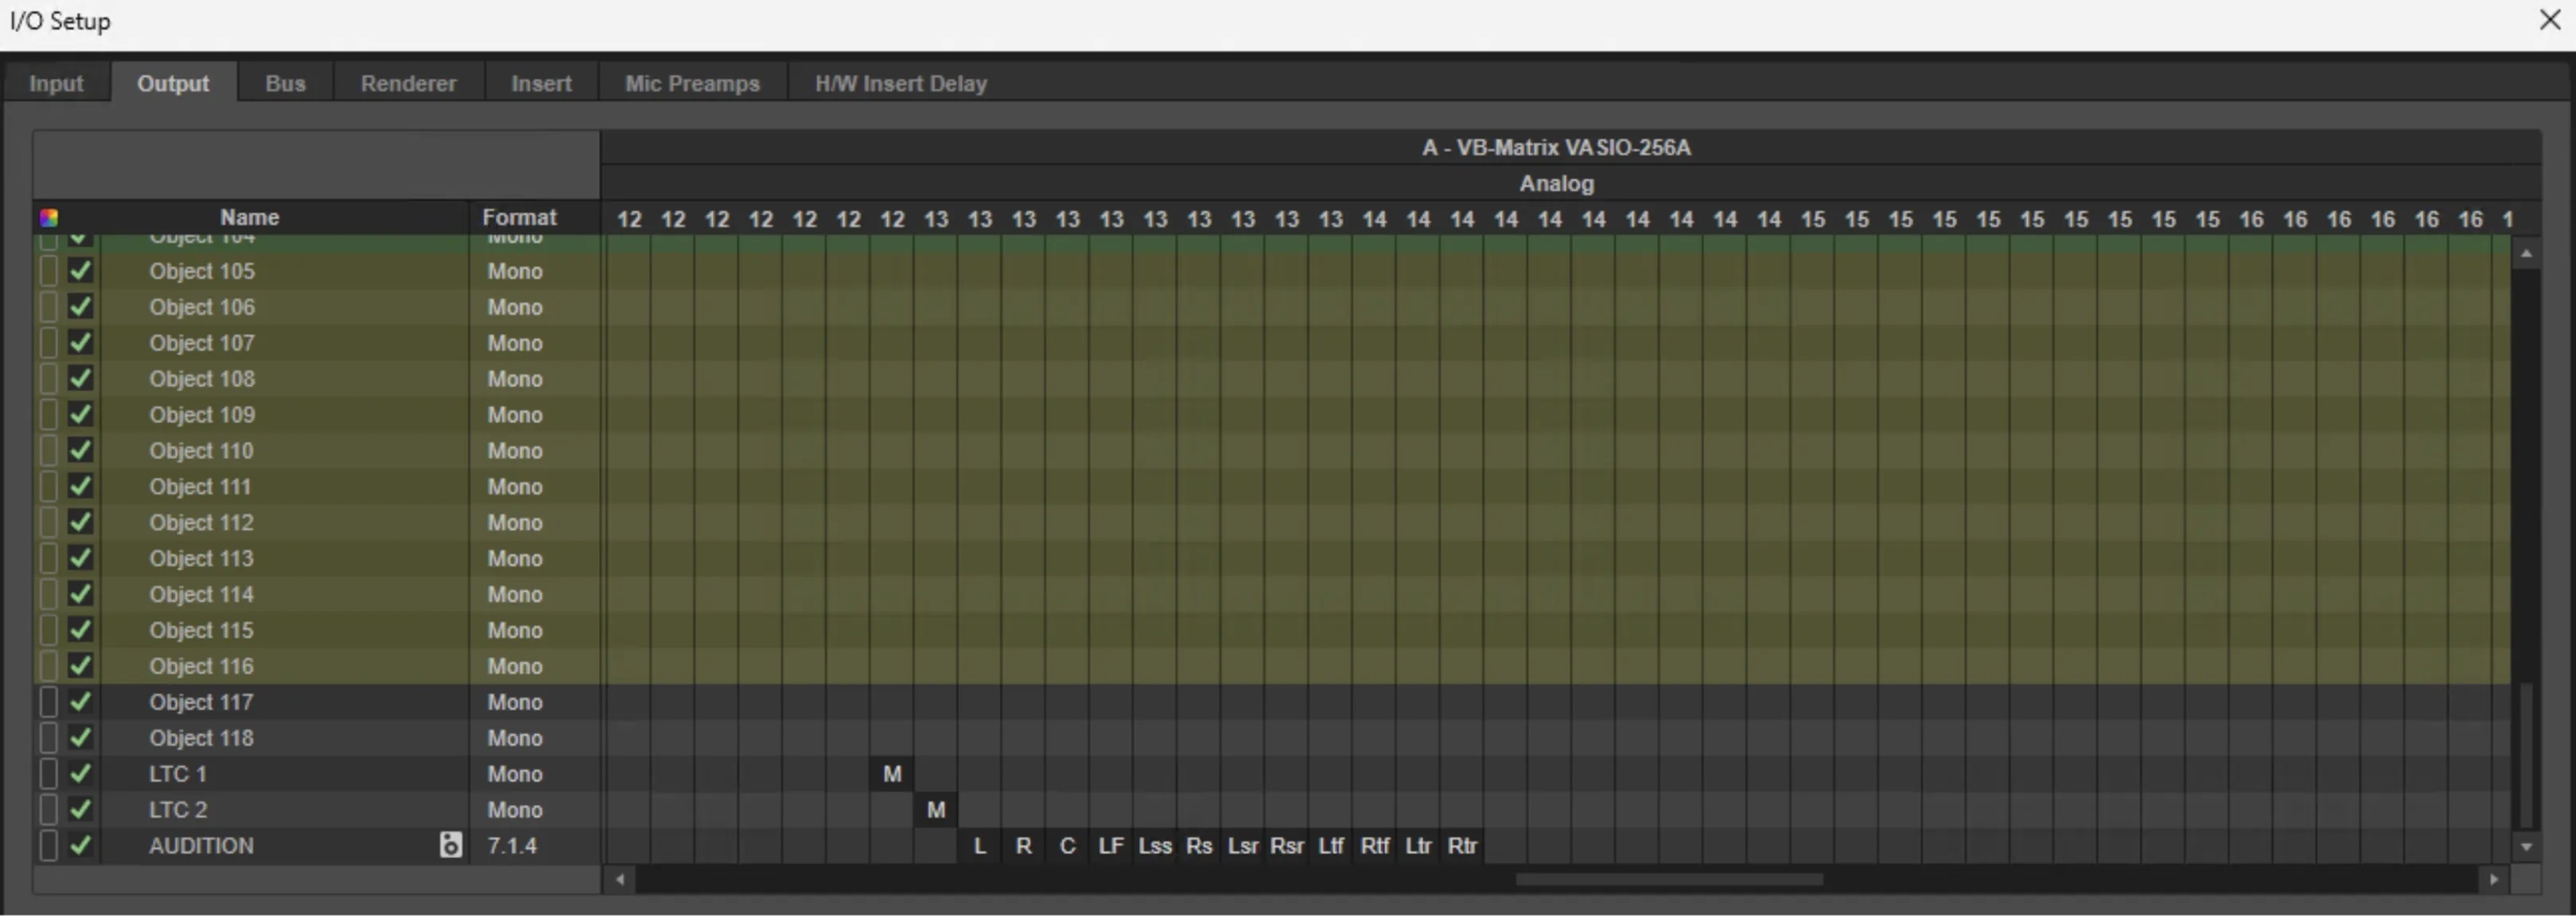
- Route an LTC track in Pro Tools to VASIO_A channel 129 (and thus input 129 on SC4F). This will ensure that Source-Connect reads LTC from channel 129 in the SYNC tab.
Step 4: Configuring Source-Connect 4 Facility for LTC
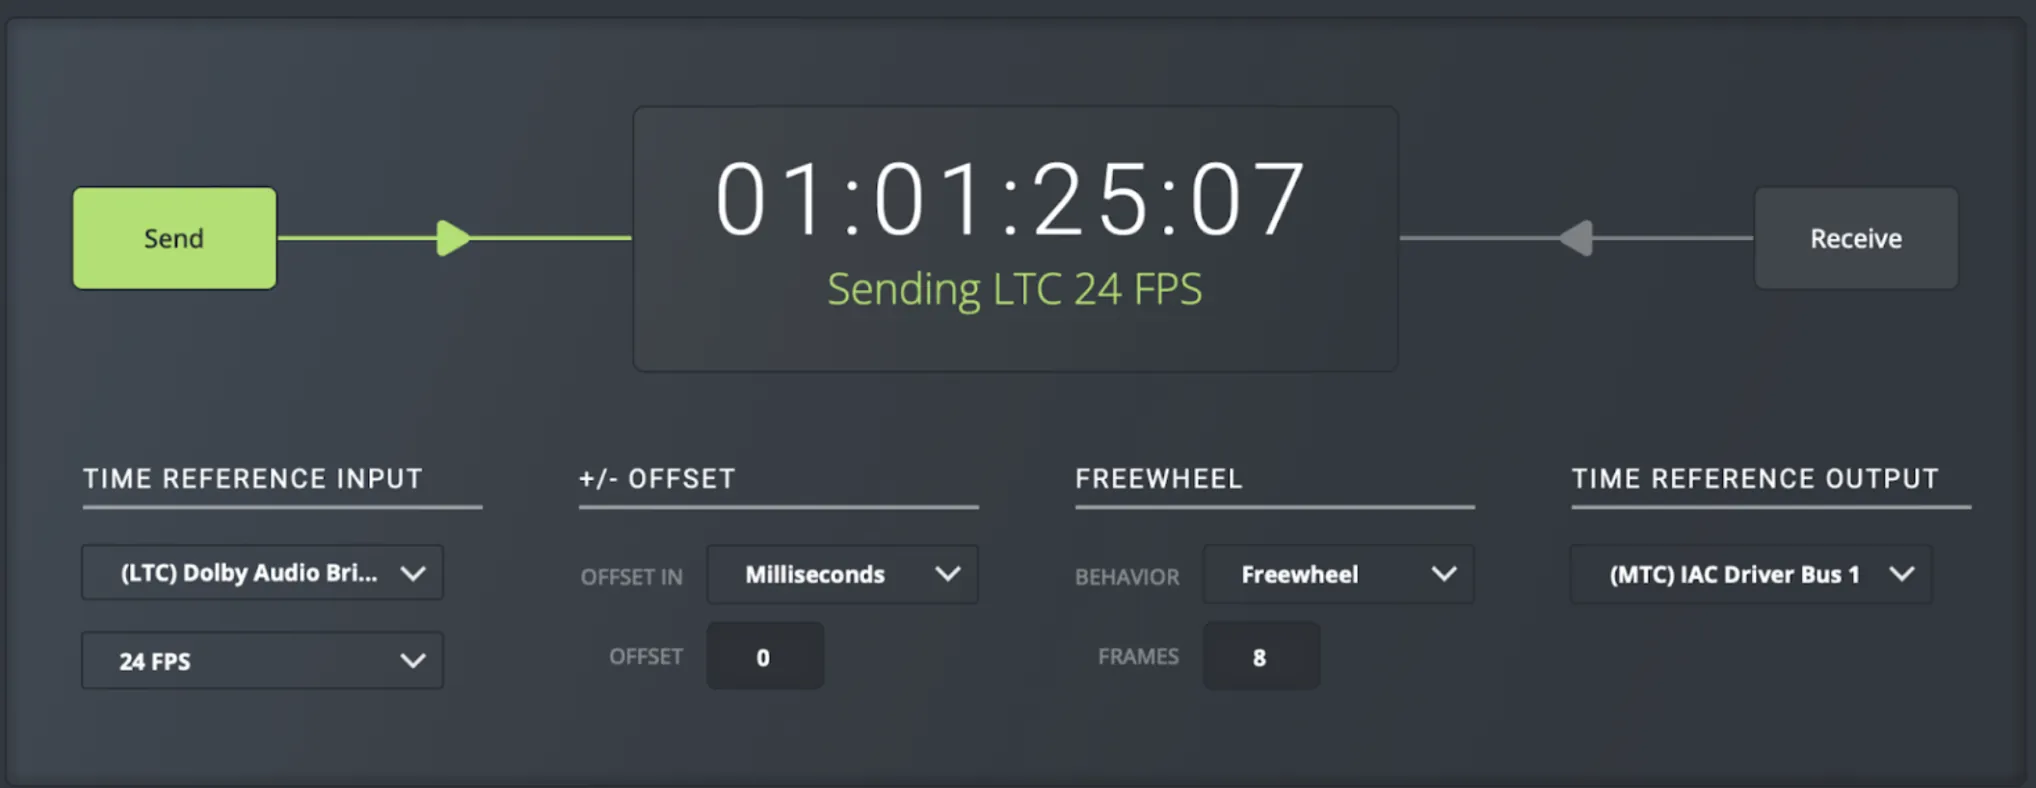
- Open up Source-Connect 4 Facility and click on the “SYNC” tab.
- On the “TIME REFERENCE INPUT”, select LTC and, then, choose the channel that receives LTC audio (normally, channel 129).
- Click the “SEND” button - you will see a “Waiting for timecode” message under the timecode number indicator.
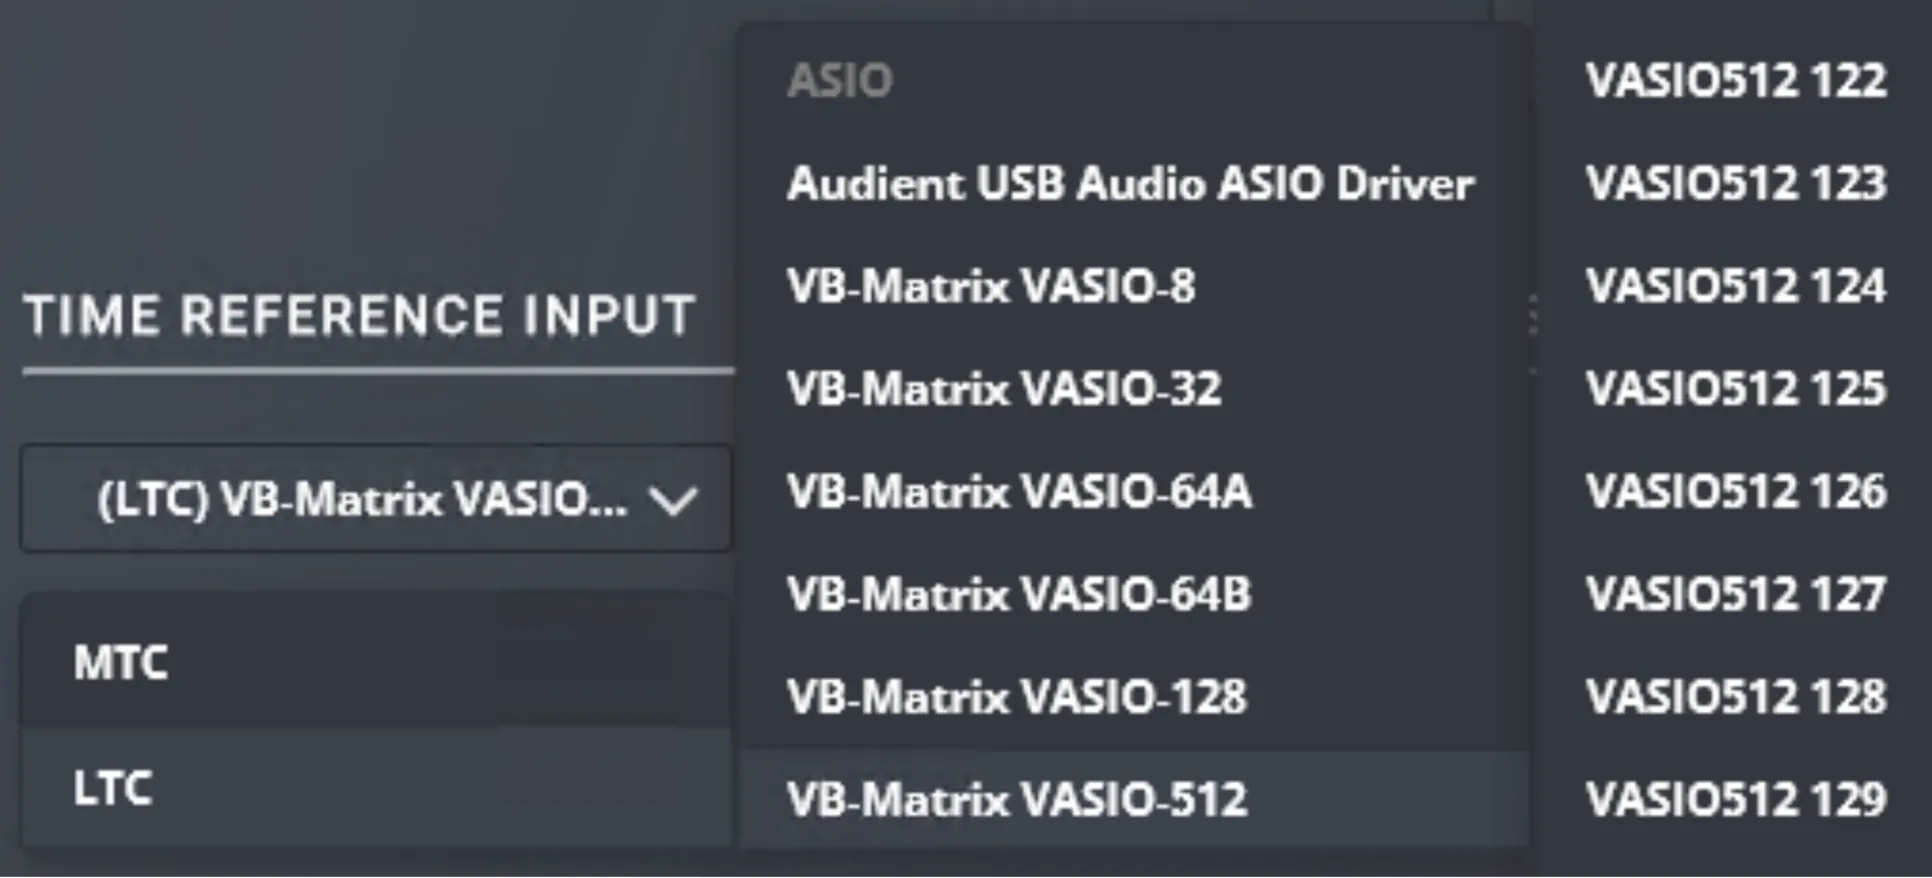
Table of Contents