Source Elements Labs - Source-Connect v1
Source Elements Labs is your gateway to experimental features before they reach production. Help shape the tools that define tomorrow's workflows.
1. Introducing Source-Connect 4 - Labs
What is Source-Connect Labs: this is an exclusive preview application that gives select users early access to cutting-edge features and improvements coming to Source-Connect’s remote recording application. As a beta testing initiative, it serves as the proving ground where innovations for the main Source-Connect app can be refined and tested today.
Who it’s for: Source-Connect Labs is designed for experienced Source-Connect users who are passionate about remote recording technology and want to shape its future while providing feedback. Ideal candidates include audio professionals who rely heavily on remote recording for their work - beta testers should be comfortable with occasional bugs to provide detailed feedback, and excited about exploring new features before they reach the general public.
Why you need it: by joining the beta program for Source-Connect Labs, you gain exclusive access to breakthrough features months or even years before they are available to everyone else. You’ll experience enhanced audio quality improvements, streamlined workflows, and experimental features that could revolutionize how you capture remote conversations. Your feedback directly influences which features make it to the final release and how they're refined.
What you will find in this document: this guide will include setup guides and overviews for the features included in the Labs version of Source-Connect. For an overview of other existing features in Source-Connect 4, please visit Source Connect 4 Hub and read through the Talent, Studio or Facility user guides.
About Source-Connect™
Source-Connect provides access to high-quality, real-time audio streaming, with integrated DAW/NLE functionality. Source-Connect is suitably low latency for creative collaboration, and boasts high-quality audio thanks to the AAC ELDv2 codec from Fraunhofer, and the Opus codec for high channel support. Through the integrated dashboard Source-Connect provides contact management and instant messaging features. Edit your personal settings and manage your contacts on the Source Elements website.
2. What's new in this Release (V1)
This specific release of Source-Connect Labs is macOS only.
This first release of Source-Connect 4 - Labs includes four new key features:
Separate Talkback Device Configuration
This new feature grants you the ability to set up a talkback input that is separate from your main input. The talkback input can be controlled by an ASCI key with either a monetary or latch action.
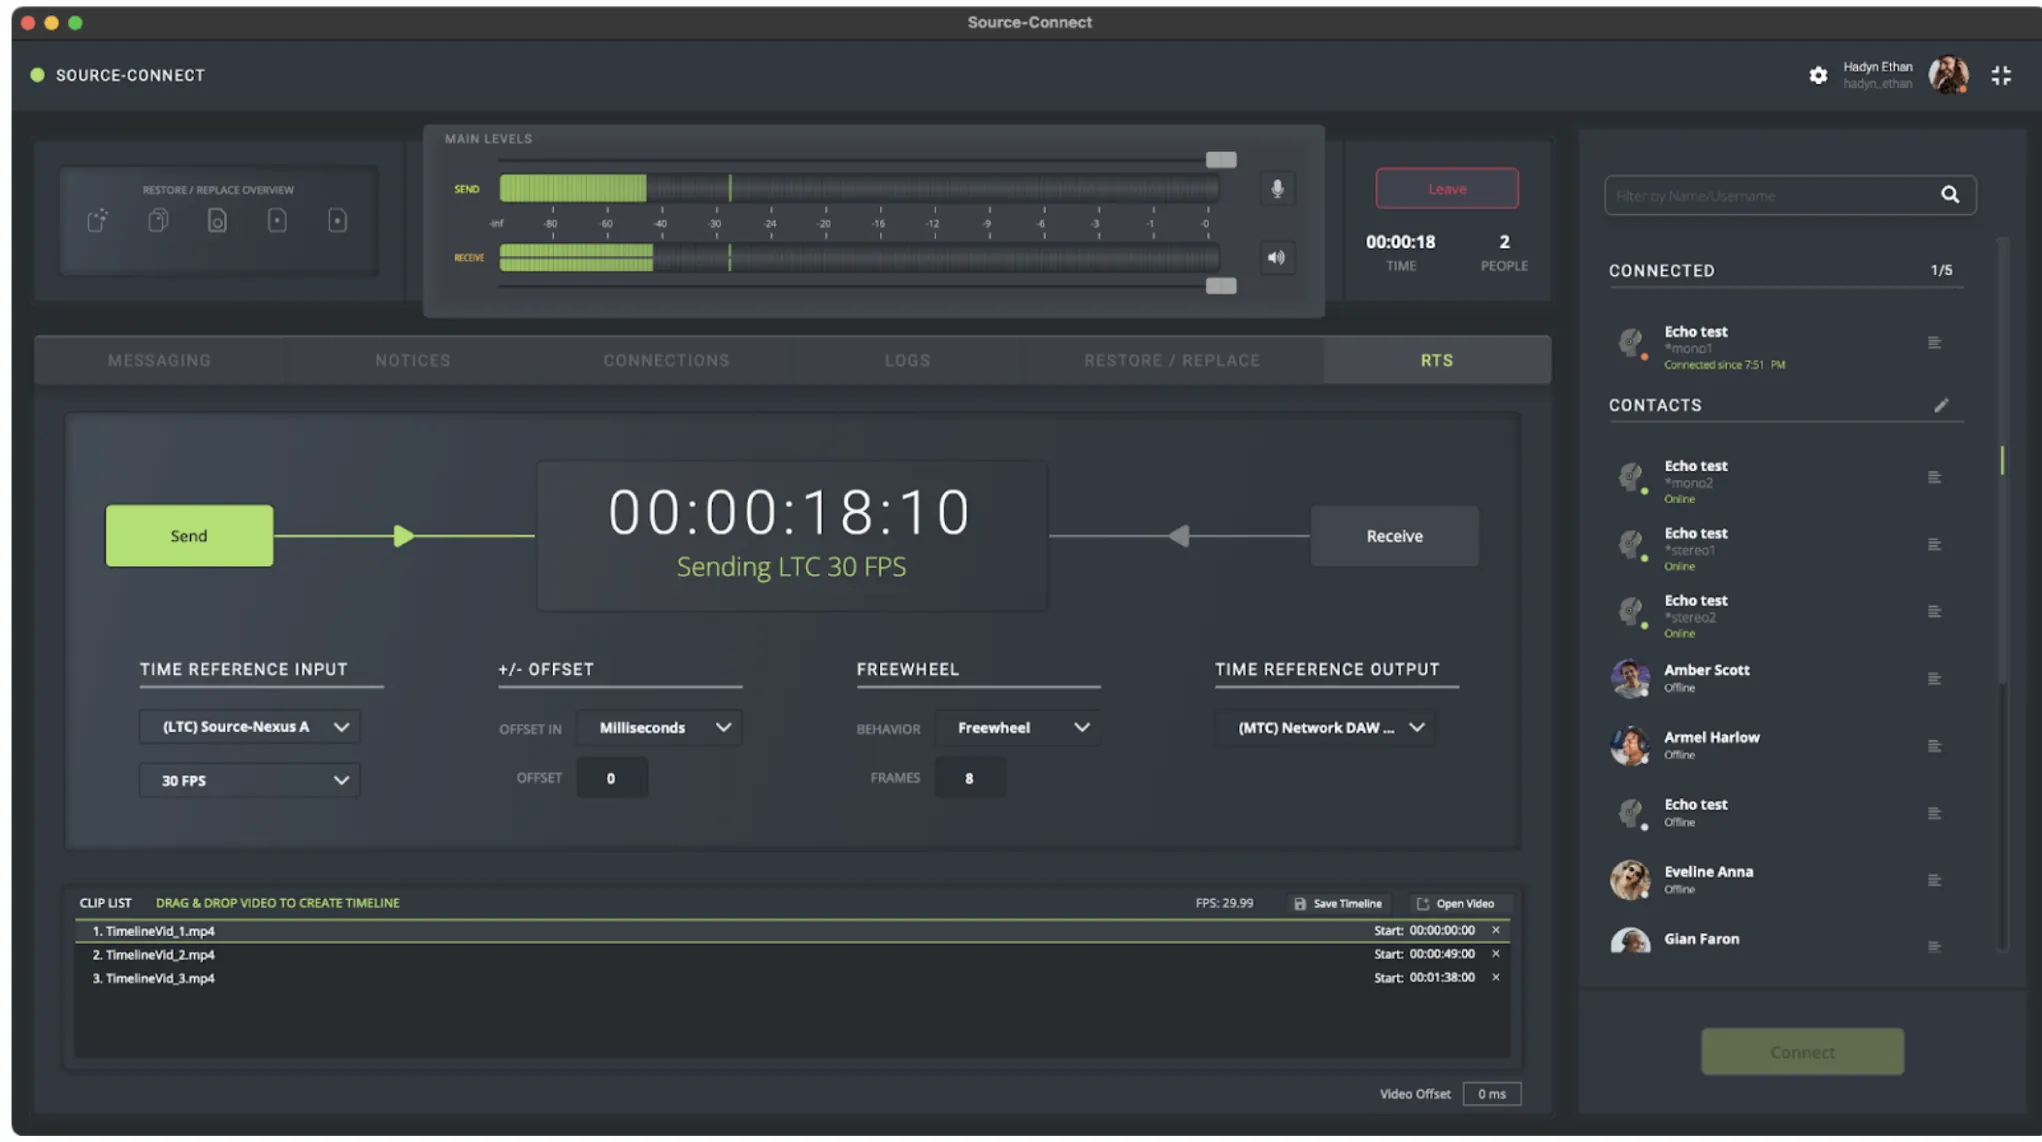
RTL (Remote-Timeline)
The RTL functionality allows the receiver to host a video for synchronized playback without needing a DAW.
Monitor Configuration (Highly Experimental)
The monitoring feature included in Source-Connect Labs allows you to hear your own input while you are in a recording session. It will allow you to hear what is going out, including any modifications you have made with plugins.
Restore/Replace Enhancements
Starting with this version of Source-Connect 4 Labs, you will be able to replace all files using the “RA” button in the Connections menu of the Restore/Replace tab.

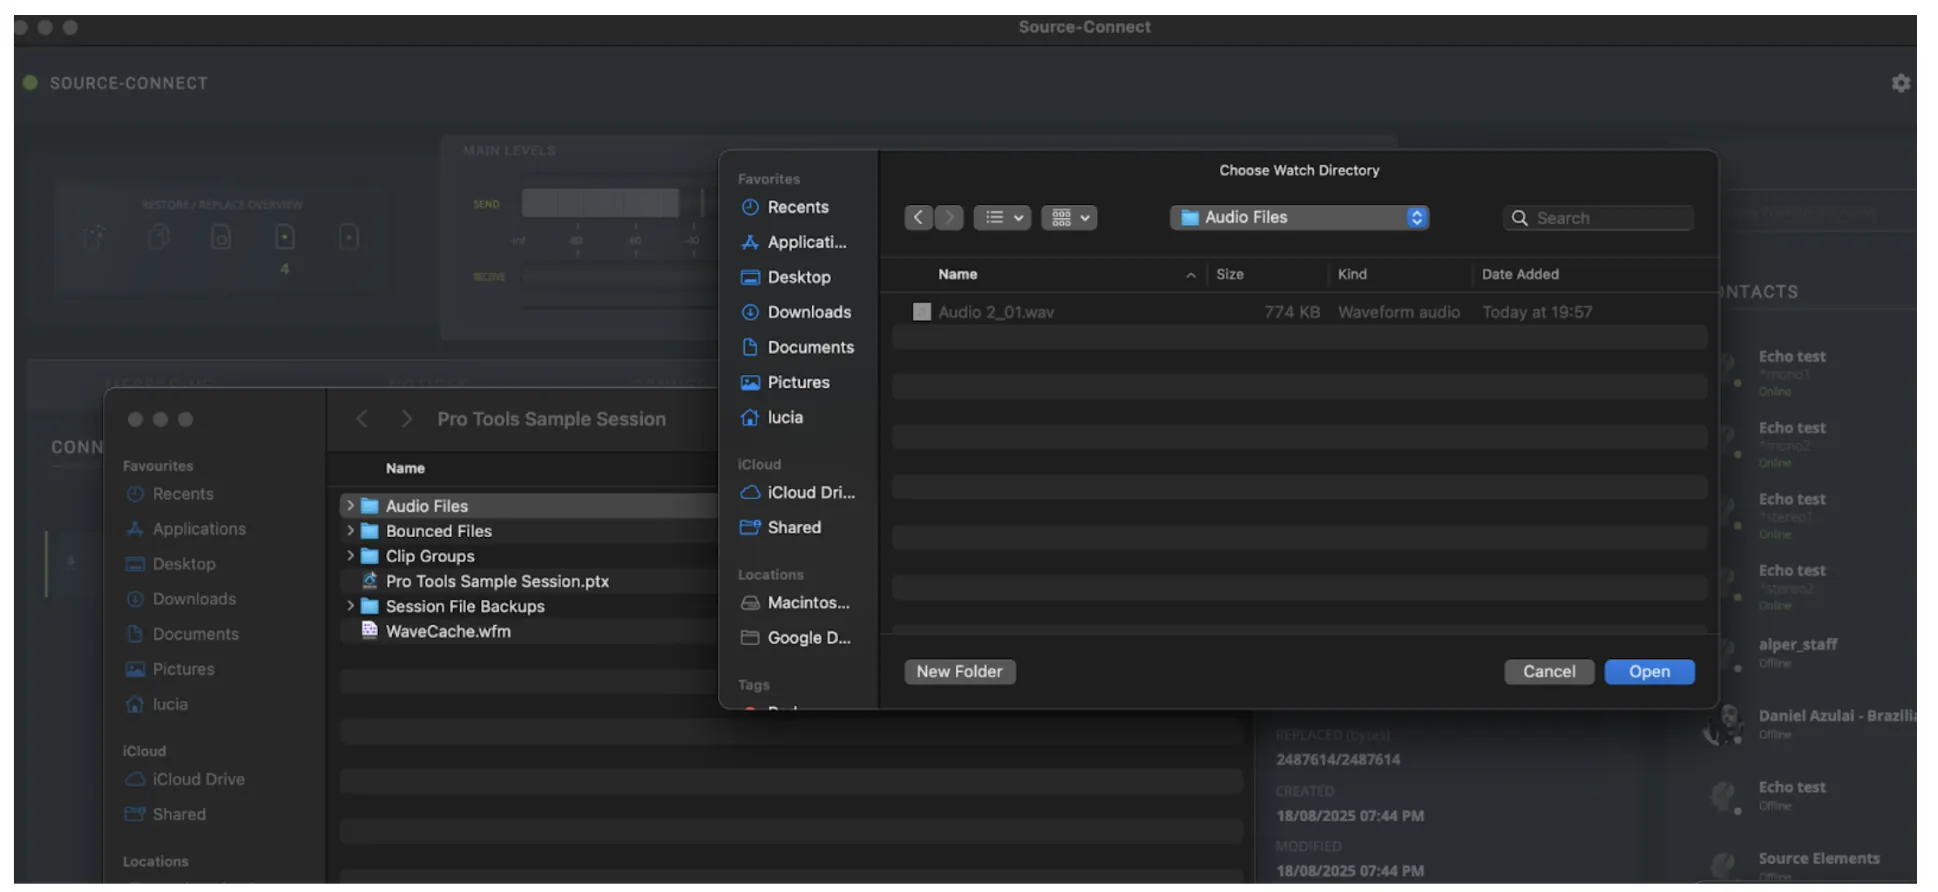
In addition, Source-Connect will now auto-detect your saved Pro Tools sessions. If you open a new saved session and click the “Watch Folder” button, the folder with your session files will be opened in the Finder.
For more information, please check on the specific Restore/Replace section.
3. System Requirements
The following are the system requirements and compatibility to install it:
- macOS 10.14+ (Mojave) or higher.
- For plugins: AAX only.
This specific version of Source-Connect Labs supports the following DAWs:
- Compatible with Pro Tools 10+.
Please note that there is a known compatibility issue with the Source-Connect plugin and Pro Tools 2022.09. If you are using that version of Pro Tools, please upgrade to avoid any issues.
Backwards Compatibility
The advanced features included in Source-Connect Labs are compatible with Source-Connect 4 only. You will still be able to connect and see your contacts, but these functionalities will only work between 4.x versions.
Having said that, we highly recommend that you only use a release version of Source-Connect 4 when connecting to another user who is not using the Labs version. We can not predict what interactions may happen when combining connections with Labs and Full Release versions.
Network Configuration
Bandwidth
Source-Connect requires an Internet connection with very consistent and jitter free bandwidth of at least 300 kbps upload and download per participant. As importantly, consistent reliability on your network will ensure quality of service on your connection. You may need to configure your firewall and/or router if you are inside a corporate network or have an active firewall. Corporate firewalls and routers may be able to provide QoS (Quality of Service) and CoS (Class of Service) rules to better guarantee consistent bandwidth for your application. Please contact our support personnel if you have difficulty connecting successfully, we have dedicated tools and services to support all corporate and enterprise use cases.
You can get an idea of your available bandwidth and ping value via Speed Test sites, such as https://speedtest.net. However, due to the “peering” nature of the internet and how many different providers are used to cooperatively mesh the public internet together, take note that a report from a site in California does not mean that you will be getting the same bandwidth when connecting to a peer in, say, Australia. In most cases, Source-Connect will work well however dedicated testing prior to a recording session is recommended.
4. Installation and iLok Licensing
To get started with Source-Connect Labs, download the latest release from the Source Elements dashboard, in the “Labs” tab of the Products & Downloads page.
Once you have the software downloaded, open the application and follow the instructions. Because this is a closed beta, you will need an iLok license to activate your access to the Labs application. Depending on your license (Talent, Studio, Facility), you will see different versions of the following screen:
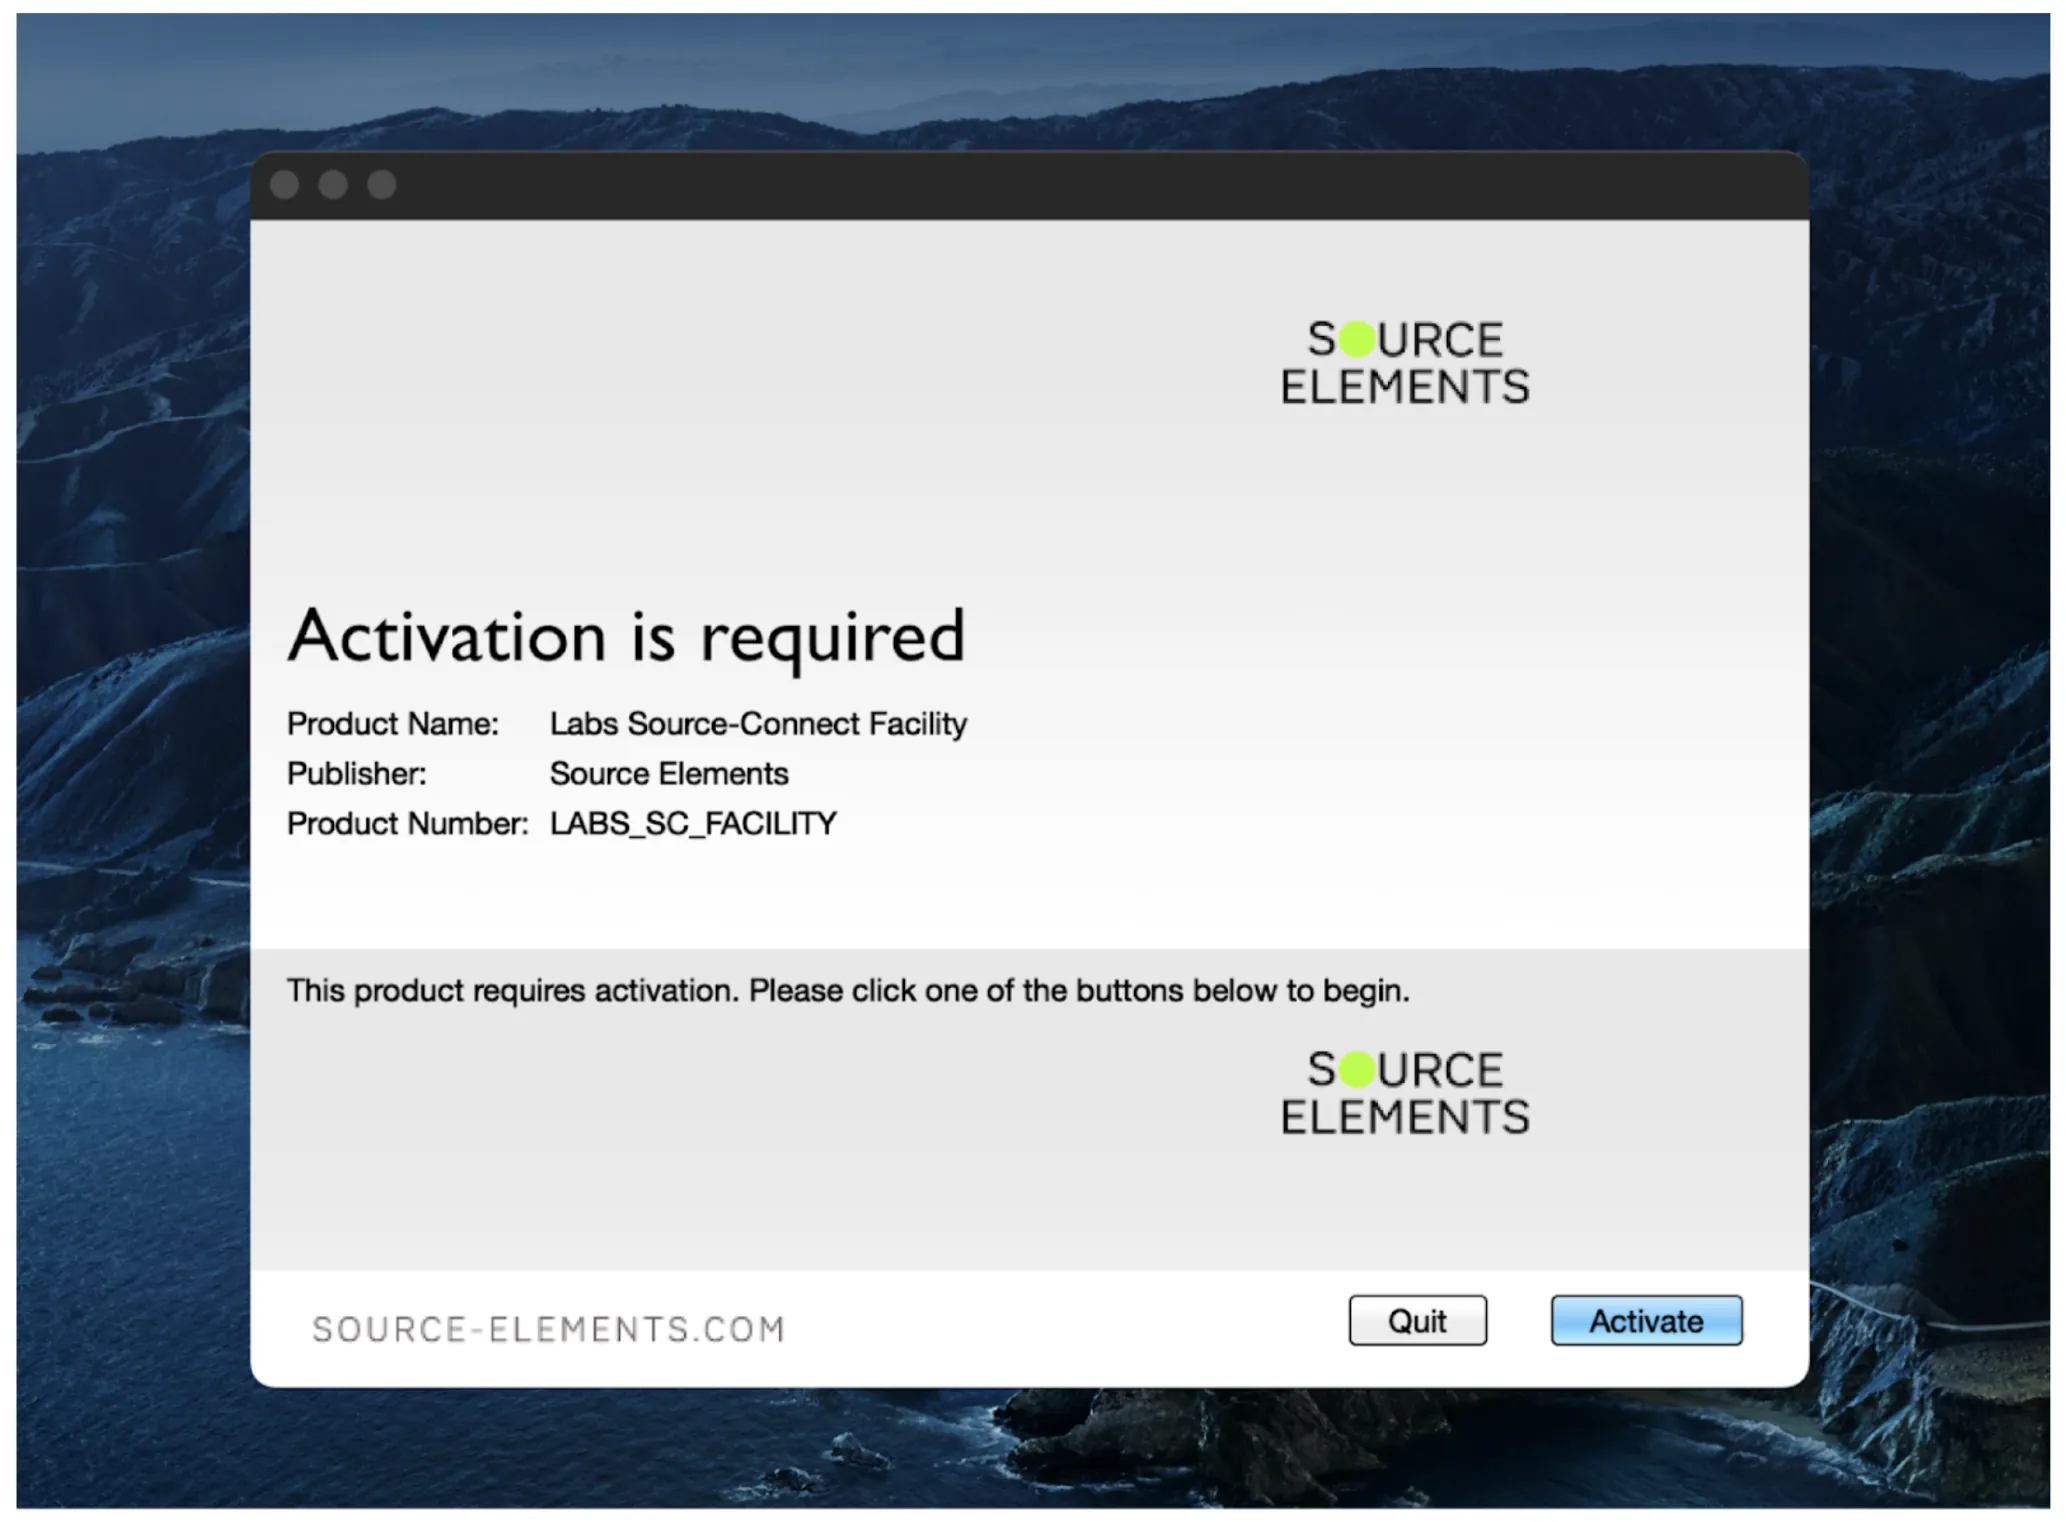
Click the “Activate” button. In the next screen, enter your iLok username and password.
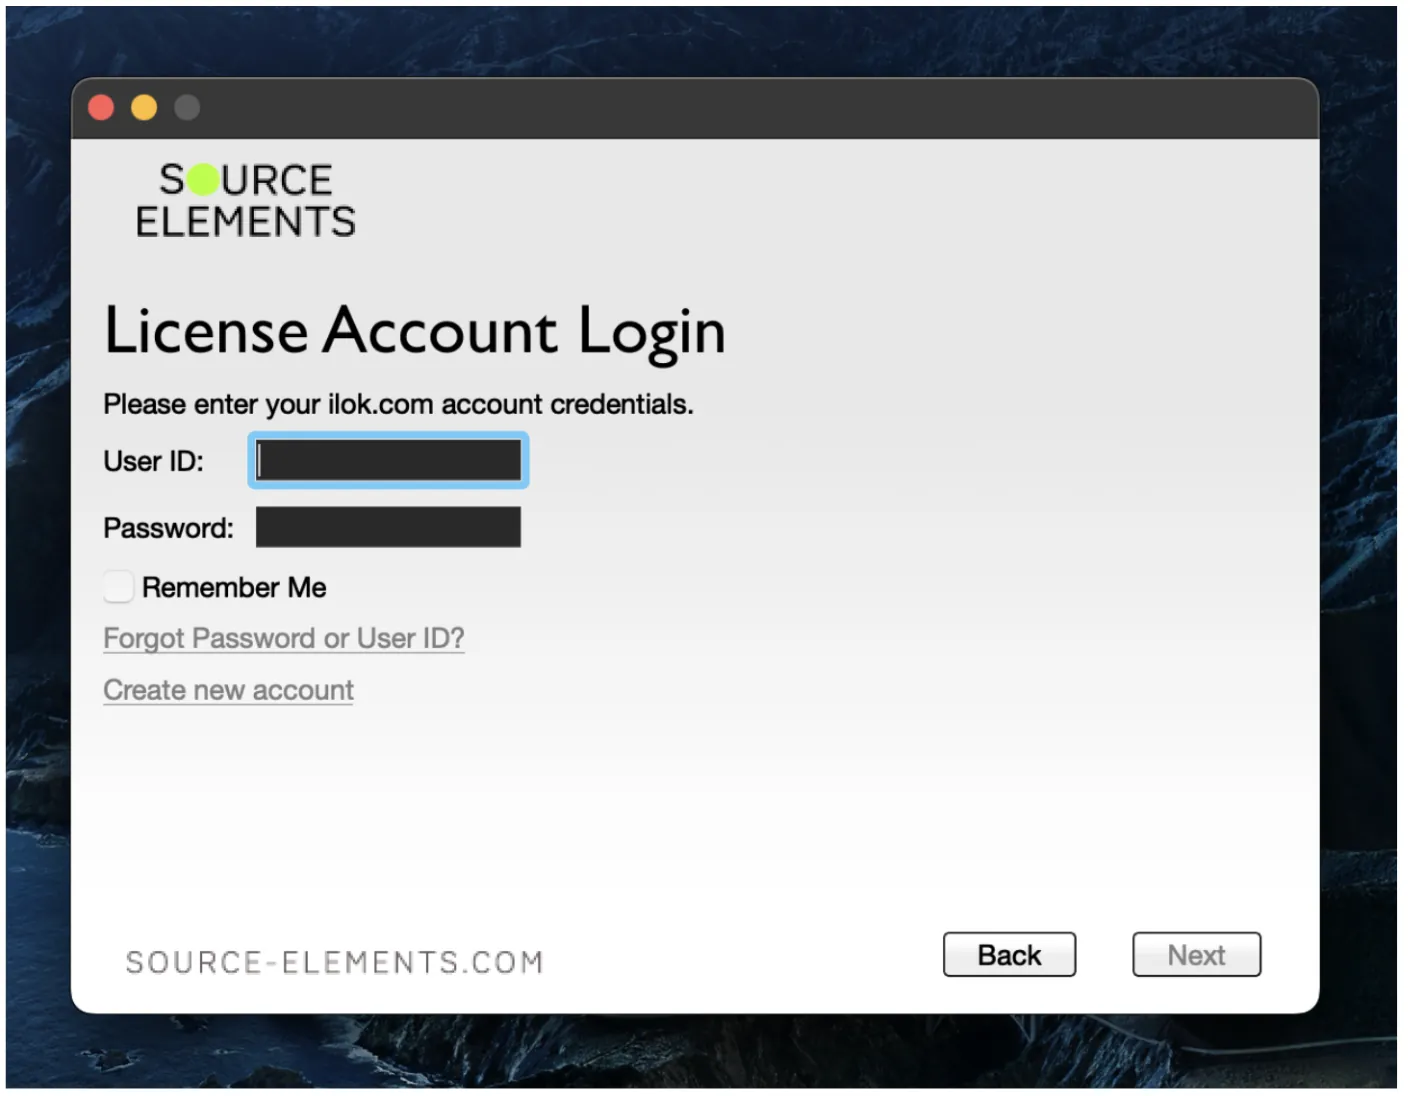
Source-Connect Labs will check your iLok account for a license and, if one is found, you will be prompted to activate the license to your computer (or iLok dongle).
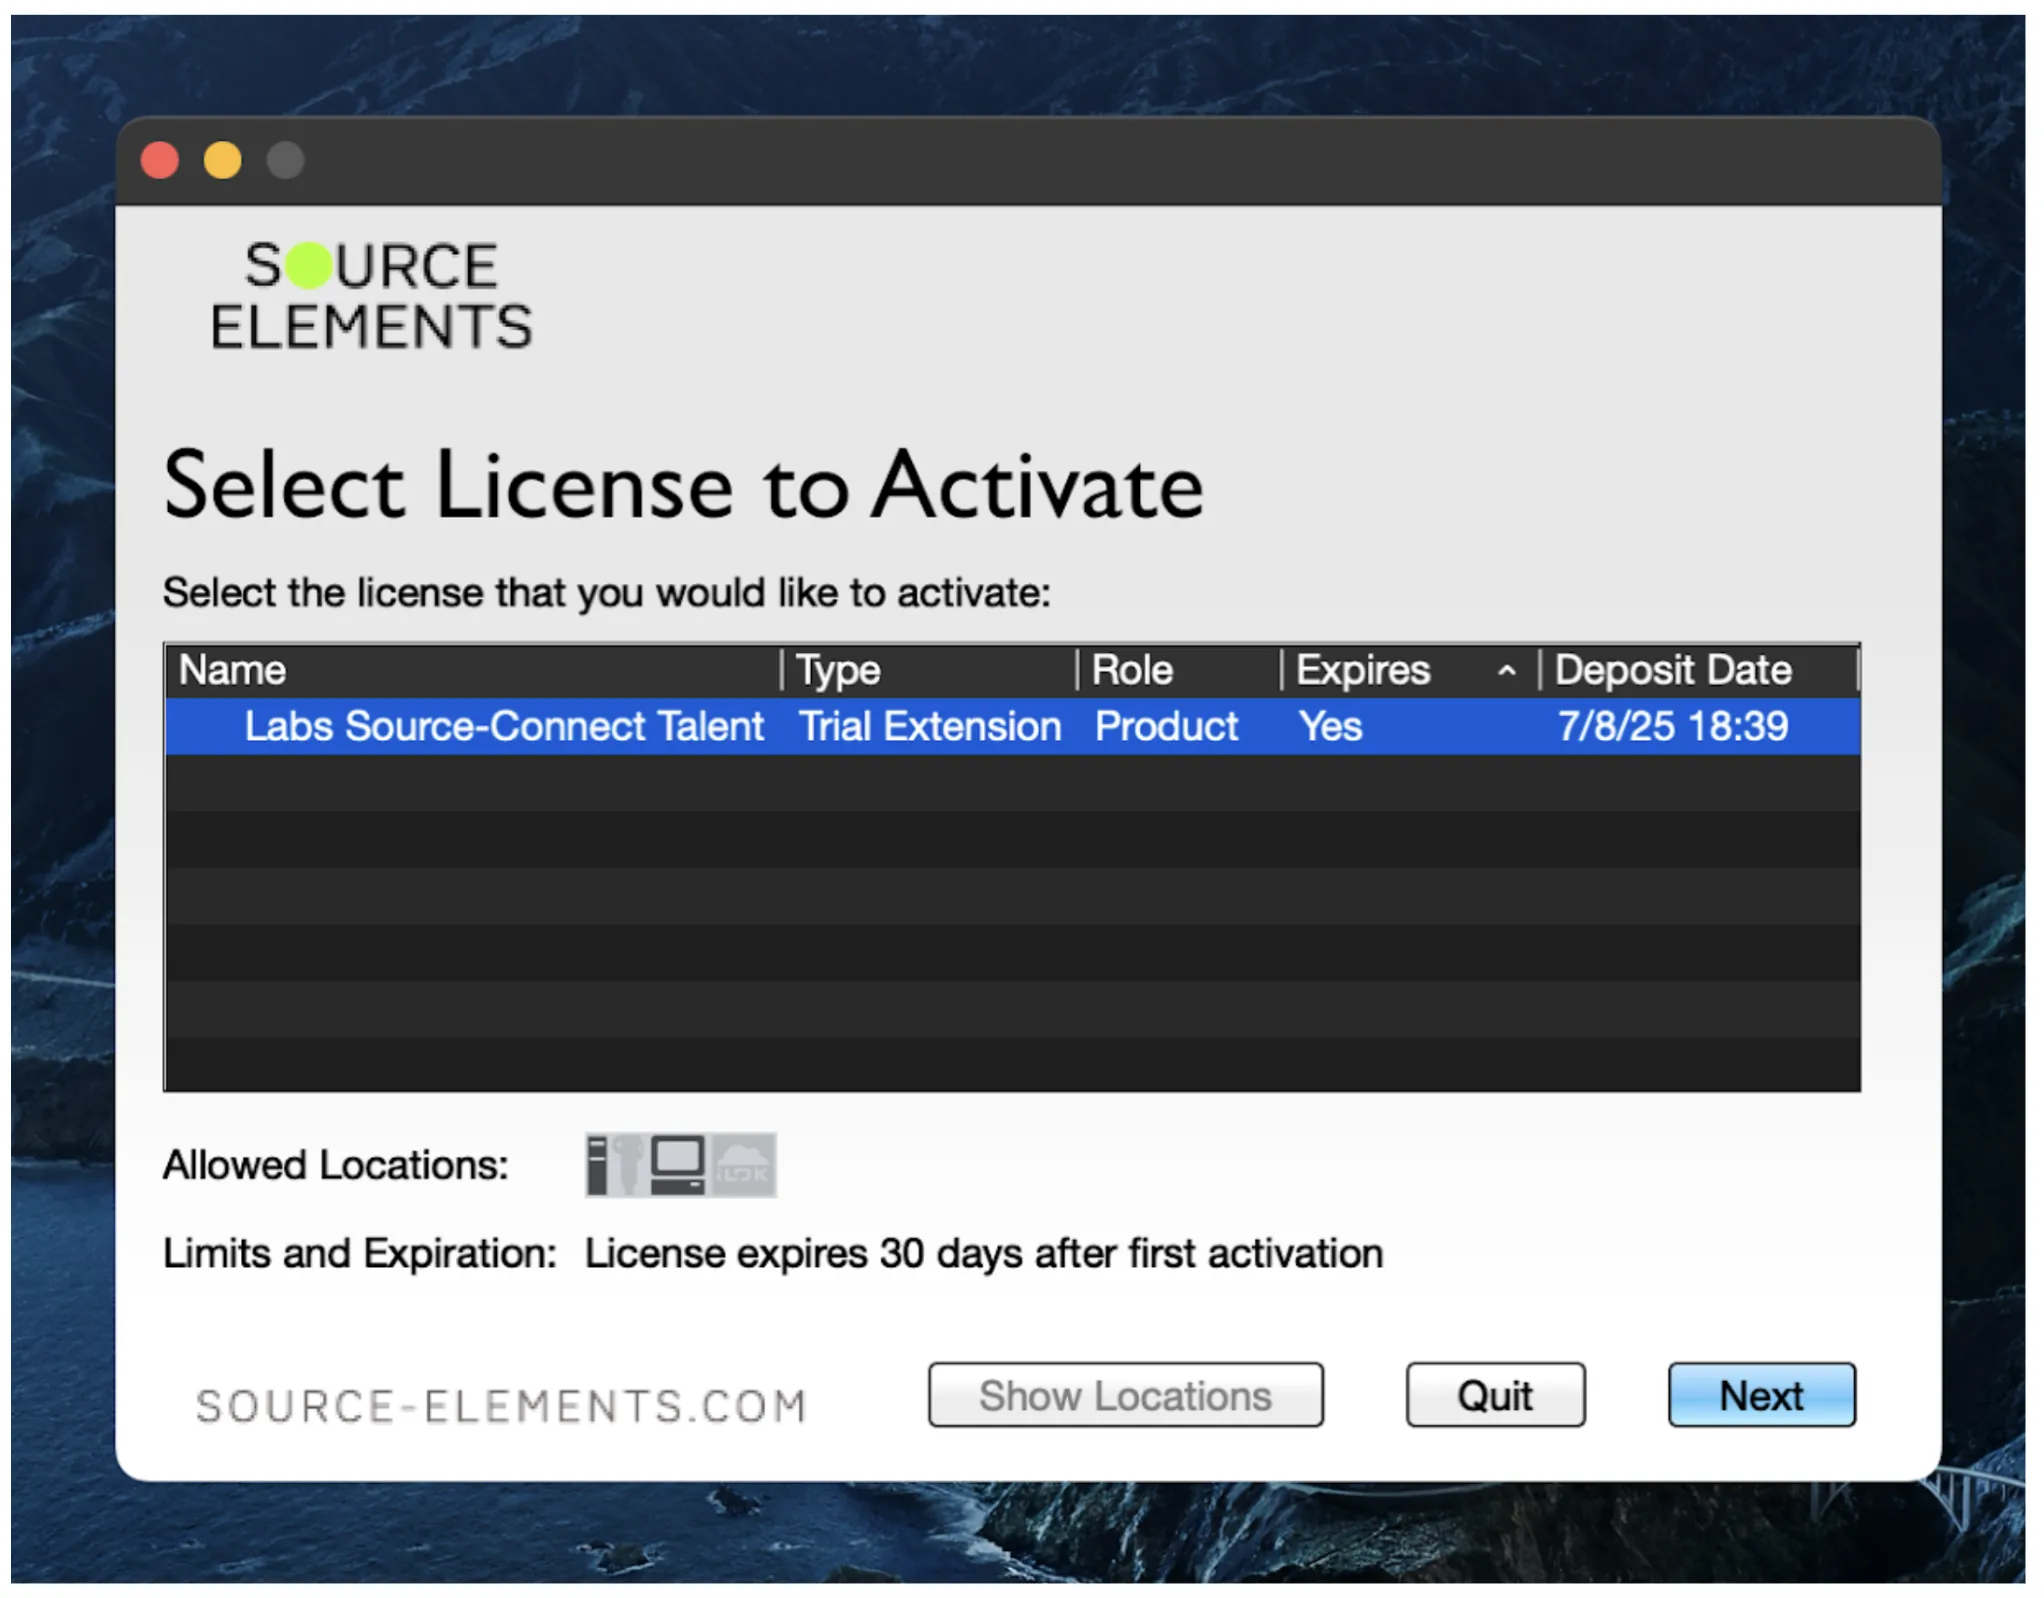
If you see an error message saying you don’t have any licenses in your account, or that none of the licenses have activations available, contact our team at [email protected].
Uninstalling Source-Connect Labs
To uninstall, we recommend using the installation file and, in “Installation Type” selecting “Uninstall”. This will remove any preferences and unnecessary files from your computer as well. You can also go to the Applications folder on your Mac and drag and drop the Source-Connect icon into the trash.
5. Talkback Device
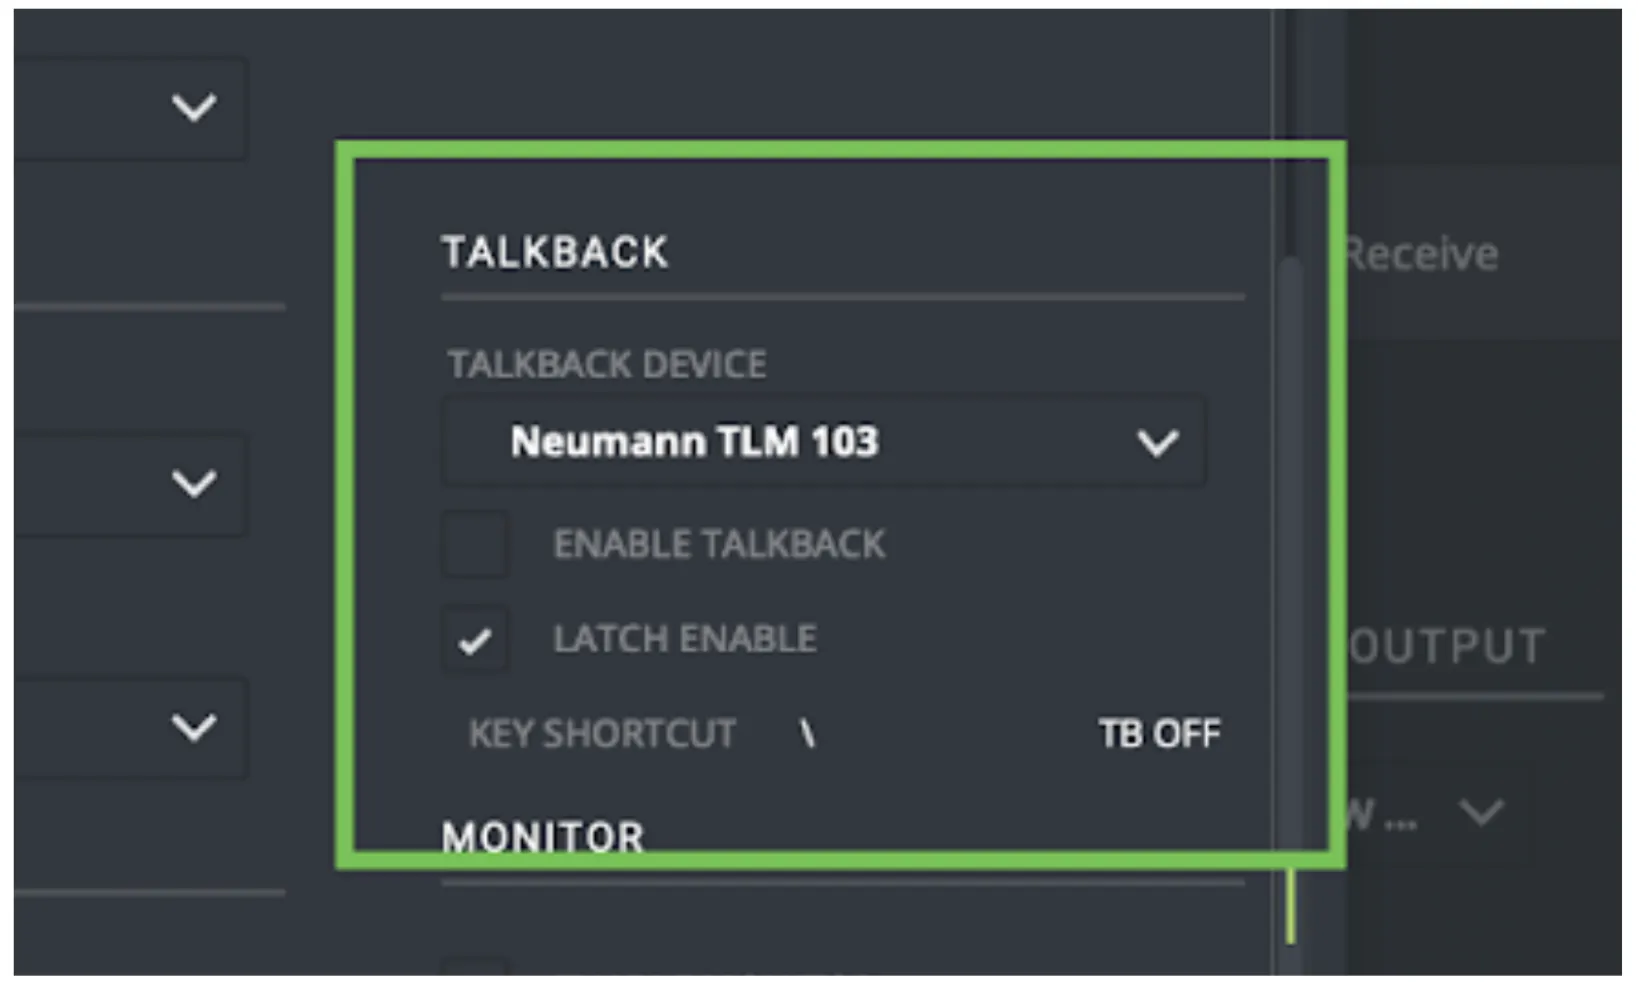
The new talkback feature in Source-Connect allows you to configure a dedicated microphone specifically for communicating with talent during recording sessions. This means that your primary recording input can remain set to your studio microphone or audio interface, while your talkback input can be set to a different device entirely, such as your headset microphone, your computer’s built-in microphone, or a talkback microphone outside of your recording booth.
You will see a separate “TALKBACK” section near the “AUDIO I/O” settings.
How to configure my Talkback device
- Open Source-Connect and establish a connection with remote talent.
- Navigate to Settings → Default Connection Settings.
- Scroll to the Talkback section at the bottom.
- Select Talkback Microphone: Choose your desired mic from the dropdown list.
- Enable Talkback: Check the enable box.
Additional Settings
The following settings are also available in the Talkback section:
-
Latch Mode (Optional):
- Enabled: the push-to-talk key stays open when pressed once.
- Disabled: the key must be held down (momentary mode)
-
Set Shortcut Key:
- Double-click the shortcut field. You will see a “Capturing” message.
- Press your desired key (e.g., "\" slash key).
- The system will capture and display your chosen key.
Test your Talkback Device
Once you are ready:
- Press (or hold) the shortcut key depending on your Latch Mode setting.
- The system should open the talkback channel.
- You should see your talkback microphone signal appear on the main levels send meter.
- Release or re-press the key to close your talkback (depending on your Latch behavior).
- Confirm your talkback during a live connection. Select a contact or an echo test, initiate the
connection and press your talkback shortcut key to speak.
- You will receive confirmation (for example, a response from the remote talent or a returned signal from the echo text) that the talkback audio is being transmitted correctly.
6. Remote TimeLine (RTL)
Building on Source-RTL’s foundation, Source-Connect Labs introduces the new Remote TimeLine (RTL) section that streamlines the review process for remote sessions. This feature provides a built-in timeline interface that allows you to load and play video content directly within the application, eliminating the need for reviewers to have their own DAW software installed on their system.
This documentation will use Source-Connect I/O as the means to route audio from Pro Tools into Source-Connect - you can use any other plugin that you are familiar with.
Supported DAWs and Source-Connect I/O versions
For this specific version of Source-Connect Labs, only the Source-Connect AAX Plugin and Pro Tools are supported.
Supported File Types
The supported video formats for the RTL section in Source-Connect are the following:
- MP4
- MOV
- 3GP
Supported Video Codecs
Below are the video codecs supported by the RTL section:
- Apple ProRes
- H.264 (Preferred)
- MPEG-4
- Several formats in the DV video and MPEG-2 family.
The following codecs are not supported:
- DNxHD codec (for example, DnxHD36)
- HEVC-encoded QuickTime videos or movies
Quick Start Checklists
Sender:
- Talkback configured with a shortcut key
- Video loaded in DAW with noted timecode
- Audio routed into Source-Connect (you can use Source-Connect I/O, Source-Nexus I/O or other plugins, as needed).
- RTL file created and sent with video [ ] MTC/LTC /timecode output enabled
- "Send" activated in RTS tab
Receiver:
- RTL file imported.
- Note: the video file must be in the same directory as the RTL file.
- "Receive" checked in the RTS tab.
- Ready to receive synchronized playback
Sender Setup
-
DAW Preparation
- Load your video and audio into your DAW session
- Note the timecode start position (e.g., 59:53:00)
- Route audio on your DAW into Source-Connect (you can use Source-Connect I/O, Source-Nexus I/O or
any other plugin, as needed).
- Depending on how you are routing with Source-Connect I/O, you may need to make sure to disable “Mute Through” to hear video audio.
-
Configure Audio Routing
- Set Input: If you are using Source-Connect I/O then select the appropriate the Source-Connect AAX Plugin (to send DAW mix)
- Set Output: Your hardware output (to hear your connection partner) or route back to whatever monitor output you need.
-
Load Video into RTL Window
- Click the RTS tab in Source-Connect
- Drag video file from Finder into the RTL section of the RTS tab
- Enter the exact timecode start position (e.g., 59:53:00)
-
Save and Share Timeline
- Click Save Timeline and name it (e.g., "RTL")
- Create a folder containing:
- The saved .rtl file
- The video file
- Zip the folder and send it to the receiver.
- Configure Timecode Settings
- Set timecode input to MTC Device (for MIDI timecode) or use LTC
- In your DAW:
- Set peripherals to output MIDI timecode to MMC or generate LTC
- Enable "Generate MTC" in transport settings
- In the Source-Connect RTL tab:
- Click Send to enable sending
- Verify correct input selection
Receiver Setup
- Import Timeline
- Receive and unzip the folder from the Sender (your connection partner).
- Drag the .rtl file into the RTL section.
- Enable Receiving
- Click Receive RTS to enable timecode reception
- Video should now sync with the sender’s playback
Operating the System
For Sender:
- Press play in DAW to start synchronized playback
- Jump to any position - the receiver’s video will follow
- Stop playback using DAW transport controls
For Receiver:
- Video will automatically sync with the sender’s transport
- To stop video manually: Click the black circle with square (stop button) in menu bar
Important Notes
- Video Sync on Sender Side: The video preview in the sender’s RTL window will appear out of sync with DAW audio due to Source-Connect processing delay. This is normal and only affects the sender’s monitor - the receiver party gets everything in sync.
- Future Updates: The sender-side video preview may be hidden or modified in future versions as it's primarily for verification purposes.
- Source-Connect RTS FPS must match the cliplist FPS in order to have smooth playback.
- Network Requirements: Ensure stable internet connection for both parties to maintain sync.
Troubleshooting
- No timecode received: Verify MMC settings in DAW and Source-Connect
- Video won't load: Ensure video format is compatible
- Talkback not working: Check microphone permissions and shortcut key assignment
- Sync issues: Confirm both parties have the same video file and RTL settings
7. Monitoring (Highly Experimental)
The monitoring feature included in this release of Source-Connect Labs is highly experimental. We’d love to hear your feedback as we continue to build it!
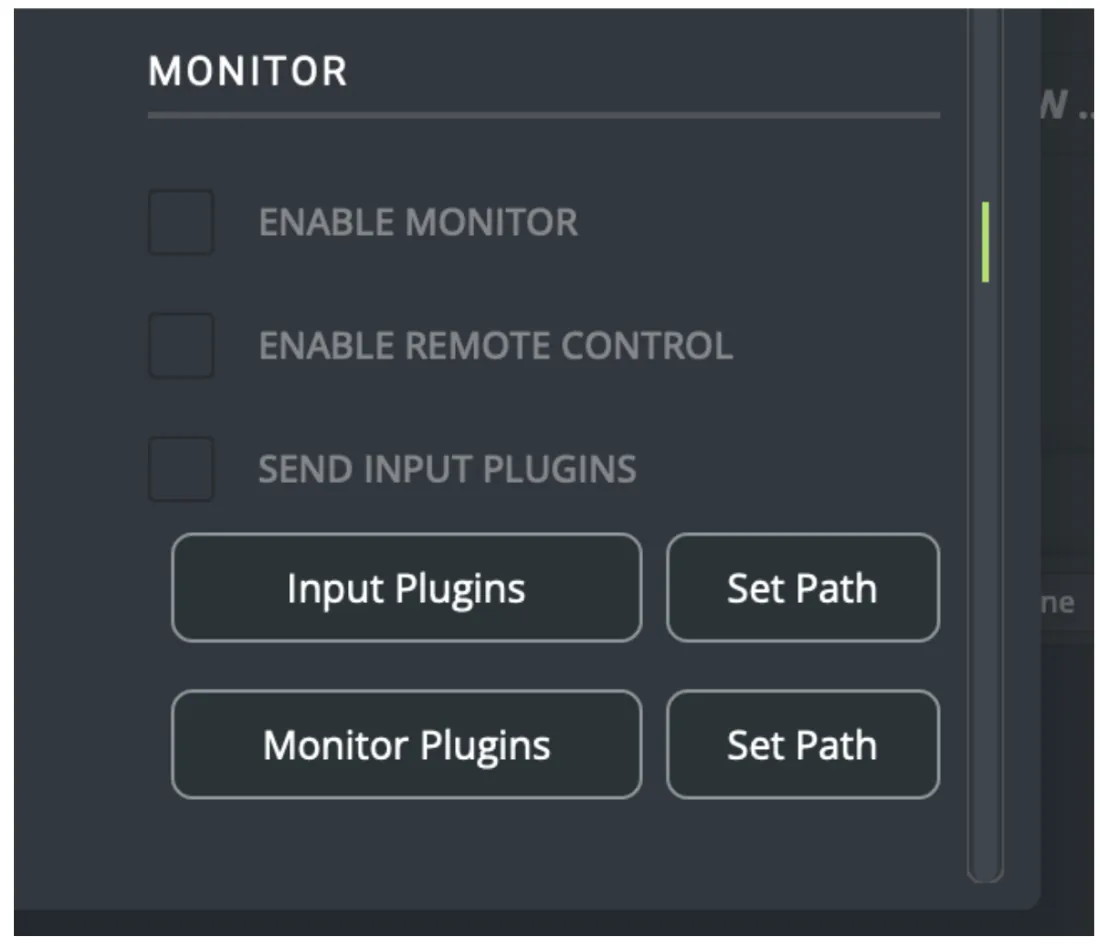
As mentioned in the “What’s new” section, the monitor feature allows you to hear your own input while you are in a recording session.
You will see a separate “MONITOR” section near the “AUDIO I/O” settings.
How to enable Monitoring
By default, monitoring will be disabled in Source-Connect. You can enable it by checking the “ENABLE MONITOR” checkbox - the first one on the list.
Additional Settings
The following settings are also available in the configuration section:
- “Enable Remote Control” - which allows your connection partner to control the settings of your monitor plugins.
- “Send Input Plugins” - which enables or disabled sending any input plugins you have added in the “Input Plugins” modal.
- “Input plugins”, which will modify the signal you send out through Source-Connect with any plugins on
the list - meaning your connection partner(s) will hear your modified input.
- “Set path” - where your input plugins are located.
- Clicking the button will open up the input plugins modal, where you can add, remove or clear input plugins. You will also see a volume slider and an “Always on Top” button.
- “Monitor plugins”, which will be noticeable for you only - your connection partners will not hear any
modifications to your input.
- “Set path” - where your monitor plugins are located.
- Clicking the button will open up the input plugins modal, where you can add, remove or clear input plugins. You will also see an “Always on Top” button.
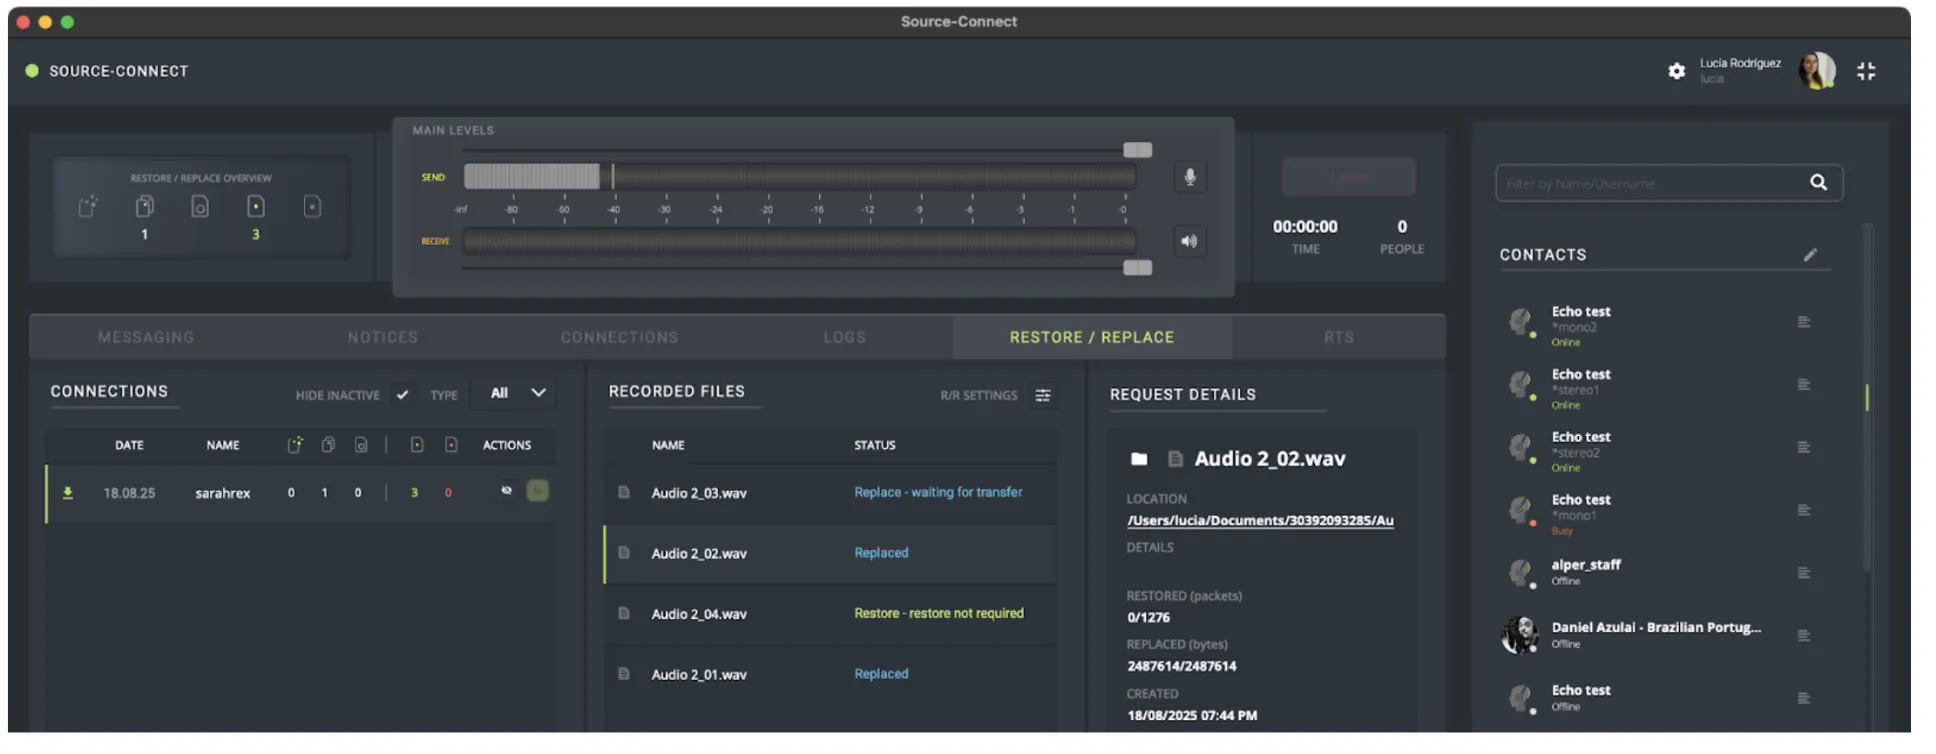
8. Restore/Replace Enhancements
Replace All
Source-Connect 4 Labs brings back a highly requested feature that was temporarily absent from the previous release - the “Replace all” option in the Restore/Replace panel. This feature allows you to streamline your workflow by batch-replacing files without the need for individual confirmations or multiple operations.
When clicking the button, the Replace process will start for all available files in the Recorded Files folder. Provided that your remote contact has not paused transfers, deleted that particular session, or shut down the machine with Source-Connect, you can activate the Replace All process at any time after your session.
Watch Folder Enhancements
The application's Watch Folder functionality has been optimized in the Labs version to reduce manual configuration steps. In the current release of Source-Connect 4, users need to manually navigate to and specify the path of their Pro Tools Audio Files folder through the interface. This, among other things, required users to know the exact location of their audio files and manually type or browse to the correct directory path.
The updated implementation automatically detects and opens the Audio Files folder in the Finder when users click "Watch Folder":
You can then drag and drop the opened folder directly into the “Choose Watch Directory” dialog, reducing setup time and potential selection errors.
9. Getting Support
Comprehensive documentation is available in this document. If your question is not answered, please send an emali to the support team at [email protected]. When you do so, please provide us with all the pertinent information required to resolve this issue. This includes, for example:
- Your computer type (Mac or Windows)
- Host and browser version.
- Network capabilities. If possible, please run the following speed test and send us a capture of your specs: https://www.speedtest.net/
- The Source-Connect version.
- Mention that you are on the Labs version.
Appendix 1: Configuring Pro Tools to send MTC
MTC (MIDI Time Code) Overview
MTC is a timing protocol that sends SMPTE timecode over MIDI connections, allowing multiple devices and software to synchronize. It transmits quarter-frame messages that reconstruct full timecode positions.
Creating an IAC Device (Mac)
IAC (Inter-Application Communication) creates virtual MIDI ports for routing between applications:
- Open Audio MIDI Setup
- Applications > Utilities > Audio MIDI Setup
- Window menu > Show MIDI Studio
- Enable IAC Driver
- Double-click the IAC Driver icon
- Check "Device is online"
- Create Ports
- Click the "+" button to add ports
- Name them clearly (e.g., "MTC to Pro Tools", "MTC from Pro Tools")
- Create separate ports for each direction to avoid feedback
- Apply Settings
- Click "Apply" to save changes
Pro Tools as MTC Host (Master)
When Pro Tools generates MTC for other devices/software to follow:
Setup:
- Open Session
- Setup Setup menu > Session
- Set your desired frame rate (24, 25, 29.97, 30 fps)
- Configure MIDI Beat Clock
- Setup > MIDI > MIDI Beat Clock
- Enable "MTC Generator Port"
- Select your MIDI output device/IAC port
- Check "Generate MTC"
- Synchronization Settings
- Setup > Peripherals > Synchronization
- MTC Generator Port: Select your output
- Frame Rate: Match your session settings
Operation:
- MTC transmits automatically during playback
- Stop/start sends position updates
- Scrubbing sends continuous position data
- Loop playback maintains sync
Pro Tools as MTC Receiver (Follower)
When Pro Tools follows MTC from another source:
Setup:
- Configure Synchronization
- Setup > Peripherals > Synchronization
- Sync Mode: "MTC"
- MTC Reader Port: Select your MIDI input/IAC port
- Frame Rate: Match the incoming MTC
- Session Setup
- Ensure session frame rate matches MTC source
- Setup > Session > Frame Rate
- Enable Online Mode
- Transport window: Click "Online" button
- Or use keyboard shortcut: Command+J (Mac) / Ctrl+J (PC)
Operation
- Pro Tools waits for incoming MTC when Online
- Playback follows external transport
- Position updates when MTC jumps
- Maintains frame-accurate sync
Important Considerations
Frame Rate Matching
- Critical: All devices must use identical frame rates
- Mismatches cause drift and sync loss
- Common rates: 24, 25, 29.97 DF/NDF, 30
Offset Management
- Set MTC offsets if devices need different start times
- Setup > Peripherals > Machine Control
- Adjust "MTC Offset" in frames
Troubleshooting Tips
- No Sync/Communication
- Verify MIDI connections and IAC online status
- Check frame rate matching
- Confirm MTC generation/reception enabled
- Monitor MIDI data with MIDI Monitor app
- Drift or Instability
- Ensure consistent frame rates
- Check for MIDI feedback loops
- Use dedicated MIDI interfaces for critical applications
- Avoid Wi-Fi MIDI for MTC
- Latency Issues
- MTC has inherent latency (1-2 frames typical)
- Use hardware sync for tighter timing
- Adjust MTC offset to compensate
Best Practices
-
Use Dedicated MIDI Ports
- Separate MTC from other MIDI data
- Avoid sharing ports with notes/controllers
-
Test Before Critical Sessions
- Verify sync across full timeline
- Test all transport functions
- Check behavior during loops/punches
-
Document your Setup
- Note frame rates and offsets
- Label MIDI connections clearly
- Save sync presets when possible
-
Consider Alternatives
- HUI protocol for tighter DAW integration
- Satellite Link for multiple Pro Tools systems
Appendix 2: Configuring Pro Tools to send LTC
LTC (Longitudinal Time Code) Overview
LTC is a timing protocol that sends SMPTE timecode over an audio track, allowing multiple devices and software to synchronize. Unlike MTC, which uses MIDI, LTC encodes timecode data into an audio signal, with a specific tone representing a “1” bit and a different tone representing a “0” bit. A full timecode position is reconstructed by decoding a series of these bits.
Pro Tools as LTC Host (Master)
When Pro Tools generates LTC other devices/software to follow:
Setup:
-
Drop your timecode into a Pro Tools audio track.
Ensure that your timecode has the same sample rate and frame rate you have configured in Source-Connect. -
Add Source-Nexus as an insert on the audio track.
In the INSERTS section, go to plug-in > Other > Source-Nexus I/O (mono) - Once you are ready on Source-Connect, press the play button to play your timecode.
Operation:
- LTC transmits the timecode when you click the play button and feeds it into Source-Connect via Source-Connect.
Important Considerations
Frame Rate Matching
- Critical: All devices must use identical frame rates
- Mismatches cause drift and sync loss
- Common rates: 24, 25, 29.97 DF/NDF, 30
Offset Management
- Set LTC offsets if devices need different start times. You do so from the Session Settings.
- Go to Setup > Session
- Adjust "Session Time Start" in “Format” section.
- Adjust any additional offset in “Sync Setup & Timecode offsets”.
Troubleshooting Tips
-
No Sync/Communication
- Check frame rate matching
- Confirm that you have the correct Source-Nexus channel in both Pro Tools and Source-Connect.
- Confirm that the frame rate has been correctly configured on Source-Connect.
-
Drift or Instability
- Ensure consistent frame rates Check for audio feedback loops
-
Latency Issues
- Adjust LTC offset to compensate
Best Practices
- Test Before Critical Sessions
- Verify sync across full timeline
- Check behavior during loops/punches
- Document your Setup
- Note frame rates and offsets
- Save sync presets when possible
- Consider Alternatives
- HUI protocol for tighter DAW integration
- Satellite Link for multiple Pro Tools systems
Table of Contents