Guía completa de Q Manager para Source-Connect Pro/Pro X 3.9
Esta sección proporciona una descripción general completa sobre el uso Source-Connect desde la versión 3.2 y posteriores con Restaurar y Reemplazar. La versión 2 Q Manager proporciona operaciones de restauración y reemplazo más fáciles y rápidas, además de varias opciones de respaldo adicionales.
La guía de ayuda en línea Q Manager también está disponible directamente desde el panel de configuración Q Manager y lo llevará a la guía completa Q Manager en línea. Puede consultar esta guía siempre que sea necesario para obtener ayuda rápida.
Si tiene alguna pregunta sobre cómo trabajar con Q Manager y Auto-Restore y AutoReplace, comuníquese con Soporte.
¿Qué es el Q Manager?
Con la grabación tradicional de larga distancia, ya sea con Source-Connect , ISDN o cualquier transmisión basada en red, la señal de envío está sujeta a varios problemas que pueden provocar la pérdida de paquetes y, por lo tanto, "fallos" en el audio grabado. Anteriormente, el único método para garantizar una grabación completamente completa era asegurarse de que su socio de conexión también estuviera grabando localmente, de modo que pudiera transferir este audio después de su sesión y reemplazarlo manualmente en su edición. Source-Connect with Q es el único método automatizado disponible para garantizar que sus grabaciones sean perfectas en todo momento, con nuestra funcionalidad de restauración y reemplazo automáticos.
¿Qué son Auto-Restore y Auto-Replace?
Auto-Restore
Primero, una descripción general de cómo se transfiere y graba el audio a través de líneas de transmisión basadas en paquetes.
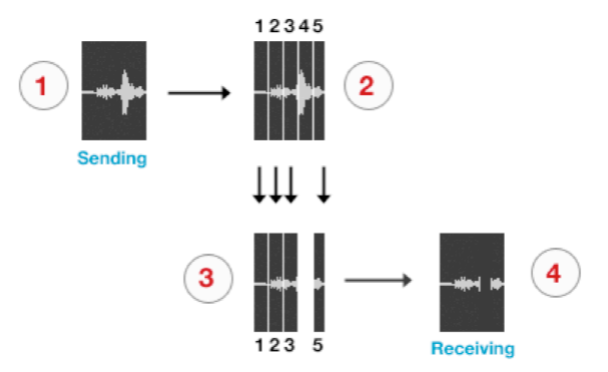
- La señal de audio se envía a través de Source-Connect y se divide en paquetes.
- Estos paquetes se envían secuencialmente a su socio conectado a través de Internet.
- Si se produce un error de red, es posible que un paquete no llegue a tiempo.
- Si esto ocurre, escuchará un pequeño fallo en la señal de audio recibida.
- El archivo de audio se escanea cuando se completa la grabación.
- Si se detecta algún paquete faltante, se solicita a su socio conectado, quien lo almacenó durante la conexión.
- Su archivo se restaura y ahora está disponible para una reproducción perfecta.
Source-Connect tiene modos de corrección de errores integrados para intentar resolver estos problemas de paquetes perdidos en tiempo real; sin embargo, bajo ciertas circunstancias, es posible que un paquete no se recupere a tiempo para recuperar la señal antes de grabarse.
La restauración automática resuelve este problema trabajando en segundo plano en tiempo no real y restaurando los archivos de audio grabados.
Auto-Replace
El reemplazo automático funciona de manera similar, excepto que los paquetes que se solicitan a su socio conectado son los datos PCM originales que se enviaron al complemento Source-Connect , y en lugar de solicitar solo aquellos paquetes que no llegaron a tiempo. , se solicitan todos los paquetes. Luego se realiza una sustitución completa del audio AAC decodificado por audio PCM de resolución completa. Una distinción importante entre Reemplazar y Restaurar es que las operaciones de Reemplazar tardarán más en transferirse debido a que PCM son datos sin comprimir. Generalmente le recomendamos que active el proceso de Reemplazo una vez que se complete su sesión.
Guía de inicio ultrarrápida para Q Manager
Esta sección se proporciona para los usos de casos más comunes.
- Inicie Source-Connect Pro y conéctese usando 44,1 khz o 48 khz, con una tasa de bits de 64 kbps mono o superior.
- El administrador Q iniciará sesión automáticamente. Comprueba que tu servicio FTP esté activo. Si recibe un error de FTP, consulte la sección de errores de FTP de este manual o comuníquese con Soporte.
- Configure su carpeta de archivos de audio/carpeta de sesión en el panel de configuración Q Manager . Esta es la carpeta donde grabará sus archivos reales.
- Asegúrese de tener marcada Restaurar y Reemplazar en el panel de configuración Source-Connect .
- Conéctese con Source-Connect a su socio de conexión y verifique que tenga un ícono Q en el estado de recepción, junto a la luz de recepción parpadeante.
- Grabe un archivo de prueba; debería aparecer inmediatamente en sus Solicitudes Q. Si dice Restaurado, seleccione y elija Reemplazar ahora en el menú de opciones.
Si progresa y vuelve diciendo Reemplazado, ¡estás listo!
Ciclo de vida de una grabación en Q Manager
Esta sección es una guía paso a paso para usar Source-Connect Pro para la restauración y el reemplazo automáticos. Muestra cómo funciona Q Manager describiendo el 'ciclo de vida' de un archivo grabado en Pro Tools y el posterior proceso de restauración y reemplazo final.
1. Habilite Restaurar y Reemplazar en la configuración de Source-Connect Pro
Para solicitar Restaurar datos, debe tener marcada la casilla de verificación 'Restauración Q' en el panel de configuración Source-Connect Pro . Para solicitar Reemplazar datos debes tener marcada la casilla 'Q Reemplazar'. Puede usar cualquiera de los dos si lo necesita, o desactivar ambos si solo está monitoreando la conexión. 
2. Solicite una sesión Source-Connect
Cuando solicita una sesión Source-Connect con Restaurar o Reemplazar marcado, a su socio de conexión se le mostrará un cuadro de diálogo indicando que desea recibir Restaurar o Reemplazar datos. 
3. Listo para grabar
Si su socio acepta, ahora ha establecido una sesión Source-Connect con Restaurar y Reemplazar habilitado. Ahora debería ver un ícono Q a la izquierda del medidor de recepción, lo que indica que puede recibir datos de Restaurar y Reemplazar. Si su socio de conexión también tiene Source-Connect Pro y tiene marcadas las casillas Restaurar/Reemplazar, también verá una Q en su medidor de envío. 
4. Grabar un archivo de audio
En este ejemplo, estamos enviando una señal sinusoidal a través del complemento Generador de señales para que se grabe y, a efectos de demostración, estamos provocando una cantidad significativa de paquetes descartados. Puedes ver en la forma de onda en la línea de tiempo cuando la grabación se degrada significativamente: 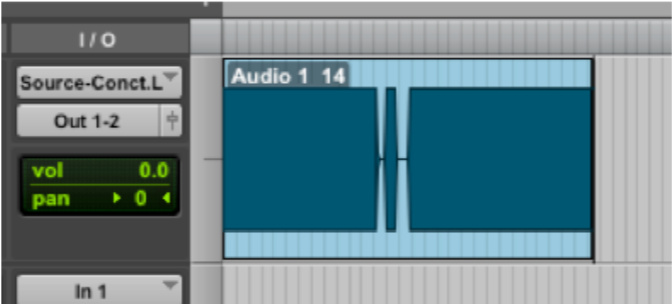
IMPORTANTE : Como se indicó anteriormente en este documento, es necesario asegurarse de que su señal grabada pase directamente a su pista de grabación, sin cambios de volumen u otros procesos de complementos entre Source-Connect y la pista de grabación. Esto garantiza que Q Manager podrá restaurar y reemplazar completamente sus grabaciones.
5. Restaurar el archivo de audio en segundo plano.
Una vez que deje de grabar, Q Manager iniciará el proceso de restauración. Puede continuar grabando varios archivos ya que el proceso de restauración no interrumpe su sesión de ninguna manera. Si tiene habilitada la opción 'Enviar notificaciones de estado a Source-Connect IM' en la configuración avanzada de Q Manager , verá el resultado del proceso en su ventana de Mensaje instantáneo Source-Connect a medida que se procesan los archivos: 
6. Echando un vistazo al archivo restaurado.
Dado que hemos grabado una señal sinusoidal, es sencillo ver visualmente cómo funciona el proceso de restauración. Seleccione el nombre del archivo en la papelera Pro Tools y elija 'Recalcular descripciones generales de formas de onda'. Ahora podemos comparar visualmente los archivos antes y después del proceso de restauración:
Antes y después del proceso de restauración: 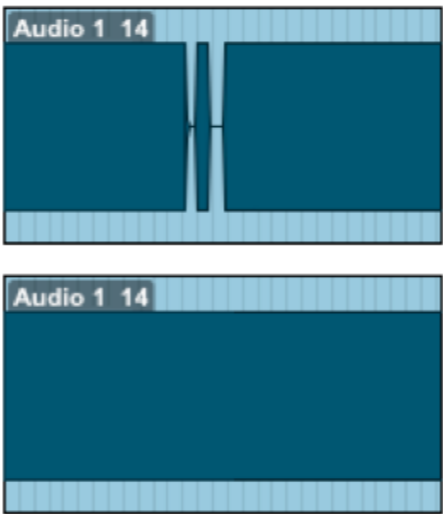
Ya podremos ver (y escuchar en reproducción) que tenemos un archivo de audio completamente restaurado y con una reproducción perfecta.
7. Reemplazo del archivo con datos PCM de resolución completa
No es necesario restaurar sus archivos de audio si solo necesita el proceso de reemplazo. Sin embargo, si sus archivos se están restaurando actualmente, deberá esperar hasta que se complete este proceso antes de activar el proceso de reemplazo. Para activar el proceso de reemplazo hay dos opciones: manualmente por archivo o todos los archivos disponibles a la vez.
Reemplazar ahora
Para procesar archivos individualmente, resalte ese archivo en el panel Solicitudes Q y seleccione 'Reemplazar ahora': 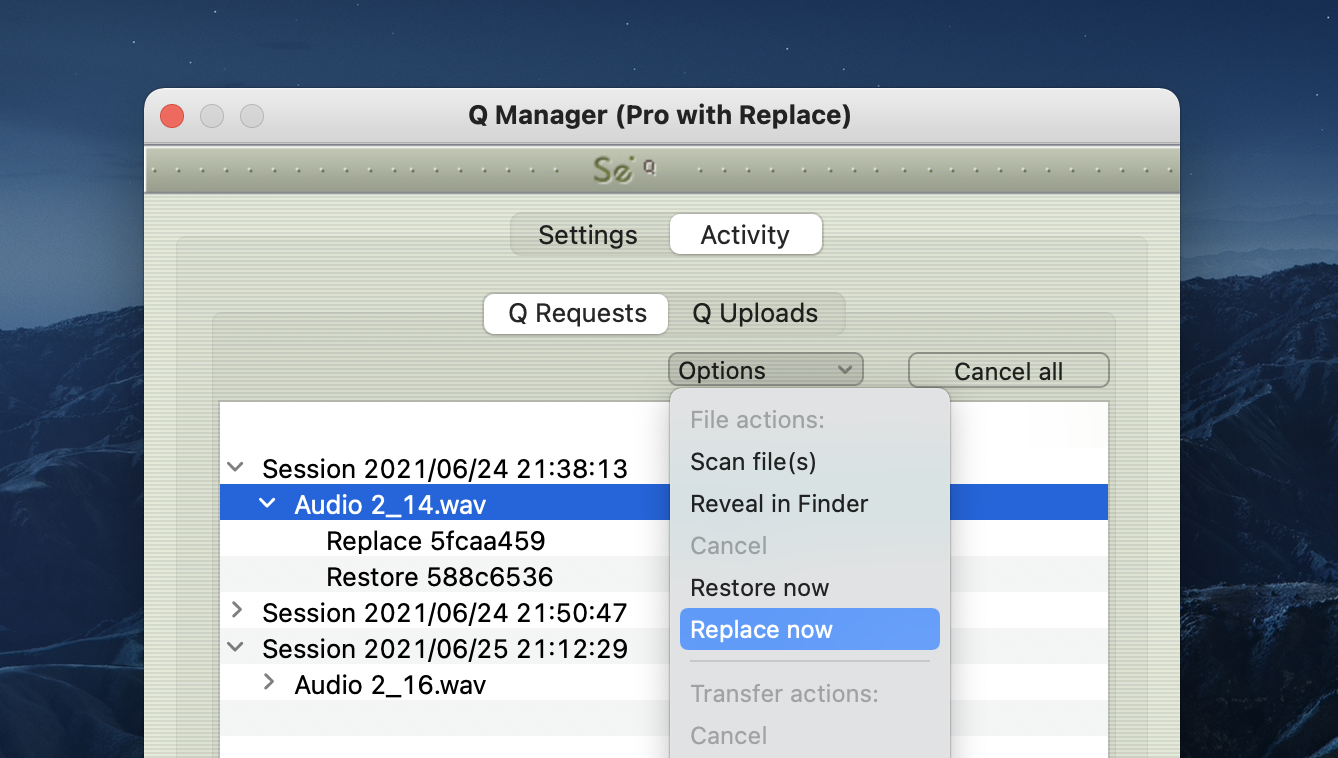
Iniciar proceso de reemplazo
Para procesar todos los archivos disponibles en el menú Solicitudes Q, seleccione 'Iniciar proceso de reemplazo' en el menú desplegable de la barra de menú Q: 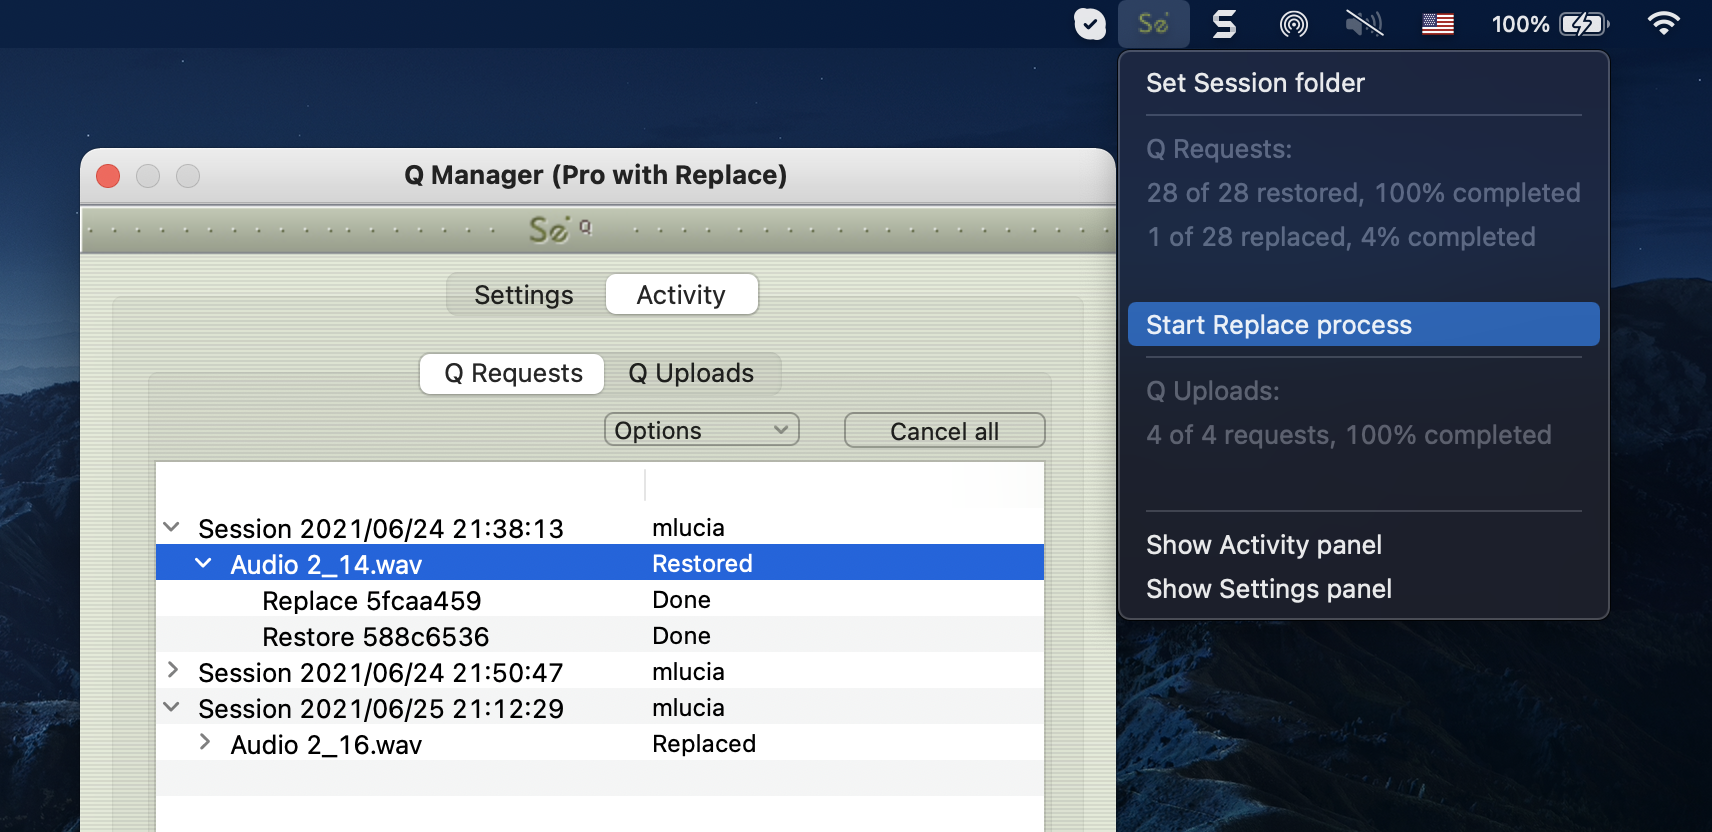
Verá un mensaje instantáneo (si las notificaciones de mensajería instantánea están habilitadas) para informarle que el proceso de reemplazo se completó y que el estado del archivo en el panel de Solicitudes Q será "Reemplazado". Dependiendo del tamaño de sus archivos y del ancho de banda disponible entre usted y su socio de conexión, este proceso llevará algún tiempo y más que el proceso de restauración. Haga clic en la flecha al lado del nombre del archivo para mostrar el progreso actual. Si el archivo es muy grande verás un porcentaje del progreso. 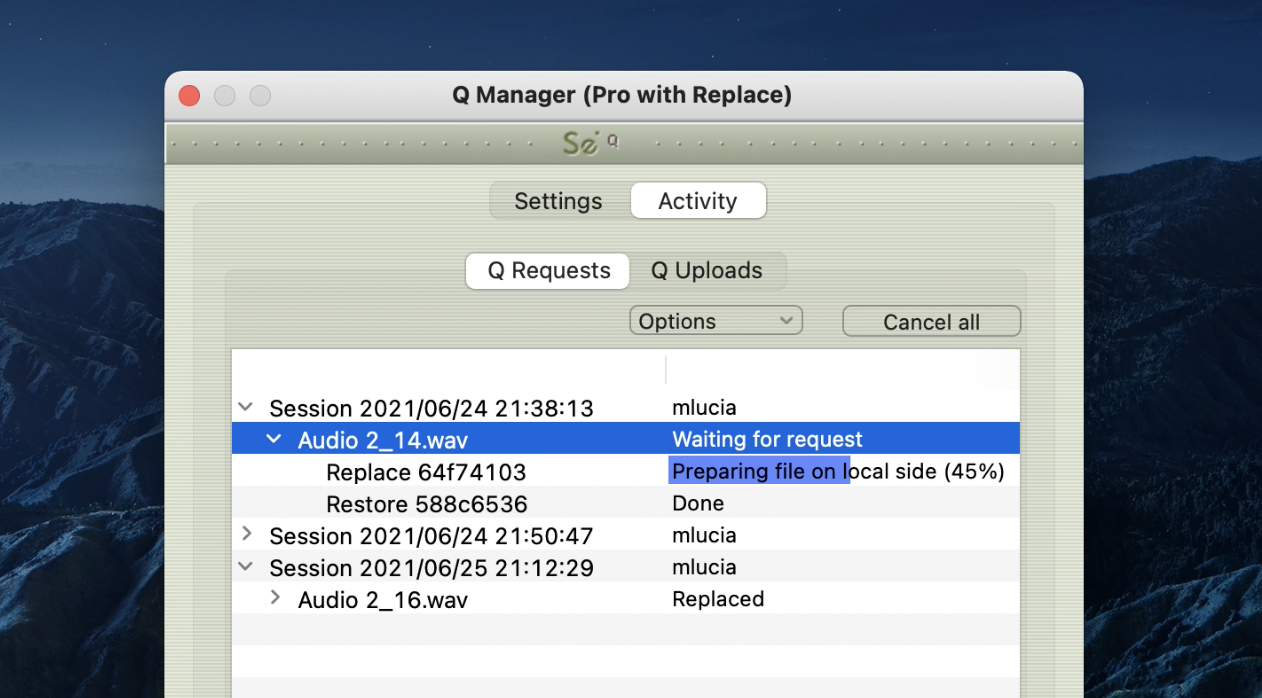
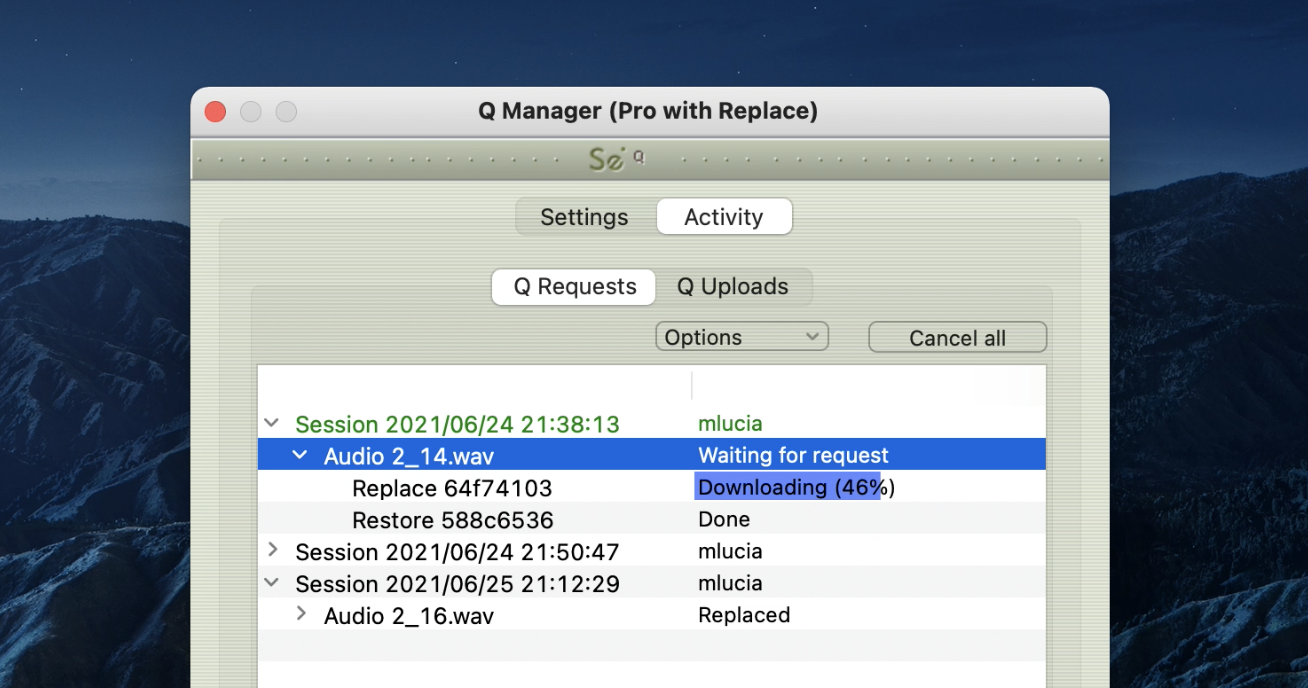
Una vez que se completa el proceso, ahora tiene los archivos PCM de resolución completa en la ventana de edición de su DAW . 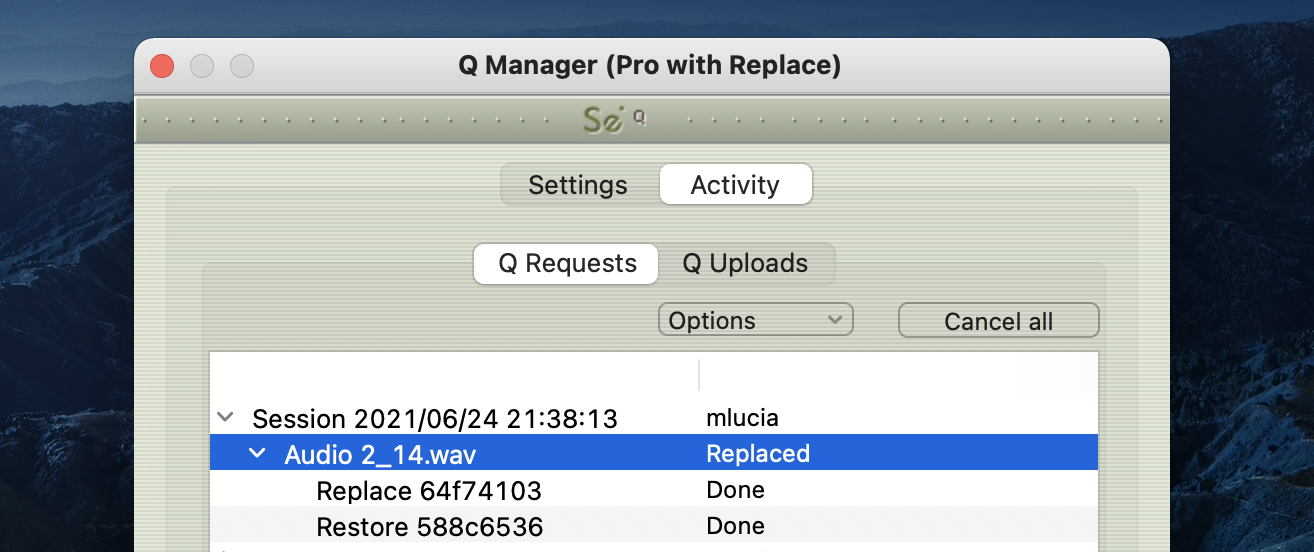
8. Detectar si sus archivos de audio están listos para restaurar y reemplazar
Es posible que debido al enrutamiento de E/S de audio, la señal Q no se detecte en el audio grabado Source-Connect , aunque se muestre el ícono Q. A menudo, esto se debe a que la E/S a través de la cual envía audio también se utiliza con otras fuentes de entrada. Para verificar si este es el caso, o si ha configurado la carpeta Archivos de audio incorrecta en Q Manager , puede intentar escanear manualmente un archivo. Si el estado del archivo vuelve a ser 'Q no presente', significa que no se registró desde Source-Connect o que el auxiliar que utilizó no era un auxiliar limpio. Recomendamos crear un canal auxiliar nuevo en la configuración de E/S de Pro Tools y probar su grabación nuevamente.
Para escanear manualmente un archivo, elija Escanear archivo(s) en el menú de opciones de Solicitudes y luego seleccione un archivo que se haya grabado a través de la conexión Source-Connect . 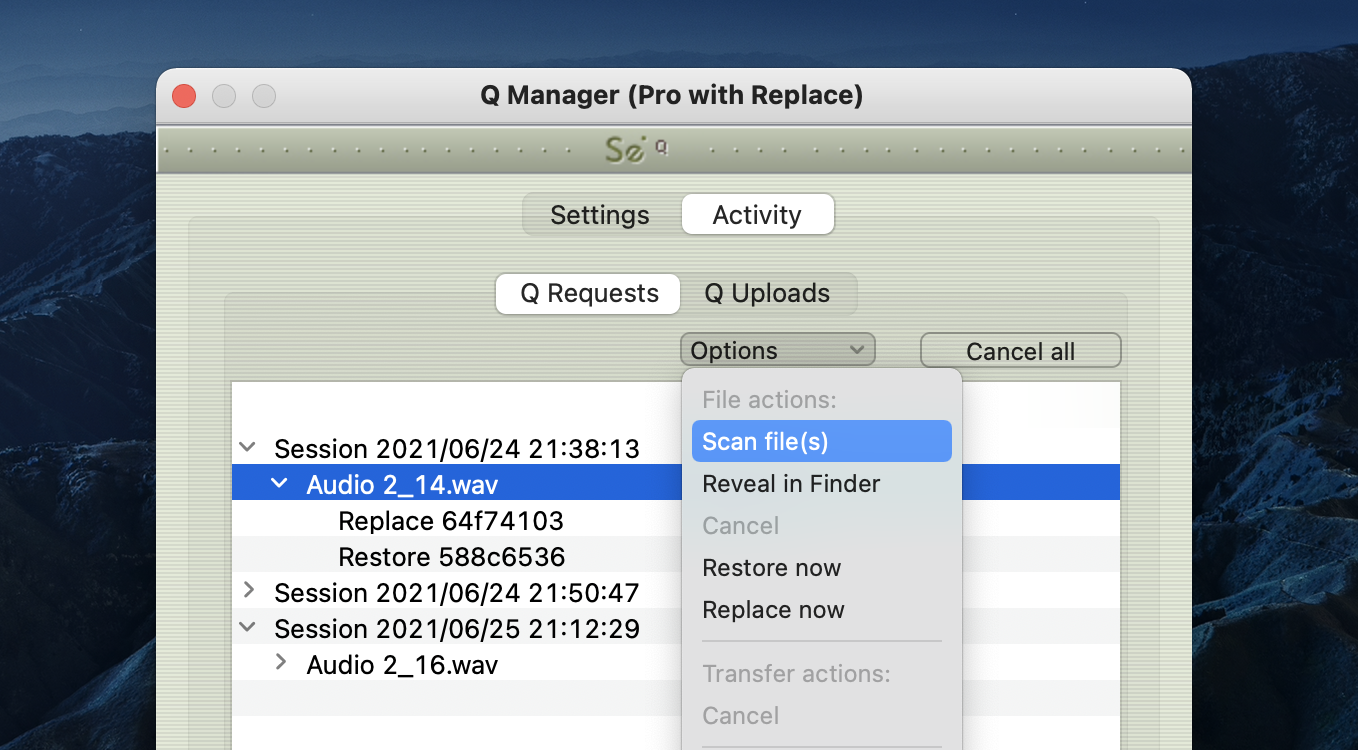
Cómo iniciar y configurar Q Manager para grabar
Cuando inicie Source-Connect , también se iniciará Q Manager . De forma predeterminada, Q Manager iniciará sesión con el nombre de usuario y la contraseña Source-Connect que se ingresan en Source-Connect . Si cierra sesión e inicia sesión en Source-Connect con otra cuenta, Q Manager también iniciará sesión en esa nueva cuenta.
Configurar su directorio de registro de sesión
Generalmente, el único paso que deberá seguir es configurar el directorio de su carpeta de sesión. Esta es la carpeta real donde grabas tus archivos de audio, por ejemplo, la carpeta 'Archivos de audio' en Pro Tools y Logic . 
Modo de inicio de sesión
Q Manager está diseñado para iniciar sesión automáticamente en su cuenta Source-Connect con la que está trabajando actualmente para facilitar su uso. Sin embargo, en algunas situaciones es posible que necesite modificar su configuración de inicio de sesión.
Modo de inicio de sesión: Automático
En el modo automático, Q Manager iniciará sesión en el Source-Connect utilizado actualmente. Si cierra sesión en Source-Connect e inicia sesión en otra cuenta, Q Manager también iniciará sesión en esta nueva cuenta. Cuando utilice el modo Automático, tenga cuidado de no utilizar una cuenta que también pueda usarse en otra computadora, si tiene varias habitaciones. Es importante que la misma cuenta Q Manager esté iniciada en la misma computadora en la que se registró la sesión original Source-Connect , debido al almacenamiento de datos local.

Modo de inicio de sesión: Manual
Puede configurar una cuenta permanente para que la utilice Q Manager . Cuando se inicie, solo iniciará sesión en esta cuenta y no cambiará cuando Source-Connect pueda usar una cuenta diferente. Esto es útil, por ejemplo, en un estudio grande donde no tienes una cuenta fija por computadora. Puede utilizar tantas cuentas Q Manager como cuentas multiconexión tenga (consulte su perfil en el sitio web Source-Connect o solicite soporte). 
El Q Manager intentará iniciar sesión en su Source-Connect cuando haga clic en el botón Guardar.
Modo de inicio de sesión: VPN
Modo Al utilizar el modo VPN en Source-Connect , también debe tener Q Manager en modo VPN, ya que utiliza un protocolo diferente para comunicarse con su socio de conexión remota Source-Connect . Si está en el modo de inicio de sesión automático, Q Manager cambiará automáticamente al modo VPN si está en el modo VPN en Source-Connect . Si está configurado en el modo Manual, deberá cambiar manualmente al modo VPN.
Configuración de FTP
El Q Manager solo transfiere audio y datos Q a través del protocolo FTP. Esto requiere que tenga una cuenta FTP activa para solicitar datos Q a su socio de conexión. La cuenta FTP que utilice no debe ser una cuenta altamente segura: para transmitir datos entre sí, esta información de cuenta se comunicará a la otra parte. Mientras SourceConnect y Q Manager hacen esto silenciosamente, es posible que la otra parte "escuche" y detecte su información de inicio de sesión FTP.
Debido a que Q Manager comunica su inicio de sesión FTP, solo el lado que solicita los datos transmitirá la información de inicio de sesión FTP que se utilizará. No es importante que la otra parte tenga una cuenta FTP válida. Lo mismo ocurre con Source-Connect Standard : debido a que Standard no puede solicitar Restaurar o Reemplazar datos, no tiene ninguna información de inicio de sesión FTP almacenada para usar. Por lo tanto, si usted es la parte que solicita Restaurar y Reemplazar, su cuenta FTP se utilizará para esas transferencias de datos.
Configuración de su cuenta FTP
Puede configurar su cuenta FTP manualmente a través de la configuración de inicio de sesión Q Manager . 
Probando su cuenta FTP
Q Manager validará su cuenta FTP enviando un archivo de prueba cada vez que inicie sesión o cambie su configuración de inicio de sesión. El archivo de prueba deberá escribirse y descargarse desde su sitio FTP. Esto significa que su cuenta FTP tiene permisos de lectura y escritura. También puede configurar una ruta FTP específica si es necesario.
Uso de Auto-Restore y Auto-Replace: detalles
- Para habilitar la grabación de restauración automática y reemplazo automático por su parte, asegúrese de que "restaurar" y "reemplazar" estén marcados en el panel de Configuración. Si su contacto remoto desea grabar con Restauración/Reemplazo automático habilitado, también debe habilitar esta configuración. No es necesario que ambos lados habiliten la restauración, solo el lado que estará grabando. Además, no es necesario habilitar Restaurar si solo desea Reemplazar.

- Conéctese a su contacto remoto a través de Source-Connect . Si la restauración y/o reemplazo automáticos está habilitada, verá un ícono 'Q' en su medidor receptor, lo que significa que puede registrar y recibir datos de restauración y reemplazo automáticos.
Nota : no se admite la conversión de frecuencia de muestreo ni la conversión de estéreo a mono. Recibirá un mensaje y su Q tendrá una barra roja si la frecuencia de muestreo y el número de canales no son los mismos en ambos lados.
- Graba la señal original recibida de Source-Connect .
IMPORTANTE : Si pasa la señal Source-Connect a través de filtros, reverberaciones o cualquier otro tipo de procesamiento de señal, incluidos cambios en el volumen, el archivo NO será restaurado ni reemplazado. Le recomendamos que utilice bussing para enviar la señal desde el complemento Source-Connect o Source-Connect Link a su pista de grabación sin modificaciones. Source-Connect Pro es totalmente compatible con grabaciones mono y estéreo. - Si se perdió algún paquete durante su grabación, Q Manager reparará su archivo grabado en segundo plano y enviará un mensaje instantáneo a la ventana de mensajería instantánea de SourceConnect con el estado del proceso del archivo.
Puede desactivar la opción Mensaje instantáneo en la configuración avanzada de Q Manager .
Configurando su carpeta Q Session
Su carpeta de sesión es muy importante: debe seleccionar la carpeta en la que va a grabar o Q Manager no podrá detectar los archivos que se procesarán. Elija la carpeta Archivos de audio de su sesión DAW . Puede hacer clic en el botón Elegir y buscar la carpeta Archivos de audio en el cuadro de diálogo que aparece, o puede arrastrar la carpeta desde la ventana del Finder. 
Activar el reemplazo automático
Si la opción 'reemplazar' estaba habilitada en Source-Connect , podrá reemplazar fácilmente el audio grabado codificado y decodificado con el audio PCM original de su contacto remoto. Hay dos formas de reemplazar archivos de audio grabados: por archivo individualmente o todos los archivos disponibles a la vez.
Reemplazo automático manual
Para activar el proceso de reemplazo automático para un solo archivo grabado, simplemente seleccione el archivo de audio que desea reemplazar en el menú Solicitudes Q del panel Actividad y seleccione 'Reemplazar ahora' en el menú desplegable. El tiempo necesario para reemplazar el archivo con el PCM original depende del tamaño del archivo y del ancho de banda disponible. Le recomendamos que espere hasta que se complete su sesión antes de activar el proceso de Reemplazo automático, ya que el proceso será mucho más rápido y utilizará todo su ancho de banda sin interrumpir su sesión Source-Connect . 
Reemplazar todo automáticamente
Para reemplazar automáticamente todos los archivos disponibles a la vez, seleccione "Iniciar proceso de reemplazo" en el menú desplegable de la barra de menú. Se procesarán todos los archivos grabados disponibles y, si su contacto remoto no ha pausado las transferencias, no ha eliminado esa sesión de Q Uploads en particular ni ha apagado la máquina o Source-Connect Q Manager , puede activar el proceso de reemplazo automático en cualquier momento después. su sesión, ya sea una hora más tarde o una semana. 
Descripción general completa de la interfaz de Q Manager
Esta sección es una descripción completa de todas las opciones disponibles en el menú "Configuración" de Q Manager y lo que puede hacer con cada configuración.
Panel de configuración

1. Estado e inicio de sesión
Elija qué modo de inicio de sesión utilizar. Si sus datos de inicio de sesión son correctos, verá que Q Manager inicia sesión exitosamente con Estado: En línea. Q Manager tardará entre 5 y 30 segundos en iniciar sesión, dependiendo de la disponibilidad de su servicio FTP.
2. Carpeta de sesión
Su carpeta de sesión es muy importante: debe seleccionar la carpeta en la que va a grabar o Q Manager no podrá detectar los archivos que se procesarán. Elija la carpeta Archivos de audio de su sesión Pro Tools . Puede hacer clic en el botón Elegir y buscar la carpeta Archivos de audio en el cuadro de diálogo que aparece, o puede arrastrar la carpeta desde la ventana del Finder.
Una vez que haya elegido su carpeta de sesión, Q Manager procesará automáticamente cualquier archivo recién grabado. Si tiene archivos existentes que le gustaría procesar, presione Volver a escanear todo y consulte su panel Actividad – Solicitudes para obtener más detalles.
Esta opción es útil cuando tiene archivos existentes en su carpeta Archivos de audio que requieren procesamiento. Por ejemplo, es posible que no haya restaurado o reemplazado sus archivos grabados en Source-Connect , o que haya habido un error que requirió un reinicio, por ejemplo.
Volver a escanear todos los archivos también se puede utilizar para recargar una sesión que contiene varios archivos cuyo procesamiento se ha retrasado por algún motivo; por ejemplo, está utilizando el modo FTP y desea reemplazar todos los archivos al final del día en un lote.
3. Eliminar todos los datos de la sesión de carga
Cada vez que establezca una sesión en la que su socio de conexión haya seleccionado Restaurar y/o Reemplazar, Source-Connect comenzará inmediatamente a almacenar todos los datos de la sesión en formato comprimido y/o PCM. Esto puede llenar rápidamente un disco duro: a una velocidad de 56 MB por hora para Restaurar y 700 MB por hora para Reemplazar.
Q Manager le ayuda a realizar un seguimiento de la disponibilidad de su disco duro informándole cuando tiene menos del 20% disponible.
Puede optar por eliminar estos datos de carga almacenados en cualquier momento y, una vez que haya eliminado estos datos, su socio de conexión no podrá solicitar ningún proceso de restauración o reemplazo. Asegúrese de que su socio de conexión haya recibido todo lo que necesita antes de eliminar estos datos.
Si elige eliminar los datos de su sesión mientras está conectado, su sesión actual no se eliminará. Esto puede resultar útil si descubre que se está quedando sin espacio en el disco y no puede restablecer la sesión.
4. Avanzado
Hay configuraciones adicionales disponibles en Avanzado: 
carpeta de datos q
La ubicación predeterminada para la carpeta de datos Q donde se guardan todos los datos almacenados cargados es:
/Biblioteca/Soporte de aplicaciones/Elementos-fuente/Datos Q/
Puede optar por almacenar estos datos en cualquier ubicación; sin embargo, le recomendamos encarecidamente que lo configure una vez y lo deje. Si Q Manager intenta enviar datos de Restaurar o Reemplazar a su socio de conexión y la ubicación de esta carpeta ha sido cambiada, el proceso fallará.
Enviar notificaciones de estado a Source-Connect IM
Para cada archivo grabado disponible en su carpeta Archivos de audio, el estado del archivo se puede enviar como un mensaje IM a su panel de mensajería instantánea Source-Connect . Esto puede resultar útil para controlar rápidamente el estado de sus archivos grabados. Tenga en cuenta que esta función requiere que inicie sesión en Source-Connect con el mismo nombre de usuario que ingresó en Q Manager . Por ejemplo, si ha iniciado sesión como 'nombre de usuario' en Q Manager , no puede iniciar sesión como 'nombre de usuario*b' en Source-Connect o no recibirá los mensajes de mensajería instantánea. Si este es el caso, la próxima vez que inicie sesión como 'nombre de usuario' en Source-Connect se le mostrarán sus mensajes de mensajería instantánea.
Comience con Source-Connect
Si esto está marcado, Q Manager siempre se iniciará automáticamente con Source-Connect . Si no tiene intención de utilizar Q Manager de ninguna manera, por ejemplo, utiliza Source-Connect principalmente para realizar puentes, puede desactivar esta opción.
5. Versión Q Manager
Esto muestra su versión instalada de Q Manager . Source Elements publica actualizaciones periódicamente, por lo que si tiene algún problema, comuníquese con Soporte con esta información.
6. Apagado Q
Presione esto para cerrar Q Manager . También puedes salir a través del ícono en el Dock o usar el menú Archivo. Una vez que se cierra Q Manager , cualquier solicitud que le haga su socio de conexión no se comunicará y recibirá un error de proceso.
Cómo ubicar la carpeta de archivos de audio de su sesión
El Q Manager necesita encontrar la carpeta donde se graban los archivos de audio para su DAW . Esta es la carpeta que configura como “carpeta de sesión” en la aplicación independiente Q Manager :
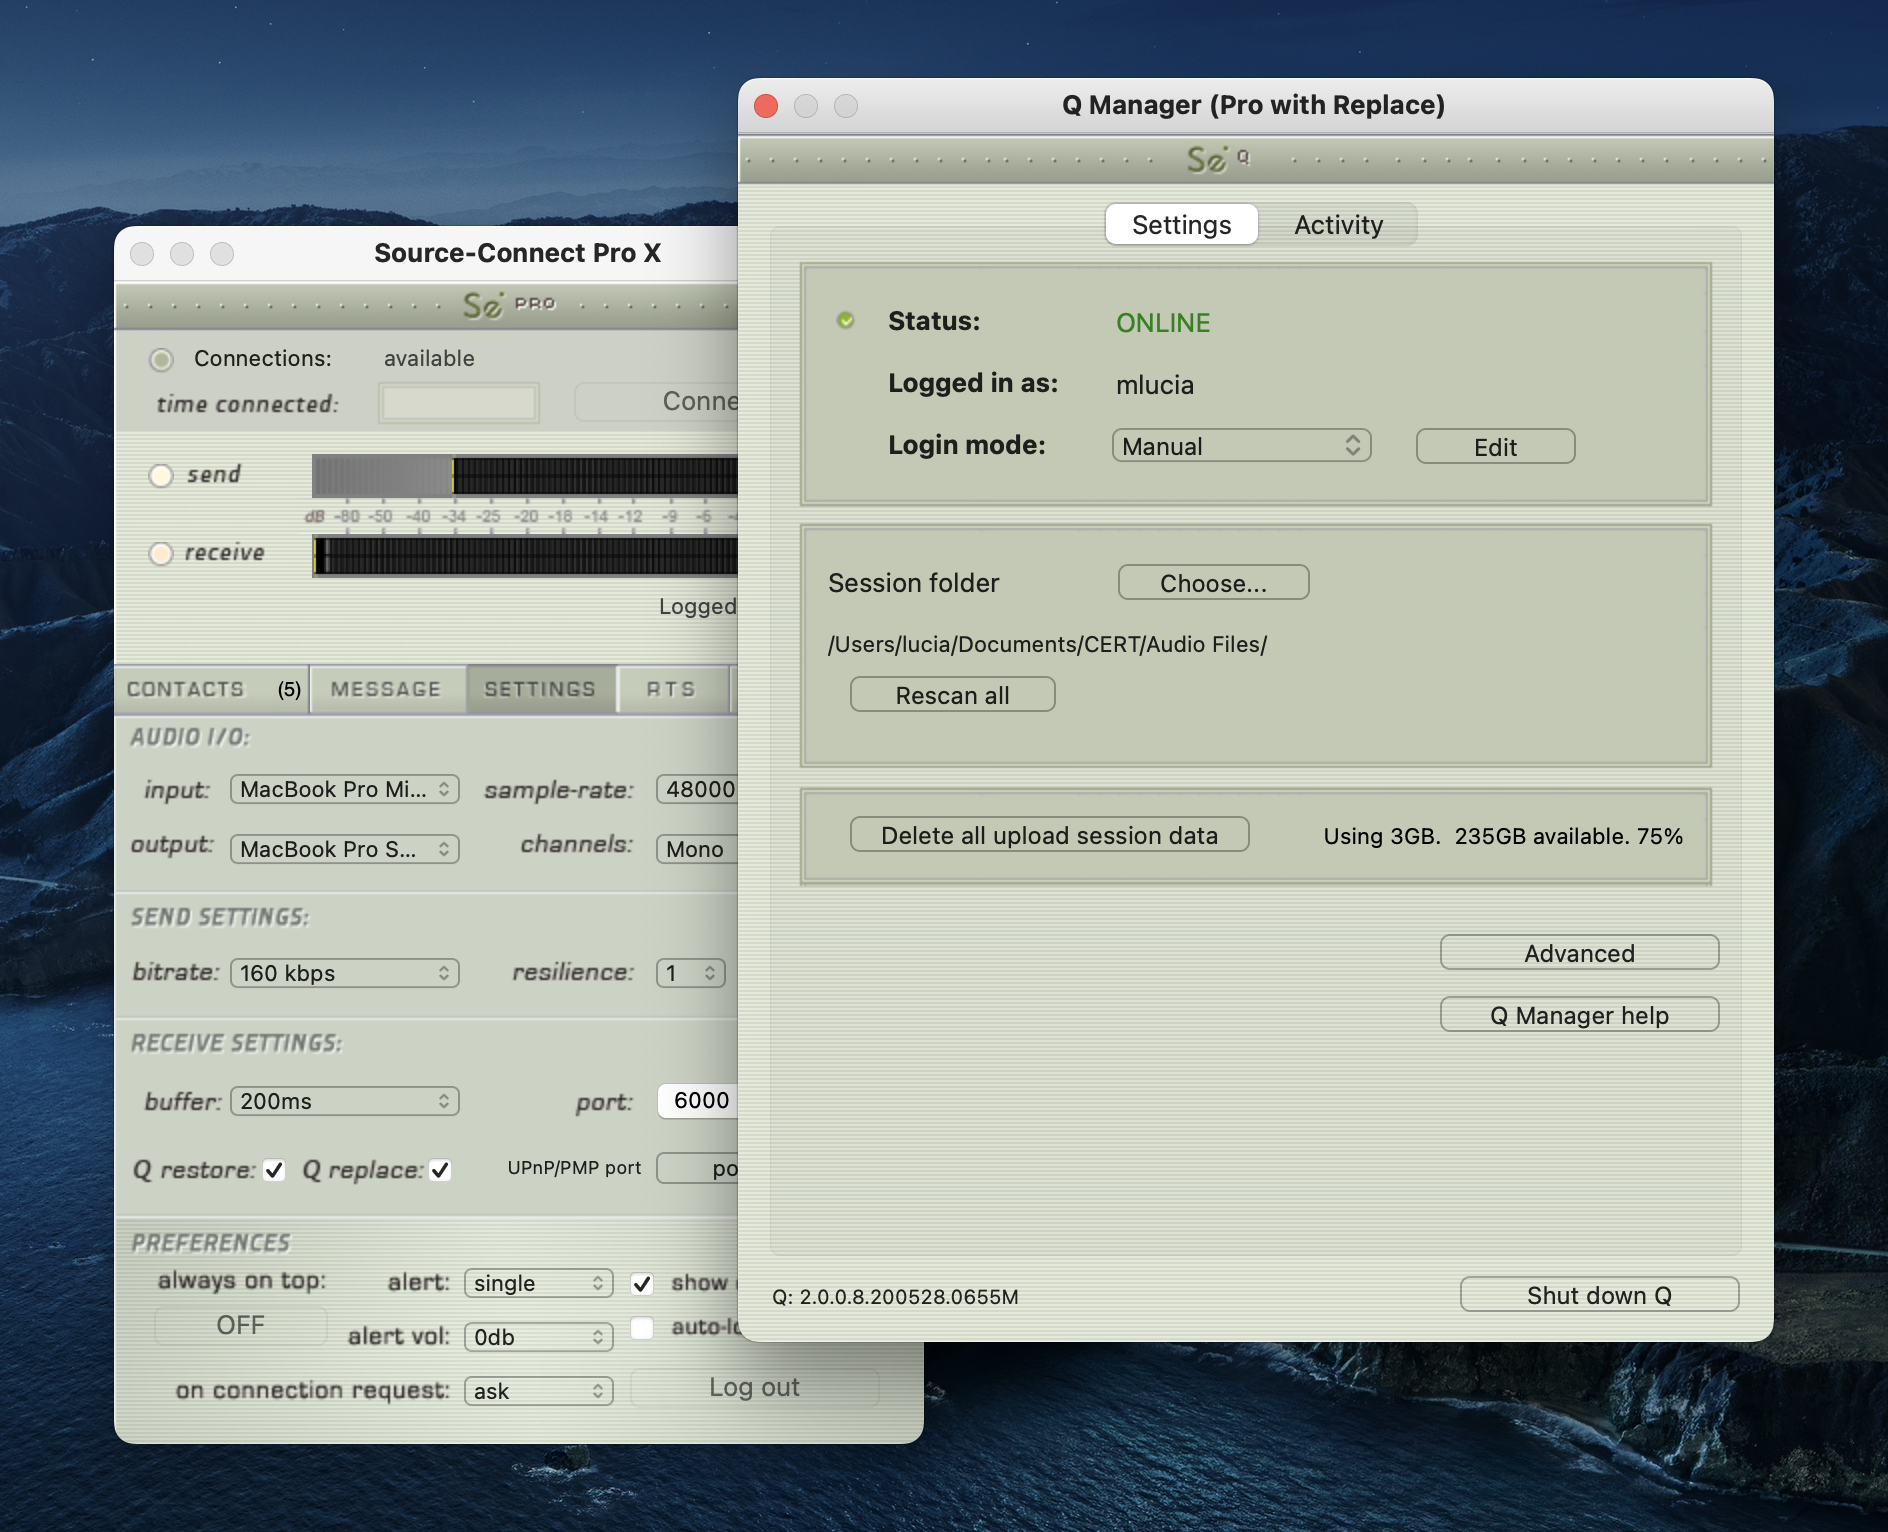
Para Pro Tools , por ejemplo, la carpeta siempre se llama "Archivos de audio" de forma predeterminada. Si utiliza una configuración de carpeta de grabación personalizada, busque la carpeta donde se graban los archivos de audio de la sesión y configúrela en Q Manager . En la captura de pantalla anterior, por ejemplo, hemos creado una sesión "CERT" en Pro Tools y los archivos de audio se encuentran en /Users/lucia/Documents/CERT/Audio Files.
Encontrar su carpeta de archivos de audio en Pro Tools
Tenga en cuenta que, al crear un nuevo proyecto, hay una configuración de "Ubicación" en la parte inferior de la pantalla de nueva sesión, donde puede cambiar la ubicación de sus archivos de audio.
- En Pro Tools , vaya a Configuración > Preferencias.
- Vaya a la pestaña "Operación".
- Consulte la sección "Ubicación de configuración y medios del usuario".
- En la carpeta "Documentación y configuración", verá la ruta donde se guardan los archivos del proyecto.
- Abre una ventana del Finder.
- Navegue hasta la ruta desde el paso 4.
- Haga doble clic en la carpeta de su proyecto actual. Verá la carpeta "Archivos de audio" allí.
Encontrar su carpeta de archivos de audio en Logic Pro
Logic gestiona sus proyectos como paquetes. Por lo tanto, deberá ubicar dónde se guarda el archivo .logicx para la sesión.
- Abre tu sesión Logic .
- Presione "cmd+s".
- Compruebe dónde está guardado el archivo .logicx.
- Abre una ventana del Finder.
- Navegue hasta la ruta desde el paso 3.
- Haga clic derecho en el archivo.
- Seleccione "Mostrar contenido del paquete".
- Vaya a Medios > Archivos de audio.
Encontrar su carpeta de archivos de audio en Cubase / Nuendo
Cada proyecto Cubase o Nuendo tiene una carpeta de Audio separada (que es, de forma predeterminada, donde se guardan los archivos de audio). Puede cambiar o comprobar dónde está la carpeta siguiendo estas instrucciones.
Sin embargo, también puede configurar dónde se graba cada pista individual.
Configuración de su carpeta de archivos de audio en Q Manager
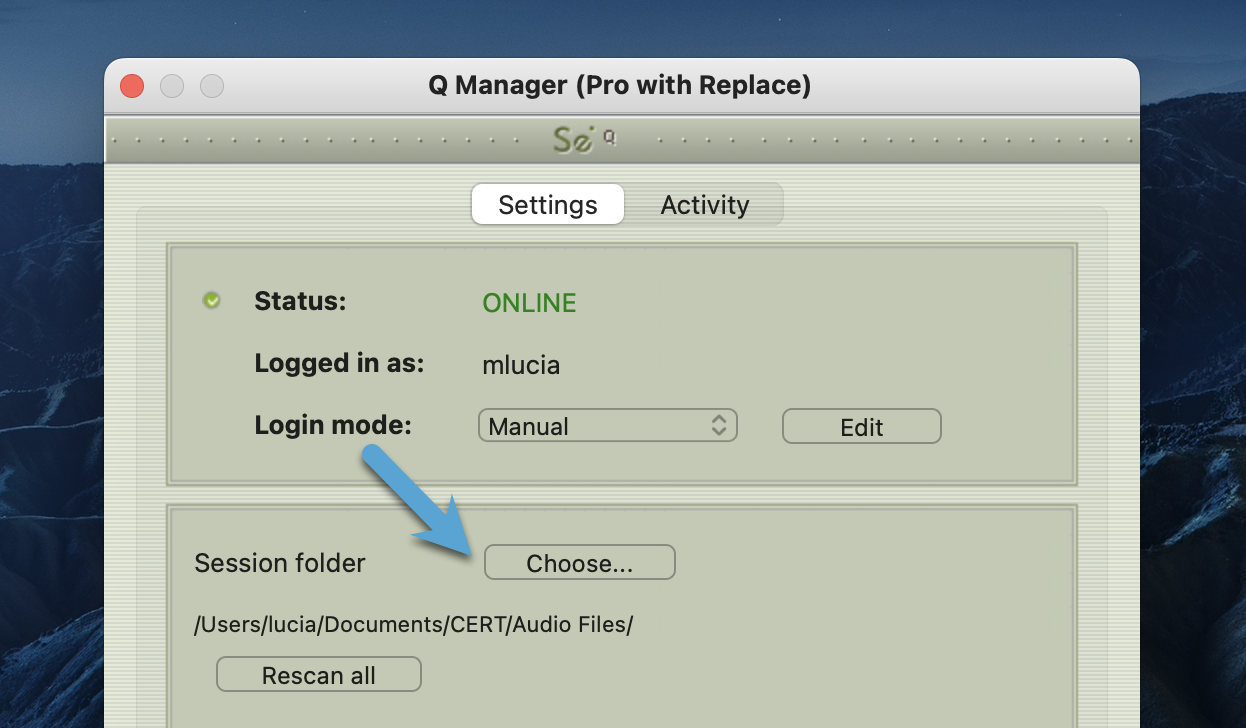
Una vez que esté seguro de la ubicación de la carpeta de audio de su proyecto, abra Q Manager y haga clic en el botón "Elegir" en la sección "Carpeta de sesión":
Cómo configurar la carpeta de archivos de audio de su sesión
Esta información se aplica a los usuarios Source-Connect Pro que desean utilizar la funcionalidad de restauración automática y reemplazo automático.
¿Por qué necesito configurar la carpeta de archivos de audio de la sesión?
Si está grabando y desea utilizar las funciones Restaurar y/o Reemplazar, debe configurar la carpeta de sesión correcta en Q Manager para cada nueva sesión que abra.
El Q Manager 'observa' esta carpeta en busca de todas las grabaciones entrantes y, si encuentra una grabación de Source-Connect habilitado para Q, buscará cualquier abandono. Si es necesario, iniciará el proceso de restauración (si 'Suspender' no está habilitado, el proceso comenzará inmediatamente). Dependiendo de la longitud del archivo y del ancho de banda disponible, este proceso puede tardar tan solo un par de segundos.
Cada archivo grabado con Source-Connect habilitado para Q devolverá un estado. Consulte la Guía del usuario para obtener detalles sobre todos los estados posibles.
Si está grabando con Source-Connect habilitado para Q y no ve sus archivos en el panel de actividad Q Manager , debe verificar su carpeta de sesión en el panel de Configuración y volver a aplicar Q Manager .
¿Cómo configuro la carpeta de audio de la sesión?
Hay tres formas de configurar la carpeta de sesión de su archivo de audio:
- Arrastre la carpeta Archivos de audio a la ventana de configuración Q Manager
- Elija la carpeta en la ventana de configuración Q Manager
- Elija la carpeta de la barra de menú (macOS) o la bandeja del sistema (XP)
- Arrastre la carpeta Archivos de audio al Q Manager
- Seleccione su carpeta de archivos de audio en el Finder y arrastre esta carpeta al panel central del panel de configuración Q Manager .
- Elija la carpeta en la ventana de configuración Q Manager
- Haga clic en el botón Elegir. Se mostrará el cuadro de diálogo del Finder y podrá buscar la carpeta Archivos de audio.
- Elija la carpeta de la barra de menú (macOS) o la bandeja del sistema (XP)
- En su barra de menú (macOS) o bandeja del sistema tiene un ícono Source Elements . Haga clic en esto para ver la opción 'Establecer carpeta de sesión'
Procesamiento de archivos con Q Manager
Esta información se aplica a los usuarios Source-Connect Pro que desean utilizar la funcionalidad de restauración automática y reemplazo automático.
Al utilizar Restauración automática y Reemplazo automático, es posible que sus archivos no aparezcan correctamente en el panel Actividad. Este documento explica por qué puede suceder esto y cómo resolverlo.
Verifique que la carpeta de su sesión sea correcta
Debes configurar la carpeta de archivos de audio correcta de tu sesión actual Pro Tools .
Verifique que el enrutamiento Pro Tools sea correcto
Panel de actividades Q
Este panel le brinda una descripción general completa de qué archivos se están procesando, cuál fue el resultado y le permite administrar completamente sus procesos de restauración y reemplazo.
Cuando graba un archivo en su carpeta Archivos de audio, Q Manager analizará el archivo para determinar si es adecuado para su procesamiento. Si el archivo grabado se creó con Source-Connect y Q Manager está configurado para 'escuchar' la carpeta de archivos de audio en la que se grabó este archivo, Q Manager lo enumerará inmediatamente después de que se complete la grabación y, si es necesario, y el Si la configuración es la predeterminada, se llevará a cabo un proceso de restauración. Dependiendo de la longitud del archivo, la cantidad de paquetes descartados y el ancho de banda disponible, el archivo se puede restaurar por completo en unos pocos segundos. Todos los archivos se enumeran posteriormente en el panel Actividad con el estado del proceso correspondiente.

Panel de actividades: Solicitudes Q
Cada vez que establezca una sesión Source-Connect , Q Manager creará una nueva sesión en el panel 'Solicitudes Q'. Todos los archivos grabados durante esta sesión en particular se enumerarán en esta sesión, lo que le permitirá administrar sus archivos por conexión. Se crea una nueva sesión cada vez que se conecta con Source-Connect .

Estado del archivo
Junto al nombre del archivo estará el estado de ese archivo. Cuando Q Manager detecta por primera vez un archivo, lo analiza para ver si se requiere alguna operación de restauración. De lo contrario, el estado del archivo será "No se requiere restauración". De lo contrario, el archivo se restaurará o, si usted o la otra parte tienen las transferencias en pausa, el archivo permanecerá "Esperando solicitud" hasta que se reanuden las transferencias. Además, si escanea manualmente un archivo (consulte “Solicitudes Q: menu de opciones”) y el archivo de audio no se grabó con Source-Connect el estado será "Q no presente".
Estado del proceso de archivo
Hay dos procesos posibles para archivos: Restaurar y/o Reemplazar . Cada proceso se puede ver haciendo clic en la flecha al lado del nombre del archivo. El estado cambiará según la etapa del proceso. Cuando se completa un proceso, el estado es "listo".
Para cada proceso, se mostrará una barra de progreso para indicar que el proceso está en marcha. Dependiendo de la longitud del archivo grabado y la velocidad de transferencia entre usted y la otra parte, la barra de progreso puede ser una indicación de cuánto tiempo llevará el proceso. Tenga en cuenta que hay muchos factores involucrados y el tiempo requerido variará según el tamaño, el ancho de banda y el tipo de proceso solicitado. Los procesos de restauración suelen ser muy rápidos. Para los procesos de Reemplazo, se realiza un reemplazo completo del audio AAC decodificado con el audio PCM de resolución completa. Por lo tanto, la transferencia de una sesión completa de Reemplazo puede requerir algo de tiempo.
Actividad: Panel informativo de Solicitudes Q
La información sobre cada sesión, archivo y proceso de transferencia está disponible resaltando una línea en el panel Solicitudes Q y viendo el panel de información debajo de la lista de sesiones. 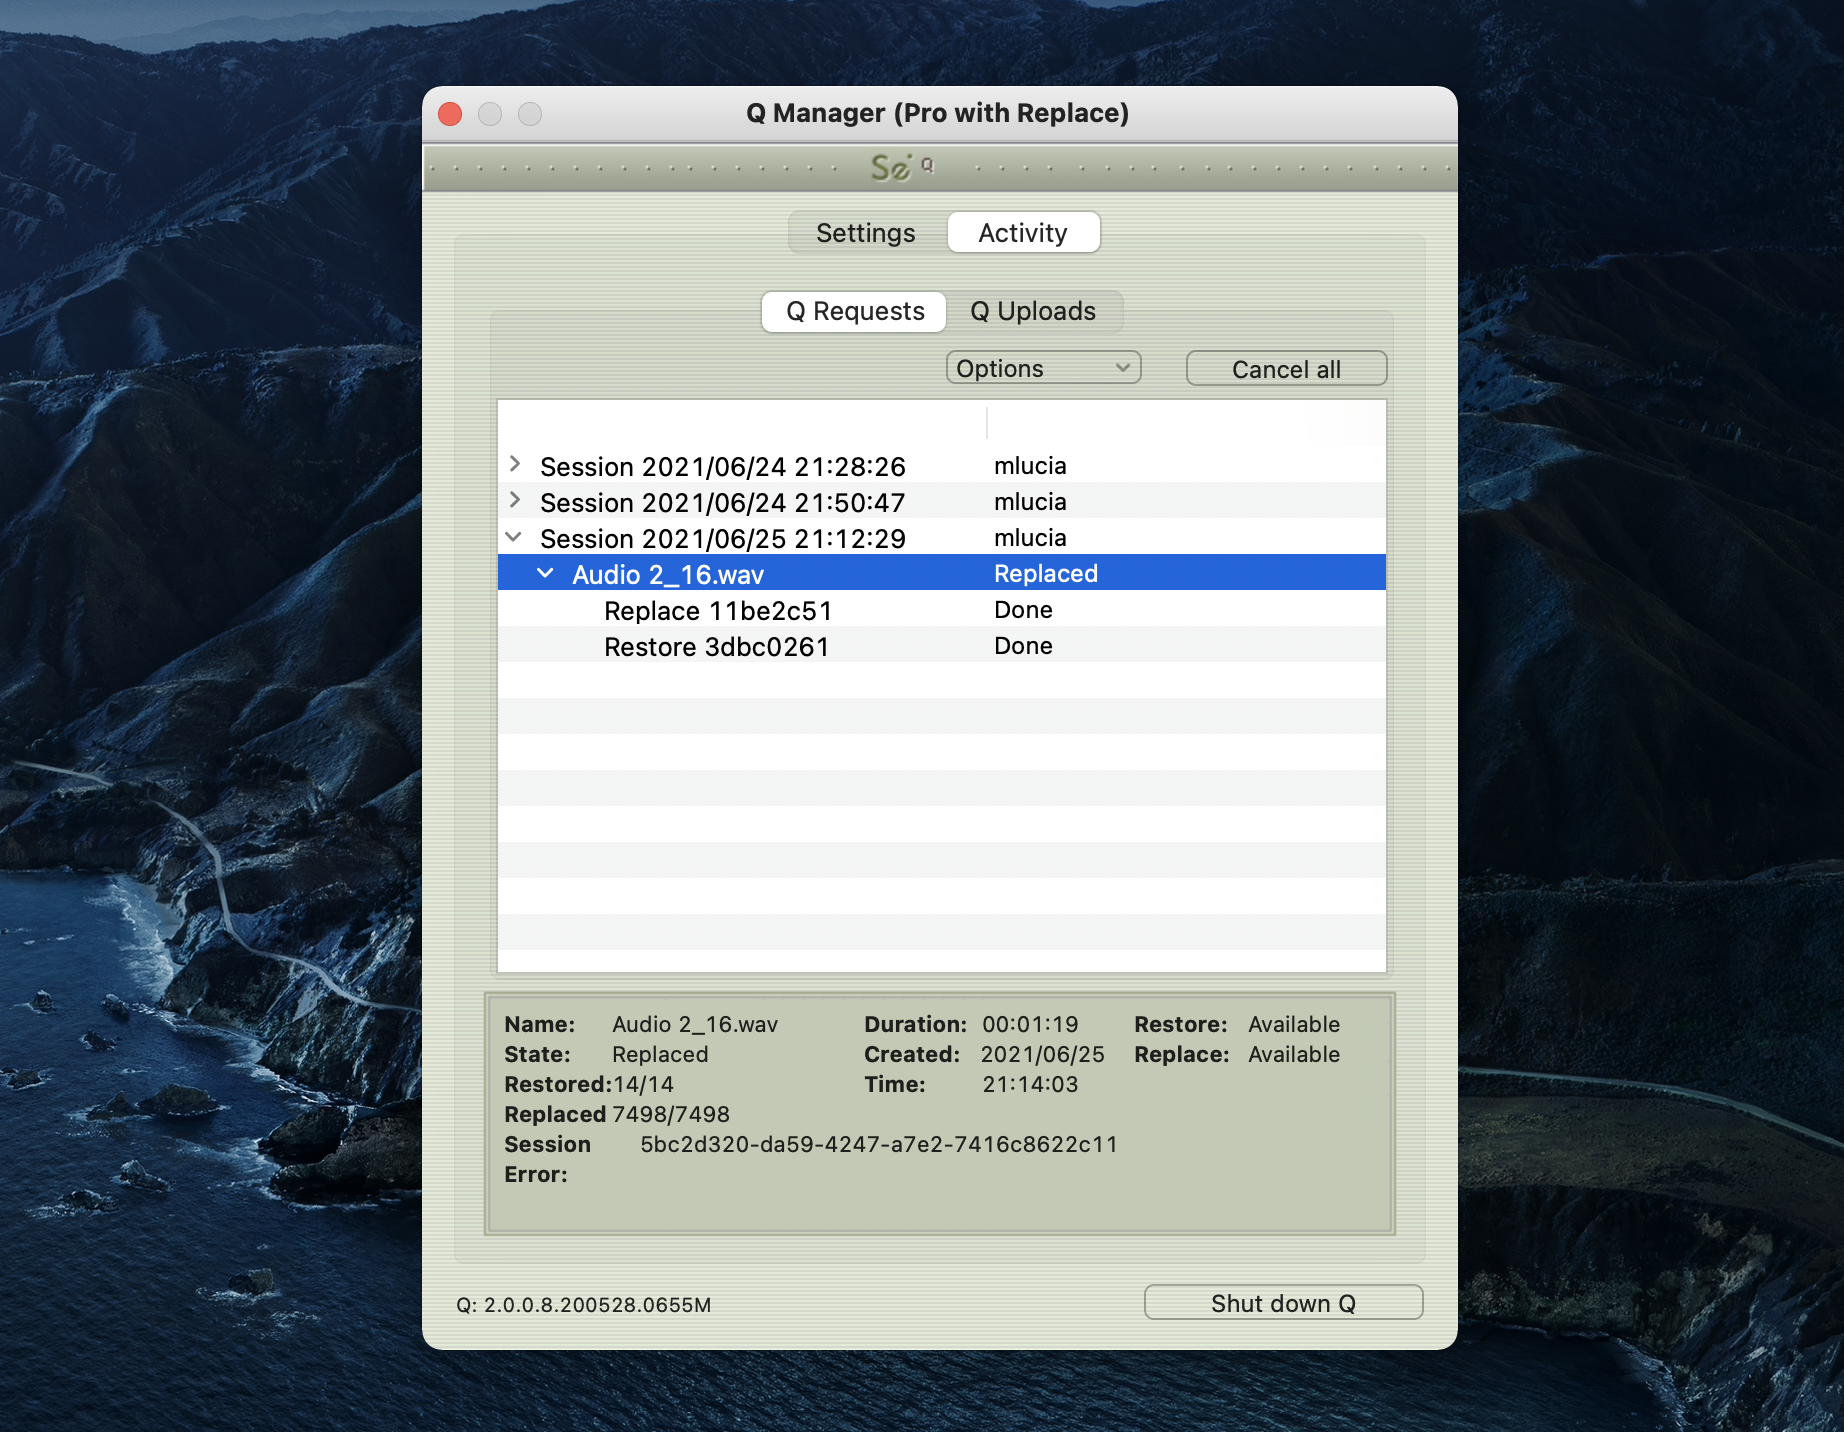
La información disponible es:
- Nombre : Nombre del archivo.
- Estado : Estado actual del archivo.
- Restaurado : cuántos paquetes (o 'caídas') fueron detectados y recuperados por el proceso de restauración.
- Reemplazado : cuántas 'piezas' de reemplazo se transferirán y procesarán.
- ID de sesión : el ID de sesión utilizado para la gestión de archivos.
- Error : para procesos exitosos, el número de error está en blanco. Si ocurrió un error, el número indicará la naturaleza del error. Consulte Solución de problemas e Informe de errores para obtener más información sobre cómo descubrir cuáles son los posibles errores y cómo resolverlos.
- Duración : Duración del archivo.
- Creado : Fecha en que se grabó el archivo.
- Hora : Hora en que se grabó el archivo Restaurar: Si el proceso de restauración está disponible para usted.
- Reemplazar : si el proceso de reemplazo está disponible para usted.
Solicitudes Q: menú de opciones
Para cada archivo y sesión, tiene opciones adicionales disponibles a través del menú Opciones. Dependiendo de lo que haya resaltado, tendrá disponibles varias opciones. 
Acciones de archivo
Escanear archivos
Esta opción le permite escanear un archivo o archivos en particular que no han sido procesados. Esto puede resultar útil si ha habido un error del sistema y ciertos procesos de archivos no se han completado, o si tiene una gran cantidad de archivos de una sesión anterior y solo necesita procesar archivos concretos. Esta opción también puede ser útil cuando hay ciertos errores que provocan que un archivo recién grabado no aparezca en el menú Solicitudes; por ejemplo, un error de CPU Pro Tools puede provocar que los archivos nuevos no se detecten. Se pueden seleccionar varios archivos en el cuadro de diálogo Archivo manteniendo presionadas las teclas "Shift" o "Command".
Revelar en el buscador
Revelar el archivo resaltado en el buscador de macOS
Cancelar
Esta opción está disponible para usarse cuando se está procesando un archivo actualmente. Esta opción es útil, por ejemplo, cuando tienes un archivo muy grande en proceso o se está realizando una transferencia y prefieres cancelar el proceso. Puede reiniciar el proceso seleccionando Restaurar o Reemplazar ahora.
Restaurar ahora
Para iniciar el proceso de restauración en un archivo individual, resalte el archivo que se va a procesar y seleccione Restaurar ahora. Si el archivo aún no se ha restaurado y la otra parte no ha eliminado ni movido los datos correspondientes y está en línea, su archivo se restaurará.
Reemplazar ahora
Para iniciar el proceso de Reemplazar en un archivo individual, resalte el archivo que se va a procesar y seleccione Reemplazar ahora. Si la otra parte es compatible con el proceso de Reemplazo y no ha eliminado ni movido los datos correspondientes y está en línea, su archivo será reemplazado.
Transferir acciones
Estas opciones se aplican a sus transferencias de red generales, no a archivos individuales.
Cancelar
Cancelar todas las transferencias de Solicitud actuales. Cualquier transferencia de archivos actual en curso será cancelada. Puede reiniciar las transferencias utilizando la opción Restaurar o Reemplazar adecuada.
Acciones de sesión
Rebautizar
Se recomienda encarecidamente cambiar el nombre de la sesión para facilitar la gestión. Puede hacer esto resaltando el nombre de la sesión y seleccionando 'Cambiar nombre' en el menú Opciones de solicitudes Q. Puede cambiar el nombre de la sesión en cualquier momento.
Quitar de la vista
Con el tiempo, su panel de Solicitudes Q se llenará de datos de sesión. Una vez que se complete su sesión y sus transferencias de datos sean exitosas, puede eliminar una sesión de la vista. Esto no elimina archivos o datos existentes, sólo "oculta" la sesión.
Para volver a mostrar una sesión, seleccione la carpeta Archivos de audio en el panel Configuración con "Volver a escanear todos los archivos" seleccionado y Aplicar. Su sesión aparecerá nuevamente en el panel de Solicitudes.
Deshacer Reemplazar
Para garantizar la integridad de sus archivos de audio grabados, Q Manager le permite la opción de deshacer el proceso de Reemplazar en caso de un proceso dañado.
NOTA : Esta opción requiere que "Copia de seguridad antes de reemplazar" esté marcado en el panel Avanzado.
Eliminar copia de seguridad
Esta opción elimina la copia de seguridad de datos de Reemplazar para su sesión resaltada. Una vez que su sesión se reemplace por completo o que otros procesos se completen exitosamente según sea necesario, puede eliminar la copia de seguridad para conservar espacio en el disco.
Quitar todo de la vista
Esto es lo mismo que "Eliminar de la vista", sin embargo, eliminará todas las sesiones visibles en su panel de Solicitudes. Esta es una excelente manera de limpiar rápidamente el panel.
Importar
Si una transferencia falló, o si elige que el socio de conexión remota transfiera manualmente la sesión Q, use este menú para importar ese archivo de datos, o simplemente puede arrastrar el archivo de datos al panel Actividad.
Panel de actividades: Subidas Q
Descripción general de cargas Q
Si su socio conectado está registrando y solicitando Restaurar o Reemplazar datos, usted almacenará datos de su lado para habilitar los procesos de Restauración y Reemplazo. Verá el estado de este almacenamiento de datos y cualquier transferencia solicitada en el panel 'Cargas Q'. 
Cada proceso de carga mostrará una barra de progreso y el estado actual. La sesión actualmente activa se mostrará en letras azules para facilitar su visualización. Cuando la carga se complete exitosamente, el estado será "Listo".
El uso actual del disco se muestra para ayudarle a saber cuándo puede necesitar asignar recursos adicionales o eliminar los datos de la sesión del disco (consulte "Eliminar todos los datos de la sesión del disco" más abajo).
Cargas Q: menú de opciones
Para la sesión, tiene opciones adicionales disponibles a través del menú Opciones. 
Cambiar nombre de sesión
Para facilitar la gestión de la sesión y su posterior reconocimiento, puede cambiar el nombre de la sesión.
Eliminar sesión seleccionada
Una vez que su socio conectado haya completado con éxito todas las transferencias requeridas, puede eliminar la sesión de Cargas para conservar espacio en el disco. Tenga en cuenta que esta opción no se puede deshacer. Esto significará que su socio conectado ya no podrá solicitar más operaciones de restauración o reemplazo. 
Eliminar todos los datos de la sesión del disco
Si sabe que su socio de grabación completó con éxito todos los procesos de restauración y reemplazo, ahora puede eliminar todos los datos de la sesión del disco. Esto eliminará permanentemente todos los datos almacenados hasta la fecha. Se le pedirá que confirme esta acción. Después de eliminar todos los datos, verá que el uso del disco en la parte inferior del panel se ha reducido a un número pequeño. 
Esta opción no está disponible para usted mientras esté conectado a través de Source-Connect . Las opciones de exportación restantes se explican en este artículo.
Actividad: panel de información de Subidas Q
Información similar sobre cada proceso de transferencia de sesión está disponible resaltando una línea en el panel Q Uploads y viendo el panel de información debajo de la lista de sesiones. 
La información disponible es:
- Nombre : Nombre del archivo.
- Fecha : Fecha en la que se creó la carga.
- Hora : hora en que se cargó el archivo.
- Duración : Duración del archivo.
- ID de sesión : el ID de sesión utilizado para la gestión de archivos.
Panel de actividad: opciones de exportación de sesión
Esta poderosa característica de Q Manager permite la exportación de los datos de la sesión almacenados desde el lado de Envío. Lo que esto significa es que si la restauración automática o el reemplazo fallan por algún motivo, siempre tendrás una copia de seguridad perfecta de toda la sesión desde el momento en que te conectaste. La sesión se proporciona en varios formatos dependiendo del método que se prefiera. 
Una vez que haya abandonos (¡si los hay!), el lado de envío verá que se ha creado una sesión en el panel Cargas de la actividad de Q Manager . Una vez que se desconecte, la sesión ya estará disponible para ser exportada.
Estas opciones están disponibles para todos los usuarios Source-Connect Pro asumiendo que Q Manager se configuró correctamente para ambos lados durante la conexión, es decir, no había una barra roja en el ícono Q en el estado de conexión Source-Connect .
Exportar MP4
Para exportar la sesión como mp4, seleccione el nombre de la sesión en Q Uploads y elija 'Exportar mp4' en el menú de opciones de Uploads. 
Se iniciará la aplicación de ayuda para la exportación y se le pedirá que guarde el archivo. 
De forma predeterminada, el nombre del archivo es la fecha y hora de la conexión de la sesión. Puede cambiar el nombre del archivo según sea necesario. Este archivo se puede reproducir en cualquier reproductor MP4, como Quicktime o iTunes, o se puede importar directamente a la mayoría de los editores. 
Puede elegir cancelar el proceso de exportación presionando el botón Cancelar.
Una vez que se completa la exportación, ahora puede reproducir su sesión completa sin interrupciones de la red y enviarla por correo electrónico o FTP a su socio de conexión.
Exportar PCM
Esta opción solo está disponible para Source-Connect Pro , si el lado receptor tiene la opción Reemplazar para Source-Connect Pro y la casilla de verificación Reemplazar estaba habilitada para esa conexión. Se aplica el mismo método que para Exportar MP4 anterior. 
Exportar, restaurar y reemplazar
Exportar, restaurar y reemplazar es muy útil en caso de que su socio de conexión no reciba sus datos debido a errores de red o fallas de FTP. Básicamente, este es un proceso manual de transferencia de datos de restauración y reemplazo, en lugar de que Q Manager los transfiera automáticamente a pedido.
Cuando esté desconectado de su sesión, seleccione Exportar Restaurar o Reemplazar: Restaurar exportará los datos AAC y Reemplazar exportará los datos PCM. El proceso de exportación de Reemplazar requerirá espacio en disco y tiempo de transferencia adicionales. 
Se le pedirá que guarde el archivo de datos: 
Ahora puede transferir manualmente este archivo de datos a su socio de conexión remota, por correo electrónico o FTP, por ejemplo.
Su socio de conexión recibirá este archivo de datos y lo importará utilizando la opción Importar en el menú Solicitudes Q o soltando el archivo en el panel Solicitudes. 
El Q Manager importará los datos: 
Cuando una sesión de Restaurar o Reemplazar se haya exportado e importado exitosamente, esa sesión tendrá un ícono R verde (para Restaurado) o un ícono R naranja (para Reemplazar).
Esto indica que todos los archivos de la sesión se han restaurado o reemplazado exitosamente y no se requieren más operaciones para esta sesión. 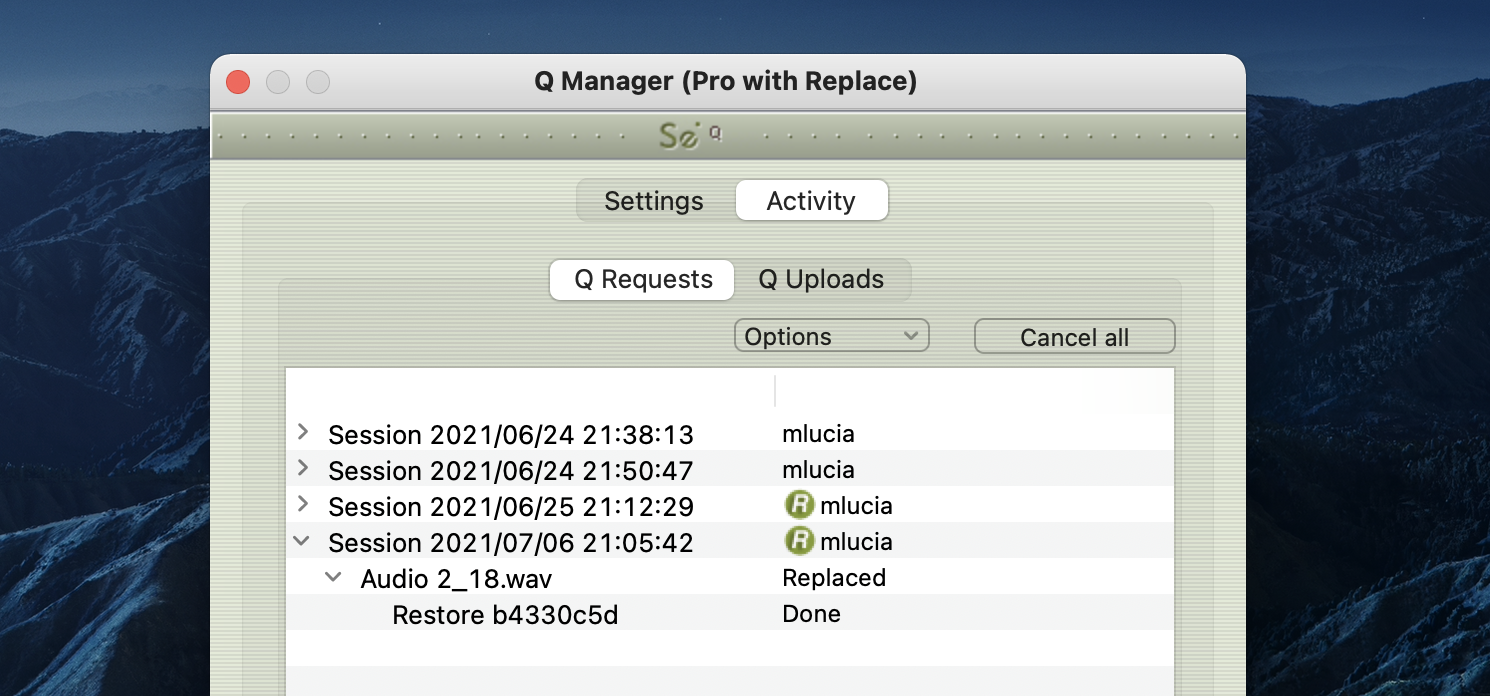
Panel de actividad: Cancelar todo
Si hay una transferencia en proceso y necesita conservar ancho de banda o ya no desea que el proceso continúe, el botón Cancelar todo pausará todas las transferencias actualmente en proceso. 
Puede reanudar cualquier transferencia nuevamente en cualquier momento; sin embargo, las transferencias se restablecerán para que cualquier dato que se haya cargado o descargado comience de nuevo.
Opciones de la barra de menú Q
Q Manager tiene varias funciones disponibles a través de la barra de menú y también proporciona un vistazo rápido a los procesos que están activos. 
Establecer carpeta de sesión
Utilice esta opción para cambiar rápidamente su carpeta de archivos de audio entre sesiones. Después de seleccionar la carpeta, se mostrará el panel de Configuración y deberá hacer clic en Aplicar para guardar la nueva configuración de la carpeta.
Solicitudes Q
Esto muestra todos los archivos disponibles para restaurar y reemplazar y el porcentaje total procesado.
Iniciar proceso de reemplazo
Esta opción solo está disponible a través de este menú: iniciará el proceso de reemplazo de todos los archivos disponibles en su menú Solicitudes Q. Tenga en cuenta que esto puede llevar algún tiempo si tiene una gran cantidad de archivos. Los procesos individuales o todos se pueden cancelar según sea necesario a través del menú de opciones Solicitudes Q.
Mostrar panel Actividad/Configuración
Abra el panel Actividad o Configuración.
Opciones del menú Q Manager
El menú Q Manager ofrece un proceso de "Limpieza". Con el tiempo, sus sesiones, aunque se eliminen de la vista, pueden hacer que su base de datos Q Manager se vuelva muy grande. Se recomienda limpiar su base de datos de vez en cuando; se le advertirá si el uso de su disco es inferior al 20% en Q Manager mediante una notificación de texto en rojo y negrita. 
Simplemente elija "Limpiar" en el menú Q Manager y cualquier sesión que ya no esté visible en su panel de Actividad se eliminará permanentemente. 
Solución de problemas de restauración y reemplazo automáticos
Para cada expediente y proceso existe un estado. Para archivos exitosos, el estado será Restaurado o Reemplazado dependiendo del tipo de proceso completado por última vez. Si ve que el estado de un archivo o archivos es "Error al restaurar" o "Error al reemplazar", significa que usted o su socio de conexión tienen configuraciones no válidas o que un componente no está instalado o configurado correctamente.
Hay varias razones por las que un archivo puede no poder reemplazarse o restaurarse. Para conocer el motivo exacto de un proceso fallido, seleccione el archivo en el panel Solicitudes Q: 
Ahora, mire el mensaje del código de error en la parte inferior: 
Por ejemplo, este error nos indica que Q Manager se cerró antes de que se pudiera completar el proceso. Para resolver esto, simplemente reinicie el proceso.
Los errores Q Manager son raros y generalmente significan que la otra parte está desconectada o ha movido o eliminado los datos de Q. Comuníquese con el soporte si tiene alguna pregunta específica, podremos brindarle información detallada caso por caso.
Permisos de volumen de red
Si los archivos no aparecen en Q Manager después de grabar una sesión en su DAW (por ejemplo, Pro Tools , Logic Pro o Cubase / Nuendo ), puede estar relacionado con alguna de las aplicaciones que no tienen acceso a los archivos de música de su grabación. . Para intentar resolver esto, verifique lo siguiente:
- Abra el menú Seguridad y privacidad.
- Vaya a "Privacidad".
- Desplácese hacia abajo hasta "Archivos y carpetas".
- Asegúrese de que tanto Q Manager como su DAW tengan acceso a "Volúmenes de red".

Problemas comunes Q Manager
Las siguientes son razones comunes por las que la restauración automática y el reemplazo automático pueden fallar.
Verifique lo siguiente:
- Compruebe que Q esté habilitado. Debería tener un ícono Q a la izquierda de su medidor de recepción Source-Connect si es el extremo de la grabación, y en el medidor de envío si es el extremo del envío. Verifique que las casillas de verificación Restaurar y/o Reemplazar estén marcadas en el panel de configuración Source-Connect Pro antes de establecer una conexión.
- Es importante que no tenga ningún complemento de audio ni cambios de nivel de volumen entre la señal de Source-Connect y su canal de grabación. Debe tener tanto la pista auxiliar Source-Connect Link como su pista de grabación configuradas en 0 dB o Q Manager no podrá procesar sus archivos y no podrá insertar ningún otro complemento entre Source-Connect y su pista de grabación.
- Los errores Pro Tools , por ejemplo errores de CPU, pueden hacer que Q Manager no detecte el archivo. Si este es el caso, vuelva a aplicar Q Manager con 'Volver a escanear todos los archivos' seleccionado o seleccione 'Escanear archivo(s)' en el menú Solicitudes Q en el panel Actividad.
-
Verifique la configuración Q Manager :
- Su nombre de usuario y contraseña deben estar correctamente ingresados
- Asegúrate de haber seleccionado la carpeta de archivos de audio correcta para tu sesión actual Pro Tools
- Asegúrese de que la configuración de FTP sea correcta y accesible para Q Manager .
- Se debe iniciar Q Manager : asegúrese de poder ver Q Manager a través del icono de la barra de menú. NOTA: Los archivos que se graban con Source-Connect cuando Q Manager no está iniciado se pueden procesar más tarde volviendo a escanear el directorio de archivos de audio.
- Los archivos deben grabarse mientras se establece la sesión Source-Connect . Los archivos grabados cuando Source-Connect no está establecido no aparecerán para su procesamiento en Q Manager .
- No se admite la conversión de frecuencia de muestreo . Verifique que su conexión no esté convirtiendo la frecuencia de muestreo.
Table of Contents