Finding your Source-Nexus Gateway controls as a broadcaster
This article is part of the Source-Nexus Gateway User GuideThe controls for the Source-Nexus Gateway can be found both on the top bar (for the interaction with the Source-Nexus Review plugin) and for the Gateway itself. Both bars are fixed and will be visible throughout the call.
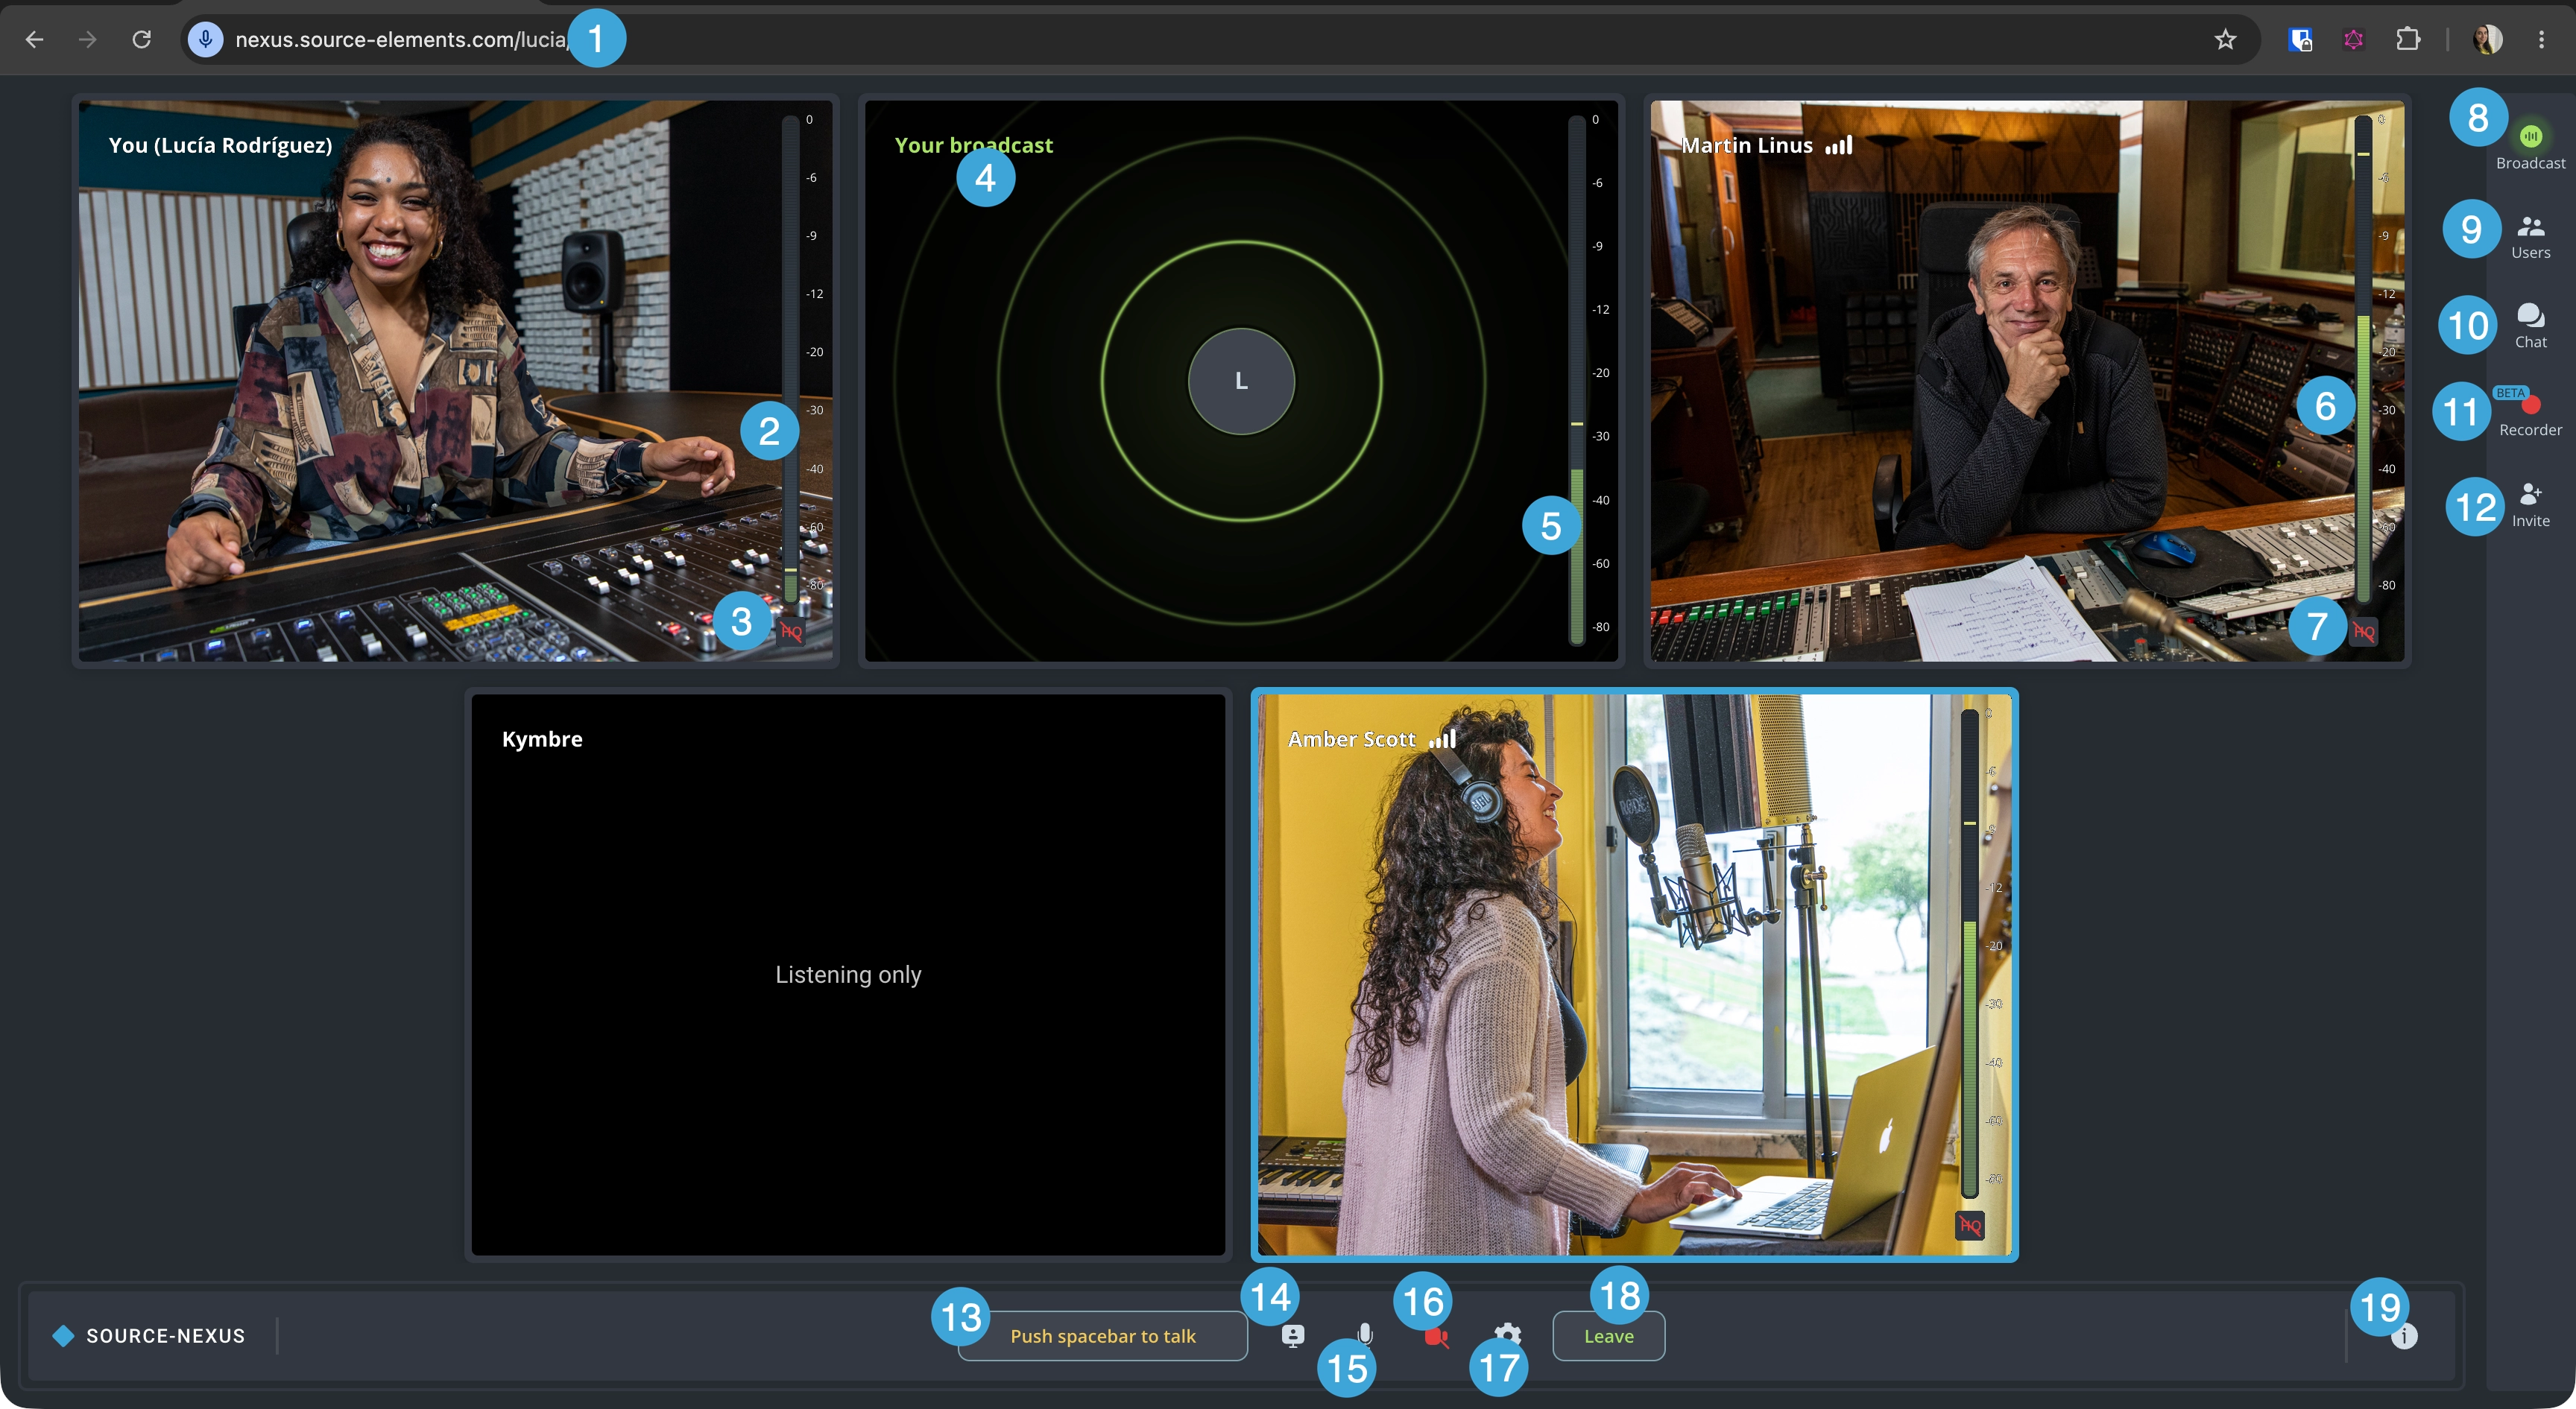
- Caller ID: the ID for your Source-Nexus Gateway session. You can invite other users to join your broadcast by sharing this URL or by going through the Invite panel.
- Your level meter. If your audio input has been configured correctly, you will see signal coming into the level meter.
- Your HQ indicator. If you have turned on 'Use Original Audio (HQ)' > Stereo Audio in the Audio panel of the Chat settings, you will see an HQ indicator on your participant widget. We recommend using original audio for the best quality - you should use headphones to prevent audio feedback.
- Your broadcast widget. If you have configured your broadcast settings in the broadcast panel, you will see a separate widget with your audio/video broadcast (as applicable). Icon number 8 (broadcast panel) will also turn green.
- Your broadcast level meter. If the audio input for your broadcast has been configured correctly, you will see signal coming into the broadcast level meter.
- Level meter for other participants. If other participants are not muted and active engaging in your call, you will see signal coming in.
- HQ indicator for other participants. If participants on your call have turned on their original audio, you will see an HQ indicator. You can turn this on/off if you are having bandwidth issues.
- Broadcast panel. This panel will allow you to configure to configure your external audio source, input, bandwidth and video settings, if necessary. You can read more about these controls in this section.
-
Users panel. This section will allow you to see the list of participants on your call - including those that do not
have their cameras on. There are two additional settings for broadcasters:
- Mute individual participants.
- Block participants
- Chat, which will display any in-call messages and allow you to contact other participants on the call.
- Recorder panel. The existing recorder tool in the Source-Nexus Gateway has been significantly enhanced and optimized to allow users to select between two recording modes to capture high-quality audio and video directly within the application. For more information, read through this section.
- Invite panel. Clicking this button will open a side panel, which allows you to share your room link and send an invitation out to one or multiple users.
- Push to talk. Pressing the spacebar will allow other participants to hear you, even if you are muted. When your talkback microphone is open, the button will be yellow and read “Release spacebar to mute” instead.
- Sharing panel. When screen sharing is on, the indicator will be green. If no screen is being shared, the indicator will be gray instead.
- Mic on/off. This button will allow you to turn your microphone on/off. This is not a toggle - unlike the push to talk button. You can configure your microphone in the Chat Settings.
- Camera on/off. This button will allow you to turn your camera on/off for other participants to see you. You can configure your camera in the Chat settings (button 13).
-
Chat settings. The chat settings menu allows you to both enable and change your:
Microphone (output).- Camera device.
- Speakers (input) - these cannot be disabled.
- Leave video chat. Clicking this button will remove you from the call. All remaining participants will see a message saying the session is no longer active.
- Host information. This will include the host's name and profile information, if they have chosen to share it publicly.
Broadcast Panel
There are nine controls specific to receiving audio from an external source. The most common scenario is to use the web broadcaster together with the Source-Nexus Review plugin, but you can use any other virtual or hardware devices. You can choose any Core Audio/Windows Audio input device for the broadcast. If you have Source-Nexus Review installed, the Nexus broadcaster will automatically choose "To Nexus Broadcast" as the input device, assuming you will be sending audio from the plugin in your DAW.
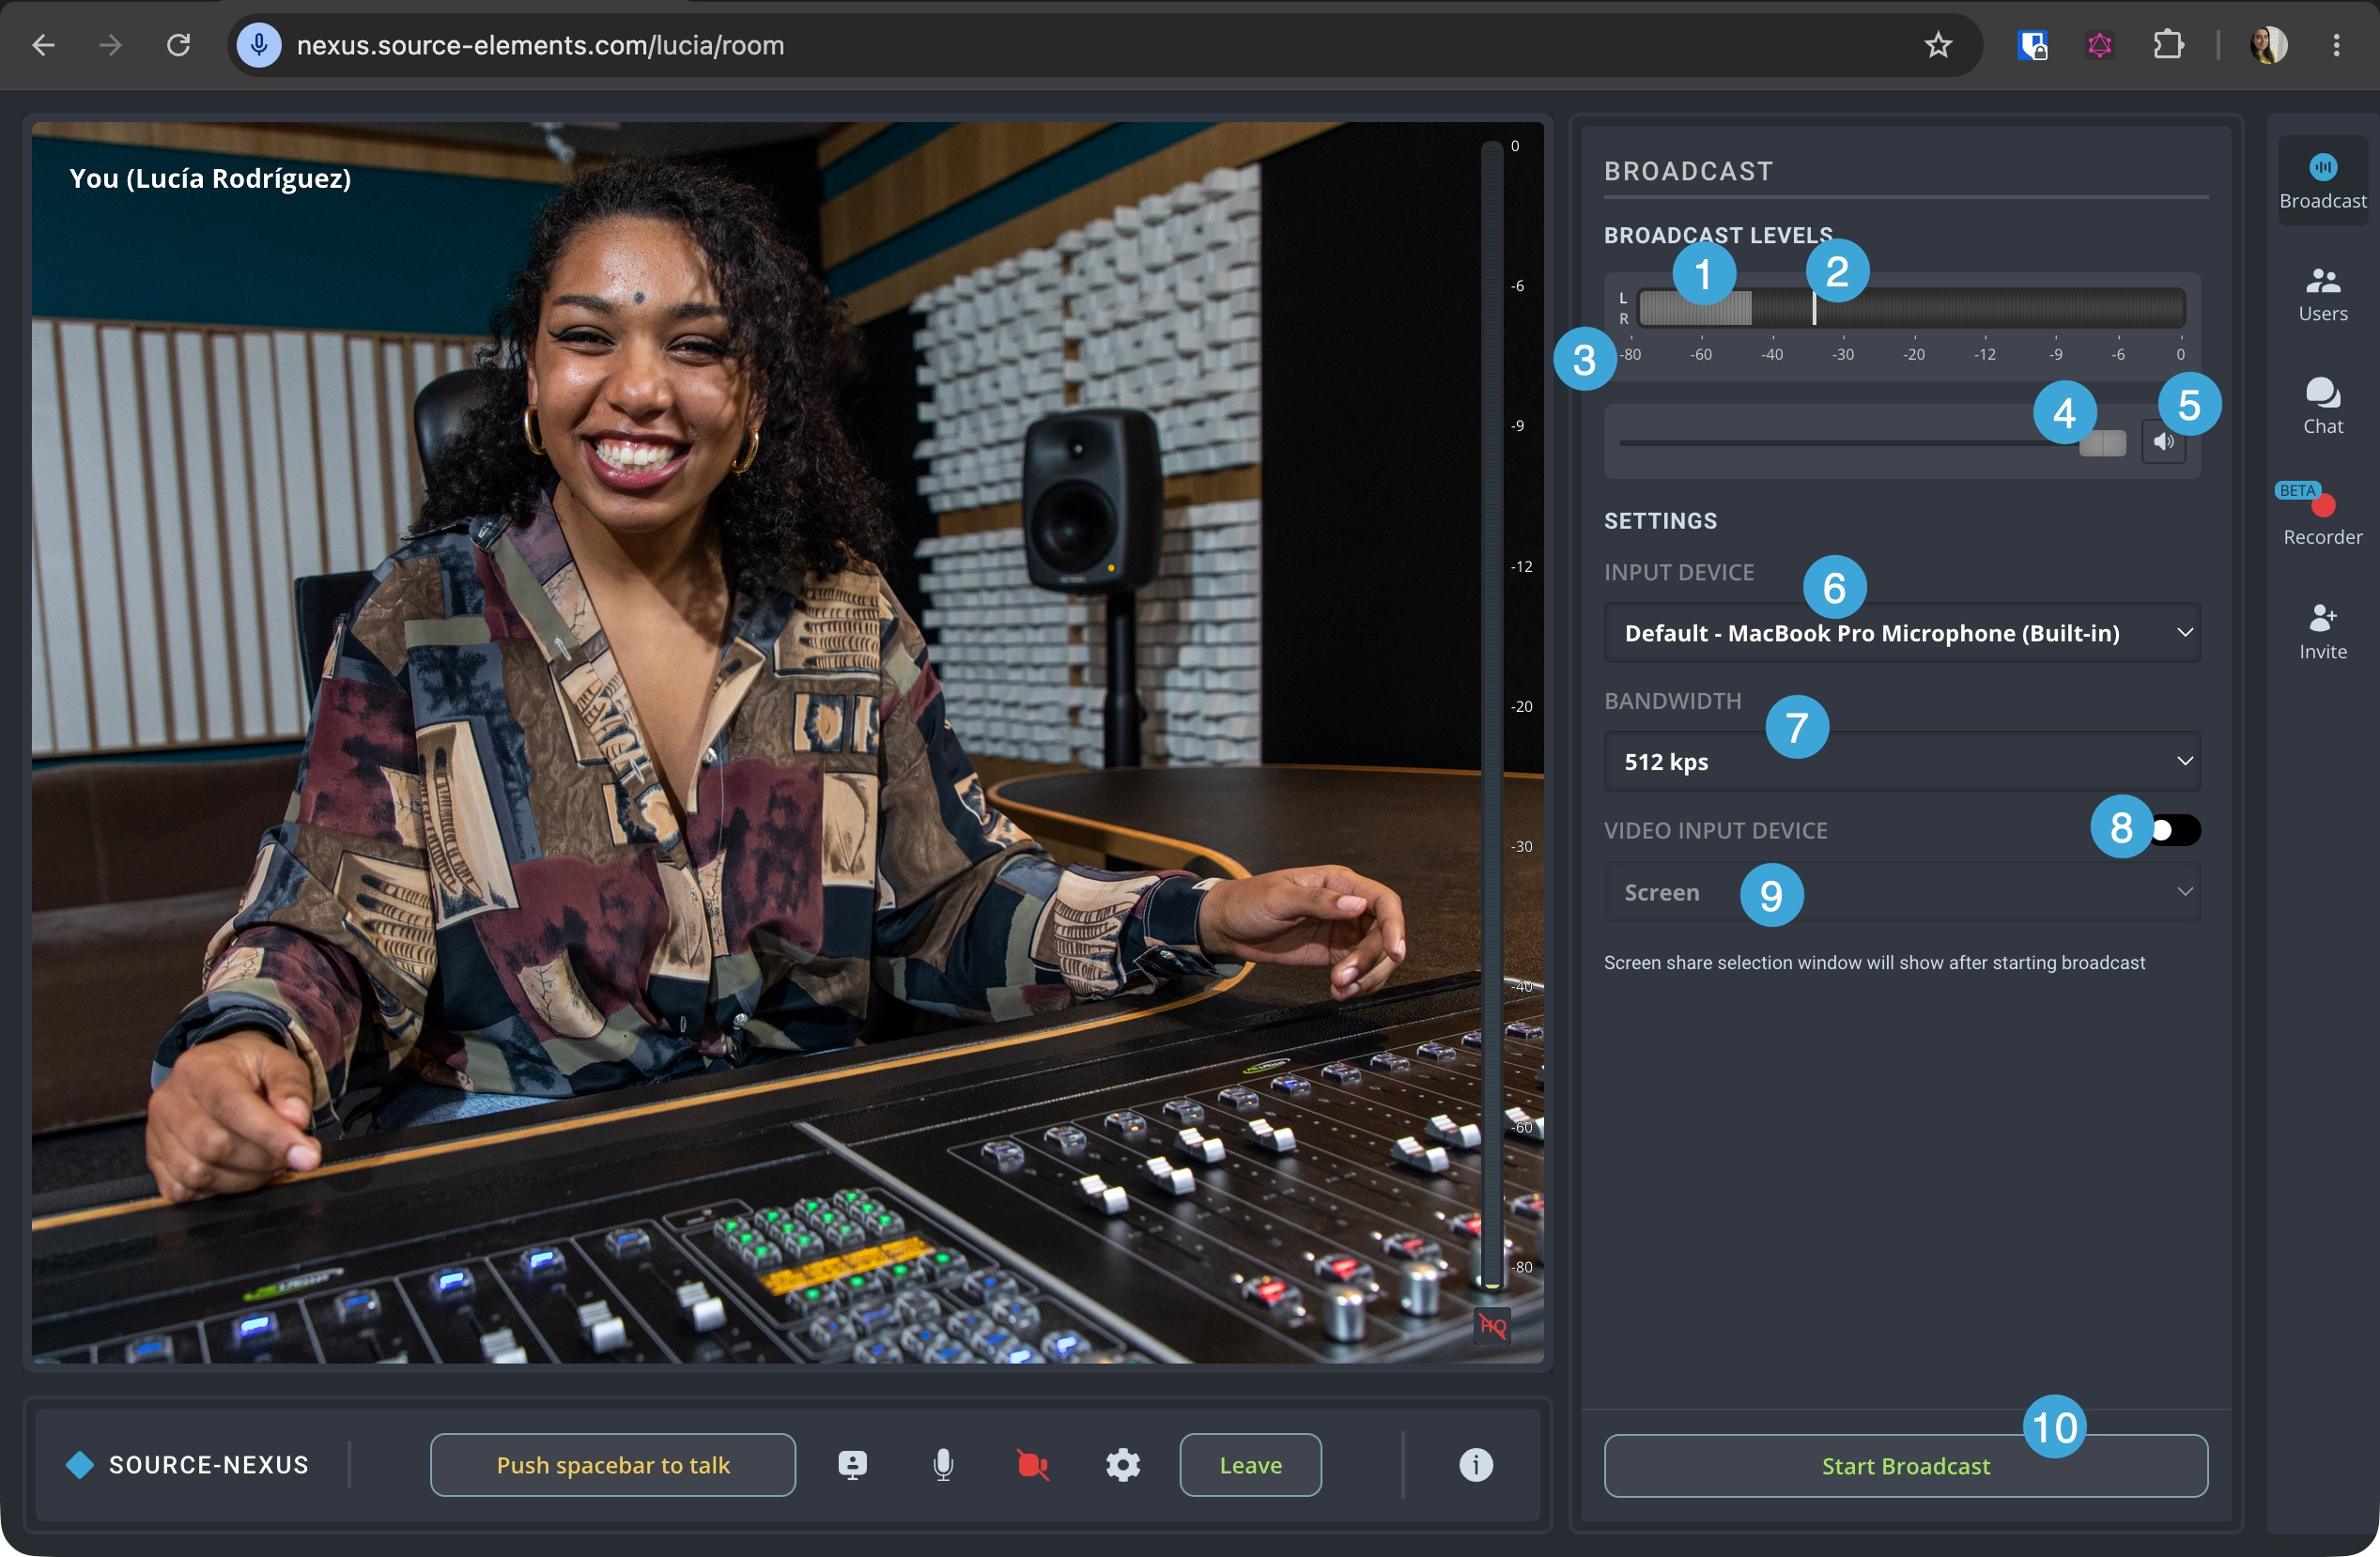
- External audio indicator. If you are using the Source-Nexus Review plugin, and the configuration is correct, you will see stereo signal coming into the web broadcaster. If the selected input is a mono input, the signal will also be mono. By default, the input will use channel 1 (for mono) or 1 & 2 (for stereo). There is no channel control.
- Peak hold indicator. The highest level caught by the broadcast. You might also see a red indicator if there was any clipping in the audio.
- Decibels scale, for your own reference.
- External audio volume slider. You can slide the volume left or right to adjust your volume level.
- External audio mute button. If you wish to completely mute the audio, you can click this button.
- External audio input source. The source of your external audio. When using the web broadcaster with Source-Nexus Review, you will see “To Nexus Broadcast" here.
- Bandwidth. Select a specific bandwidth based on your network's quality. There are three options available in the dropdown (512kbps, for high-quality connections, 256kbps and 128kbps).
- Video input device. Select a secondary video device (your screen, browser tab, window or video device) to share on your broadcast.
- Video selector. Select your screen (which enables the browser tab, window or entire screen options) or a video source (such as your built-in camera or a virtual device such as NDI™).
- Start/Stop broadcast. When you are ready to start broadcasting the external audio content, clicking “Start broadcasting” will make the content available to your users. Once the broadcast is active, you will see a ”Stop Broadcast” button instead.
Recorder Panel
The existing recorder tool in the Source-Nexus Gateway has been significantly enhanced and optimized to allow users to select between two recording modes to capture high-quality audio and video directly within the application.
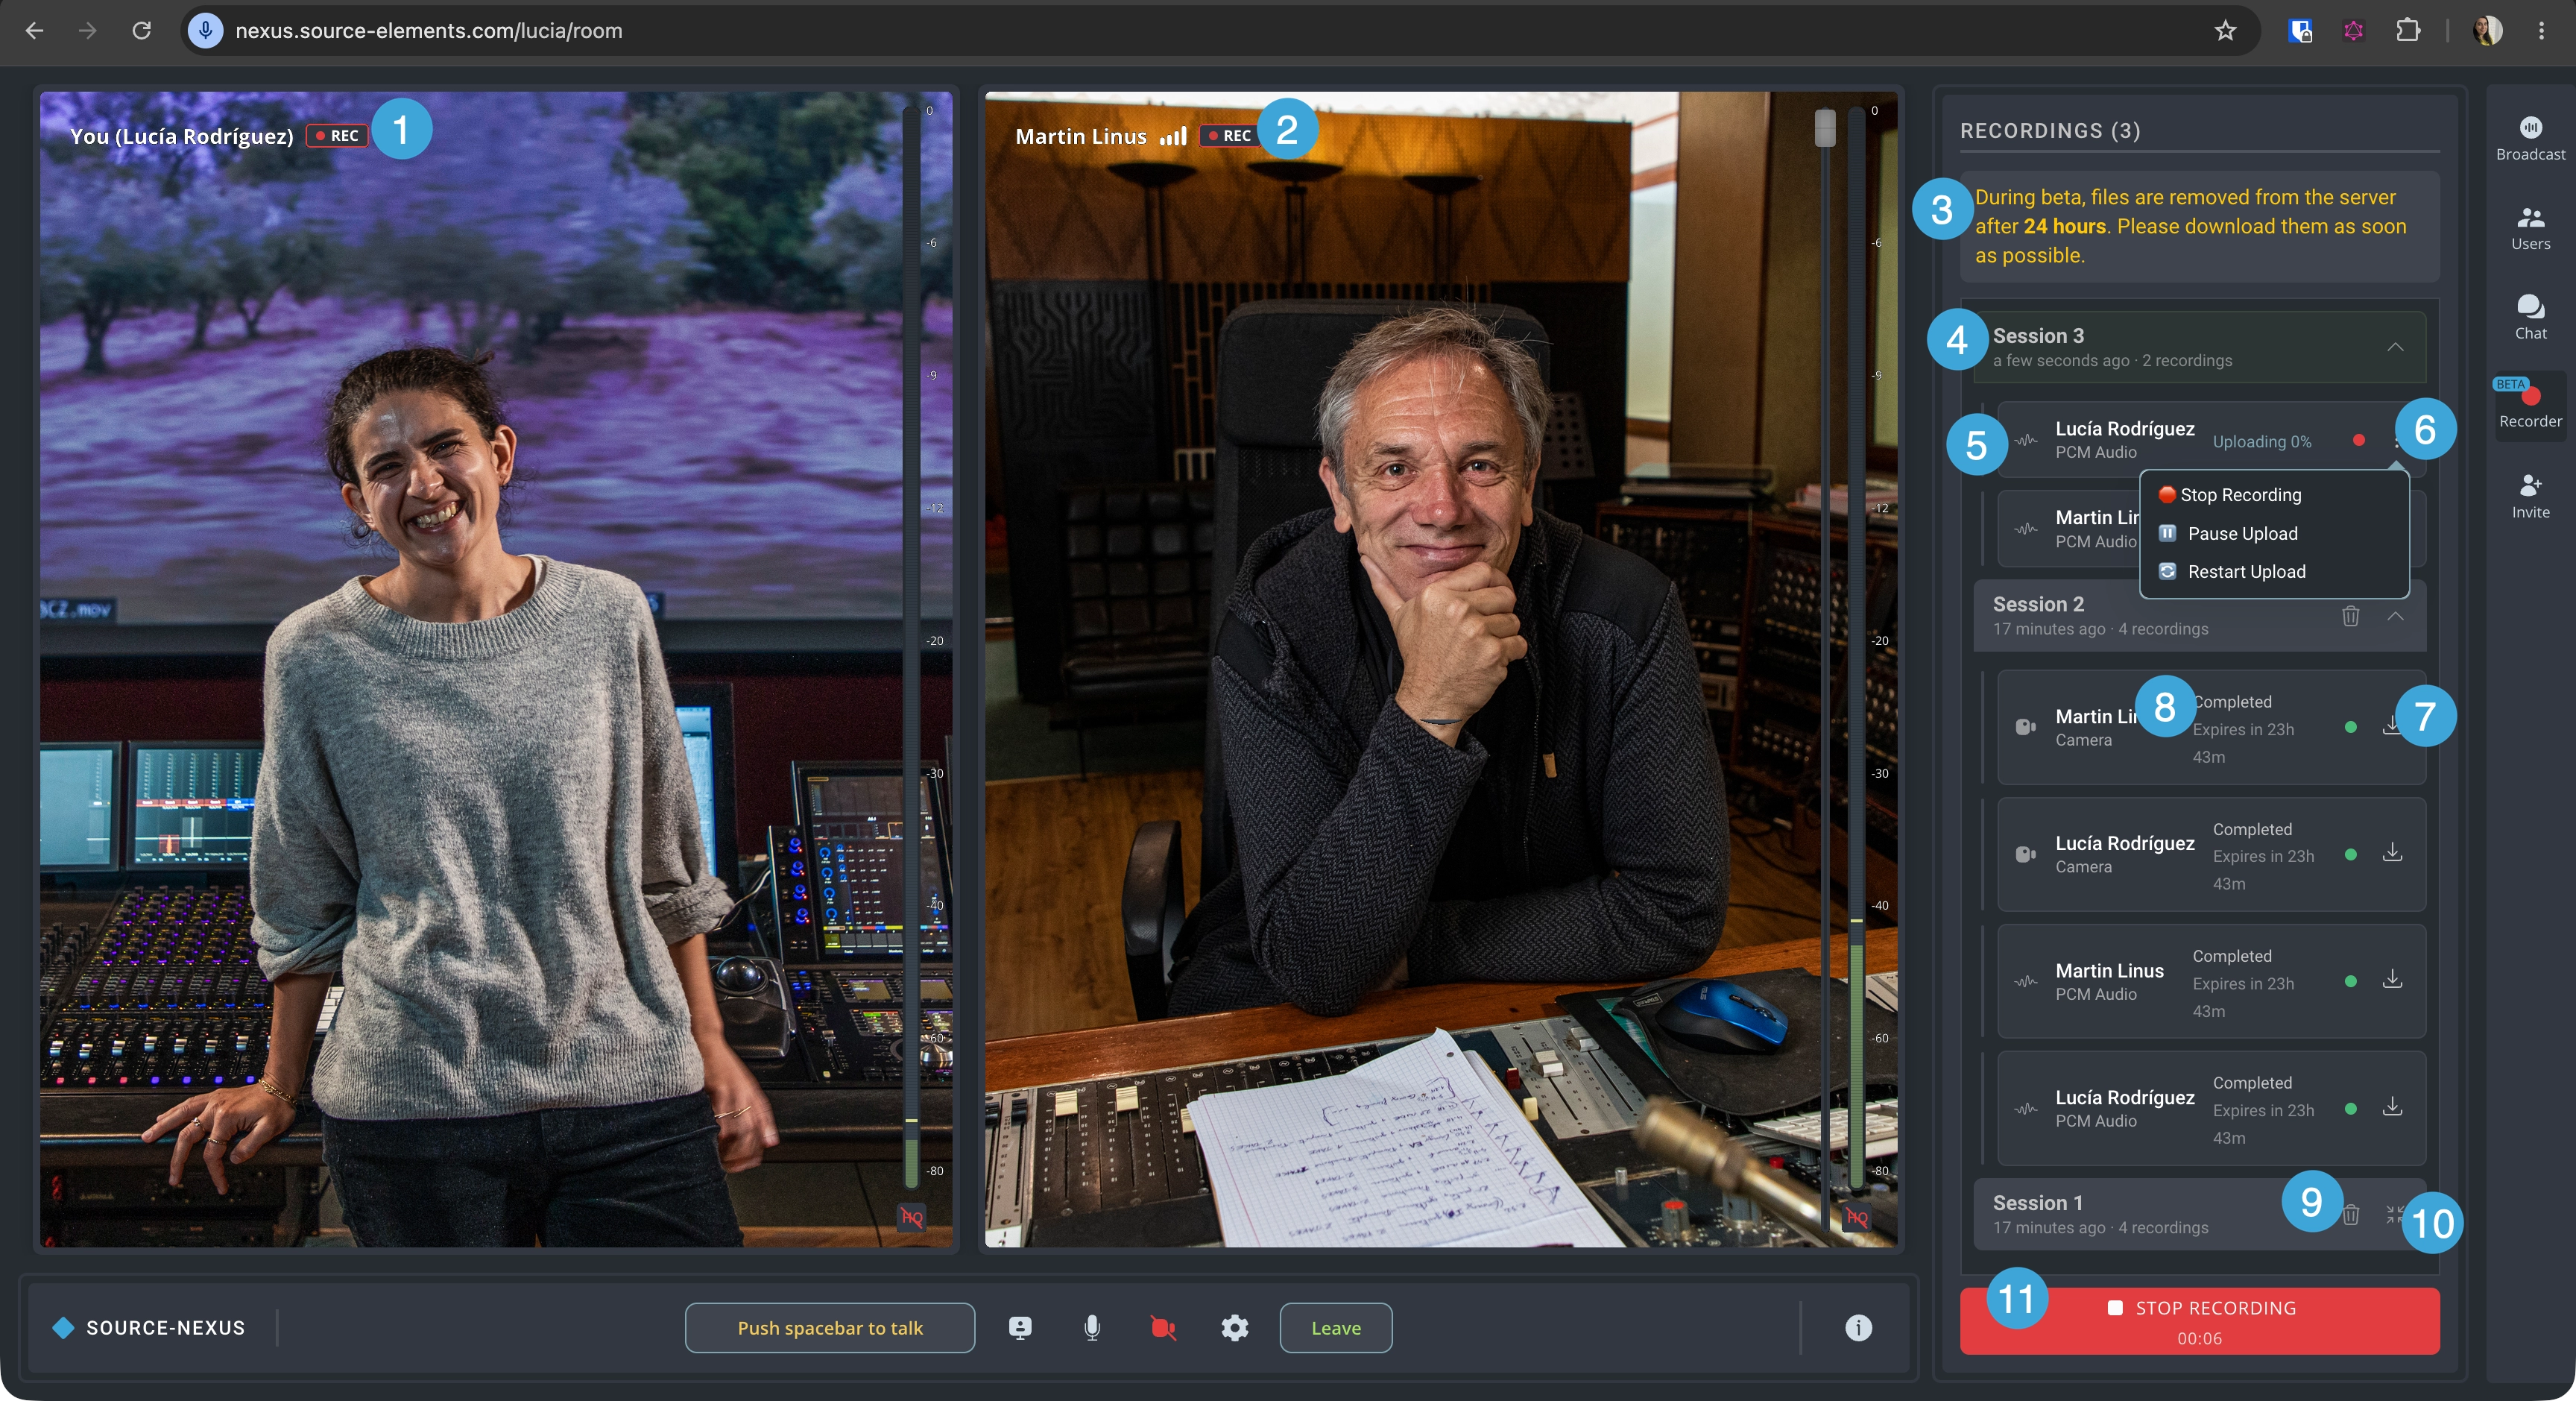
- Recording ON indicator for your own feed. If you have chosen to record your own camera in the recorder settings panel, you will see a recording indicator.
- Recording ON indicator for your participants. If you have chosen to record your own camera in the recorder settings panel, you will see a recording indicator.
- Beta disclaimer. The new recorder panel is still in beta - therefore, recordings are not saved on the Source Elements servers for more than 24 hours. We recommend that you download all relevant files before you leave the session.
- Session folders and files. In this area, you will see any video or audio recordings you have enabled for a specific broadcasting session. The session folder will include as many participants as you have selected, their video inputs and screen recordings if you are sharing anything.
- Recording type. There will be an icon next to each recording item indicating the type of recording it is (PCM audio, regular audio, camera or screen recordings).
- Available actions for each recorded item.
- Stop recording: this option will completely stop recording the person(s) you have selected for the duration of the broadcasting session. You cannot resume recording.
- Pause upload: this option will momentarily pause a recording being uploaded. You might want to select it if you notice any network issues or you know your bandwidth might not be enough for all recordings.
- Restart upload: you can restart the upload if you notice the recording might not be getting uploaded and you want the upload to start from scratch again.
- Download button: this will download the video, audio, or screen share that has been uploaded.
- Upload status: the status of each recording item - they might be "Uploading", "Stopped", "Paused" or "Completed". If the status is "Completed", you will also see the expiration date for the download - after the counter reaches 0, you will not be able to download the recording and it will disappear from the panel.
- Delete button: this option will delete the recording session and all of the recordings (video and audio) in it.
- Expand/collapse session. This will allow you to view all recorded items within a session.
- Start/Stop recording button. When the session has not started yet, you will see a cog icon next to the "Start recording" button with the following recording settings:
- PCM Audio Recording: this option will allow you to record high-quality uncompressed audio as a separate file (not included in video) for post-production use. Keep in mind that the resulting file will be larger and this might use more bandwidth.
- Sources: this section of the settings menu allows you to select the individual audio, video or screen items you want to record. You can choose to start and stop the recording as many times as needed during your broadcast, so you might want to check/uncheck any participants, as needed.
Table of Contents