Source Elements Labs - Source-Connect v2
Source Elements Labs is your gateway to experimental features before they reach production. Help shape the tools that define tomorrow's workflows.
1. Introducing Source-Connect 4 - Labs
What is Source-Connect Labs: this is an exclusive preview application that gives select users early access to cutting-edge features and improvements coming to Source-Connect’s remote recording application. As a beta testing initiative, it serves as the proving ground where innovations for the main Source-Connect app can be refined and tested today.
Who it’s for: Source-Connect Labs is designed for experienced Source-Connect users who are passionate about remote recording technology and want to shape its future while providing feedback. Ideal candidates include audio professionals who rely heavily on remote recording for their work - beta testers should be comfortable with occasional bugs to provide detailed feedback, and excited about exploring new features before they reach the general public.
Why you need it: by joining the beta program for Source-Connect Labs, you gain exclusive access to breakthrough features months or even years before they are available to everyone else. You’ll experience enhanced audio quality improvements, streamlined workflows, and experimental features that could revolutionize how you capture remote conversations. Your feedback directly influences which features make it to the final release and how they're refined.
What you will find in this document: this guide will include setup guides and overviews
for the features included in the Labs version of Source-Connect.
For an overview of other existing
features in Source-Connect 4, please visit https://support.source-elements.com/source-connect-4-hub
and read through the Talent, Studio or Facility user guides.
About Source-Connect™
Source-Connect provides access to high-quality, real-time audio streaming, with integrated DAW/NLE functionality. Source-Connect is suitably low latency for creative collaboration, and boasts high-quality audio thanks to the AAC ELDv2 codec from Fraunhofer, and the Opus codec for high channel support. Through the integrated dashboard Source-Connect provides contact management and instant messaging features. Edit your personal settings and manage your contacts on the Source Elements website.
2. What's new in this release (V2)
This release of Source-Connect 4 - Labs (v2) includes two new sets of features:
Redesigned SYNC module and settings menu
Due to the introduction of the new RTS Overdub mode, the UI for the SYNC module (formerly RTS) has been redesigned:
For a complete walkthrough and additional information, please refer to the specific New SYNC Module and Settings section.
Source-Connect I/O plugin Update
With this new Source-Connect 4 Labs release comes a more complete and versatile version of Source-Connect I/O, where users can choose their desired mode out of 8 options depending on their workflows. The modes work together with the RTS Overdub mode and, while three of the modes are required for basic ROS operations, there are 5 others that can be included for more advanced setups.
The I/O plugin Simple mode, which will be familiar to most Source-Connect I/O legacy users, has also introduced a talkback feature. For a complete walkthrough, please refer to the Source-Connect I/O section.
RTS Overdub mode
As of v2 of Source-Connect 4 Labs, Source-Connect Studio and Facility users can record talent in perfect sync with DAW sessions or timelines on both sides of the connection, without requiring the talent to manually operate the timeline or DAW transport. Instead, the studio side will be able to control the talent’s playback and run the session from their side while syncing to the talent. This is a workflow that previously required the talent side to manually control the transport.
For more information, please check on the specific RTS with Overdub section.
Remote Overdub Sync (ROS)
Source-Connect 4 Labs v2 brings back a much requested experimental Source-Connect 3 feature, where Source-Connect Studio and Facility users can record remote talent without the talent needing a DAW. Engineers use the new Source-Connect I/O plugin on their own Pro Tools system, automatically compensating for any delay, to record and rewrite audio files for sync with the help of the built-in Restore/Replace feature in Source-Connect. Both parties will hear everything in perfect sync as the take is recorded, punched or played back.
For more information, please check on the specific Remote Overdub Sync (ROS) section.
3. System Requirements
This specific release of Source-Connect Labs is macOS only. The following are the system requirements and compatibility to install it:
- macOS 10.14+ (Mojave) or higher.
- For plugins: AAX only.
This specific version of Source-Connect Labs supports the following DAWs:
- Compatible with Pro Tools 10+.
Please note that there is a known compatibility issue with the Source-Connect plugin and Pro Tools 2022.09. If you are using that version of Pro Tools, please upgrade to avoid any issues.
Backwards Compatibility
The advanced features included in Source-Connect Labs are compatible with other Source-Connect 4 Labs versions only. For the features included in this release, we highly recommend using the same version on both sides.
Having said that, we highly recommend that you only use a release version of Source-Connect 4 when connecting to another user who is not using the Labs version. We can not predict what interactions may happen when combining connections with Labs and Full Release versions.
Network Configuration
Bandwidth
Source-Connect requires an Internet connection with very consistent and jitter free bandwidth of at least 300 kbps upload and download per participant. As importantly, consistent reliability on your network will ensure quality of service on your connection. You may need to configure your firewall and/or router if you are inside a corporate network or have an active firewall. Corporate firewalls and routers may be able to provide QoS (Quality of Service) and CoS (Class of Service) rules to better guarantee consistent bandwidth for your application. Please contact our support personnel if you have difficulty connecting successfully, we have dedicated tools and services to support all corporate and enterprise use cases.
You can get an idea of your available bandwidth and ping value via Speed Test sites, such as https://speedtest.net. However, due to the “peering” nature of the internet and how many different providers are used to cooperatively mesh the public internet together, take note that a report from a site in California does not mean that you will be getting the same bandwidth when connecting to a peer in, say, Australia. In most cases, Source-Connect will work well however dedicated testing prior to a recording session is recommended.
4. Installation and iLok Licensing
To get started with Source-Connect Labs, download the latest release from the Source Elements Feedback portal.
Once you have the software downloaded, open the application and follow the instructions. Because this is a closed beta, you will need an iLok license to activate your access to the Labs application. Depending on your license (Talent, Studio, Facility), you will see different versions of the following screen:
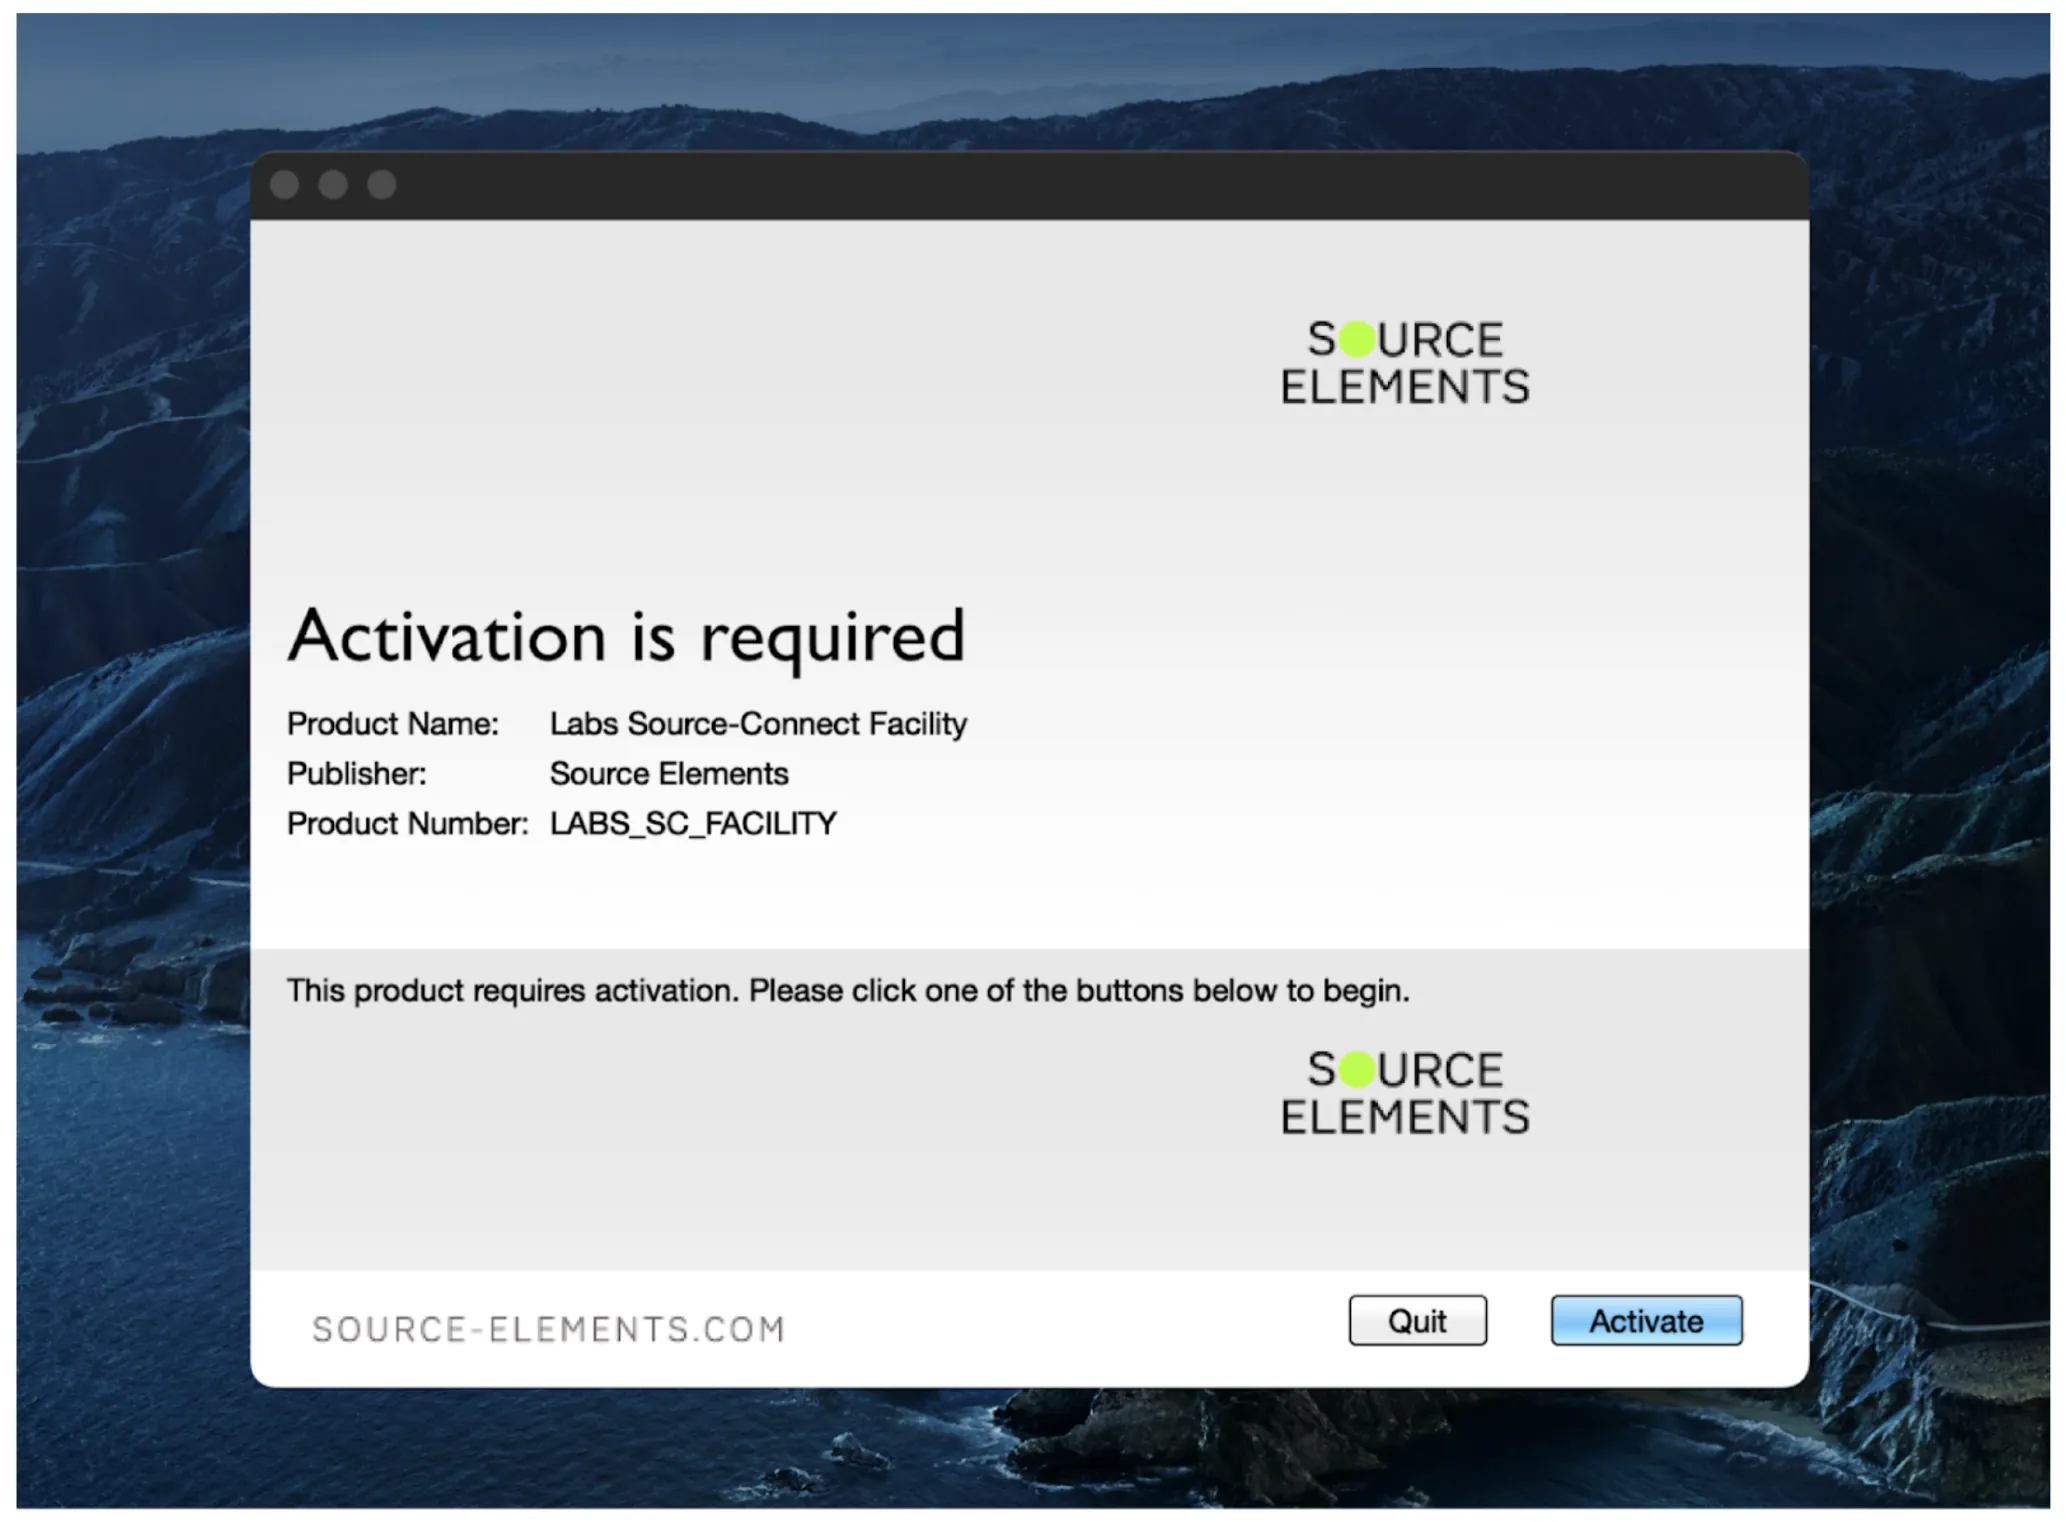
Click the “Activate” button. In the next screen, enter your iLok username and password.
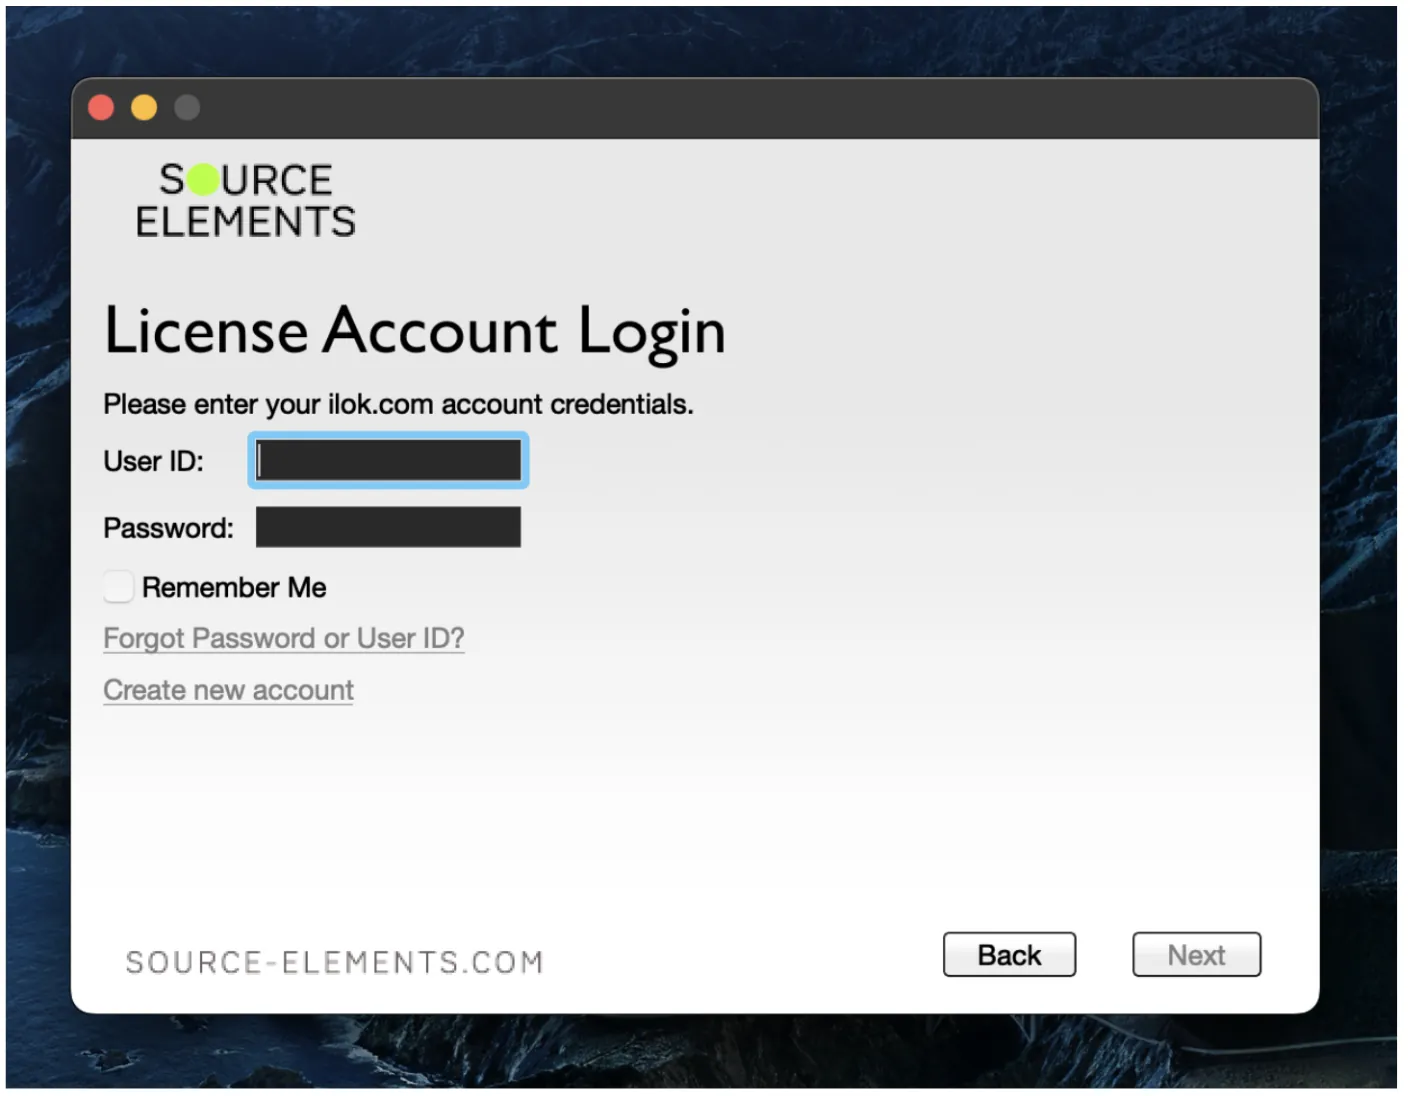
Source-Connect Labs will check your iLok account for a license and, if one is found, you will be prompted to activate the license to your computer (or iLok dongle).
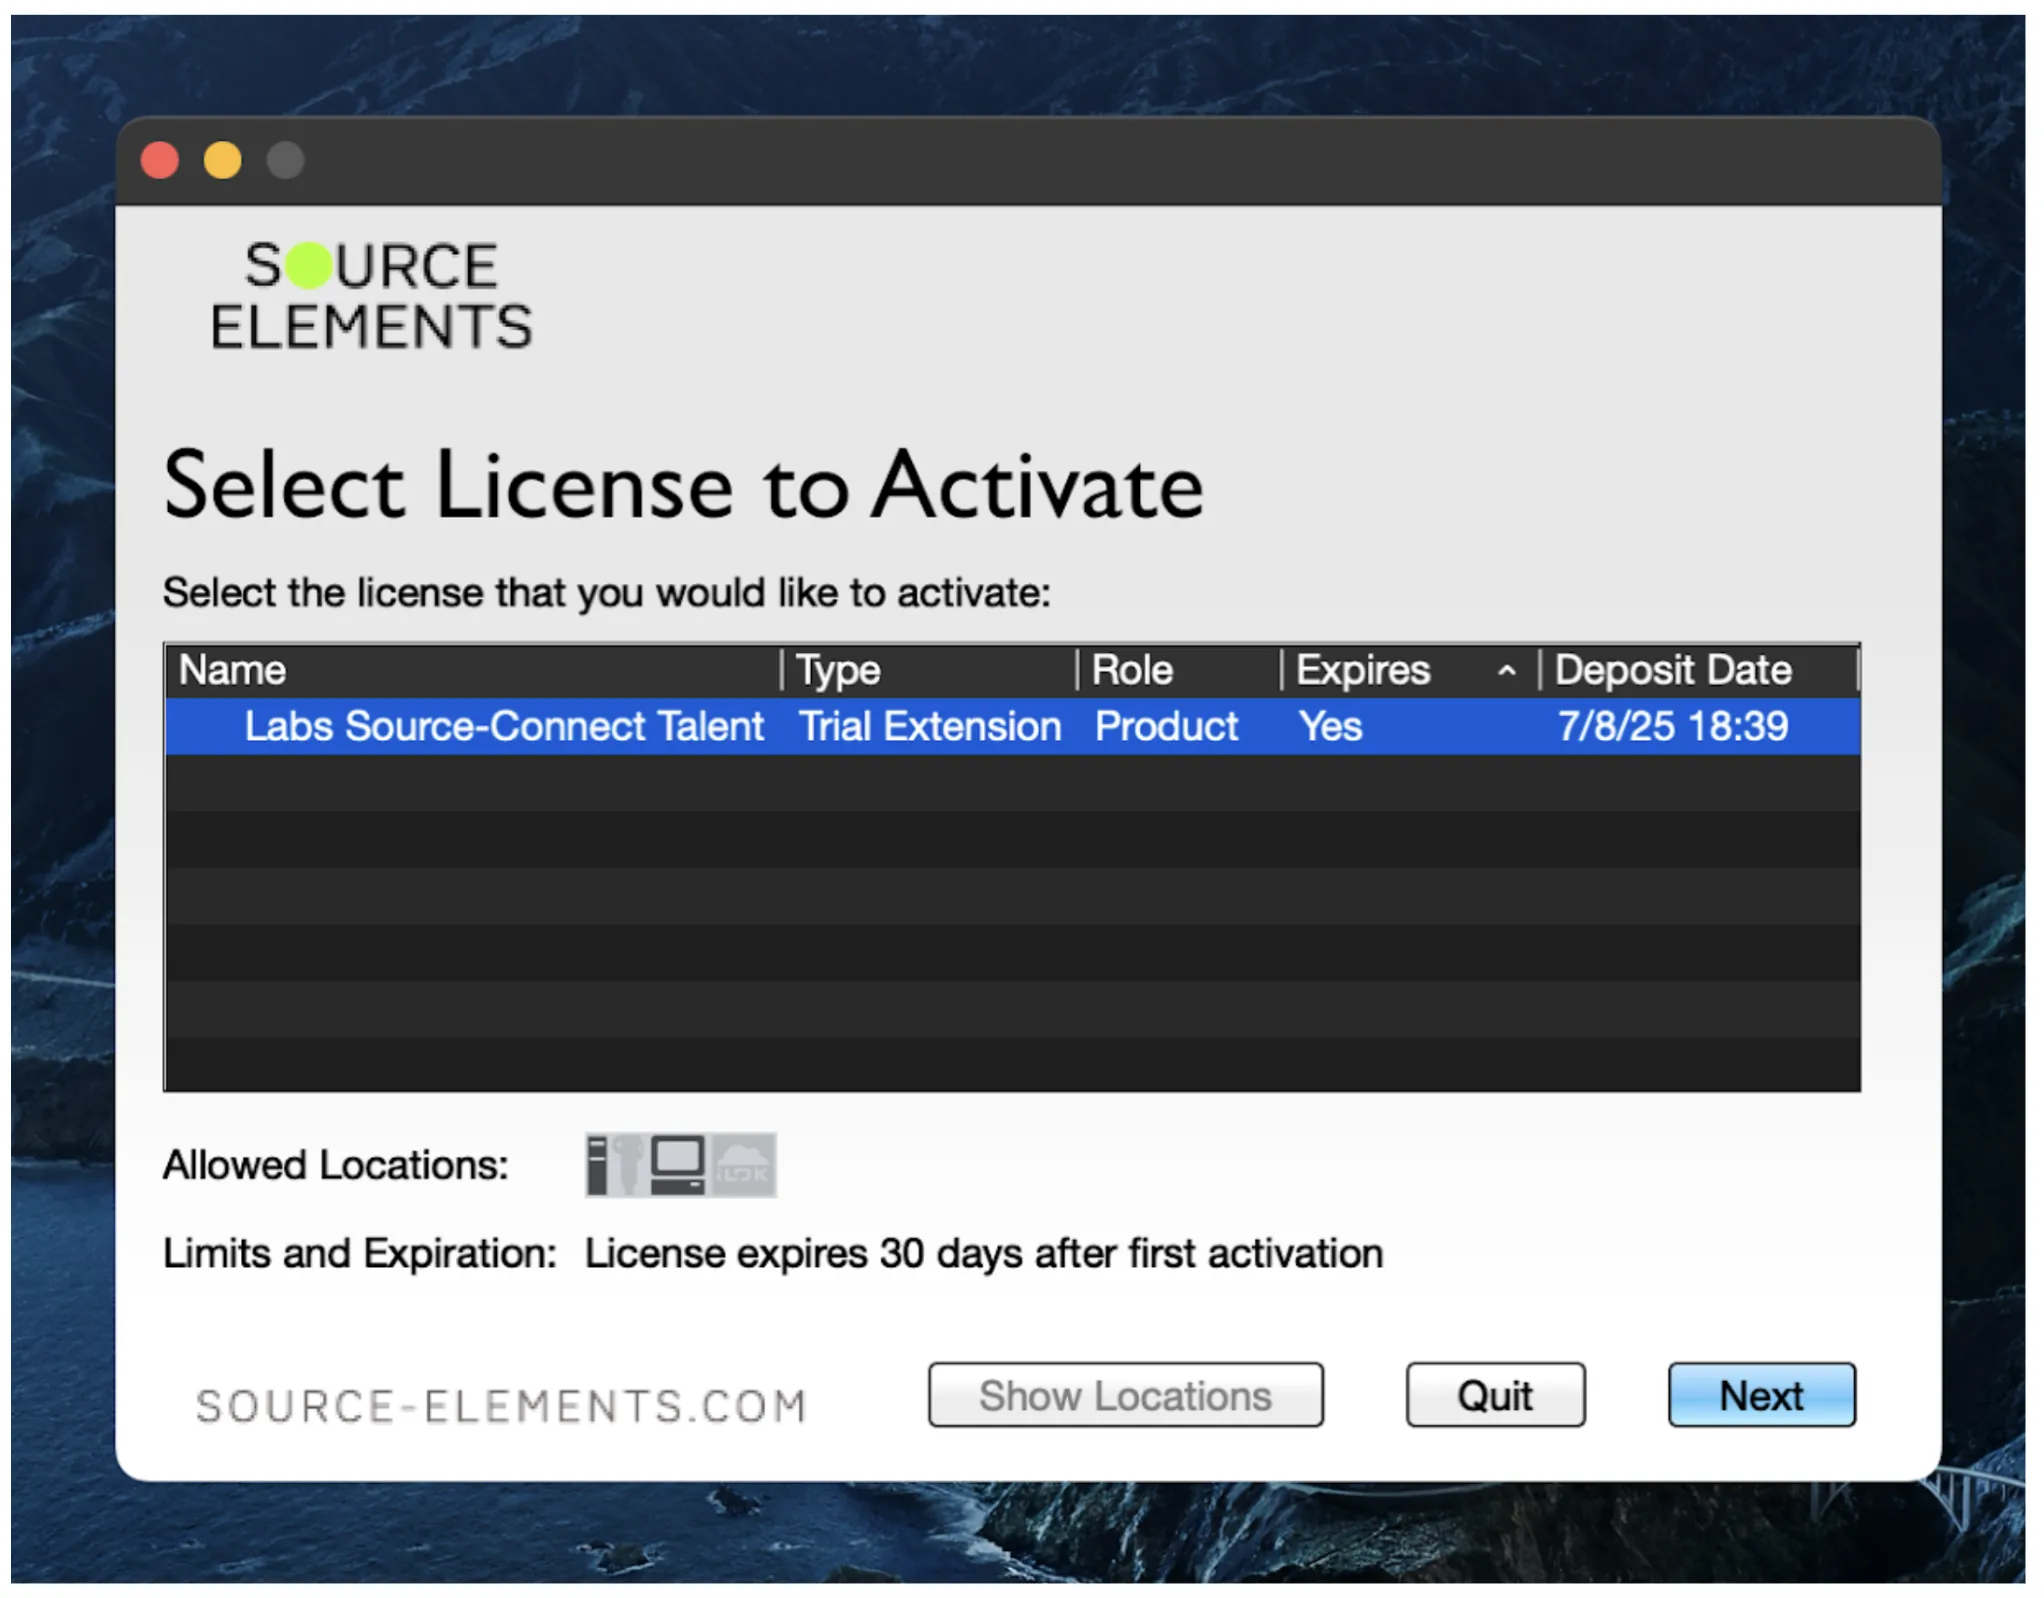
If you see an error message saying you don’t have any licenses in your account, or that none of the licenses have activations available, contact our team in the Source Elements feedback portal.
Uninstalling Source-Connect Labs
To uninstall, we recommend using the installation file and, in “Installation Type” selecting “Uninstall”. This will remove any preferences and unnecessary files from your computer as well.
You can also go to the Applications folder on your Mac and drag and drop the Source-Connect icon into the trash.
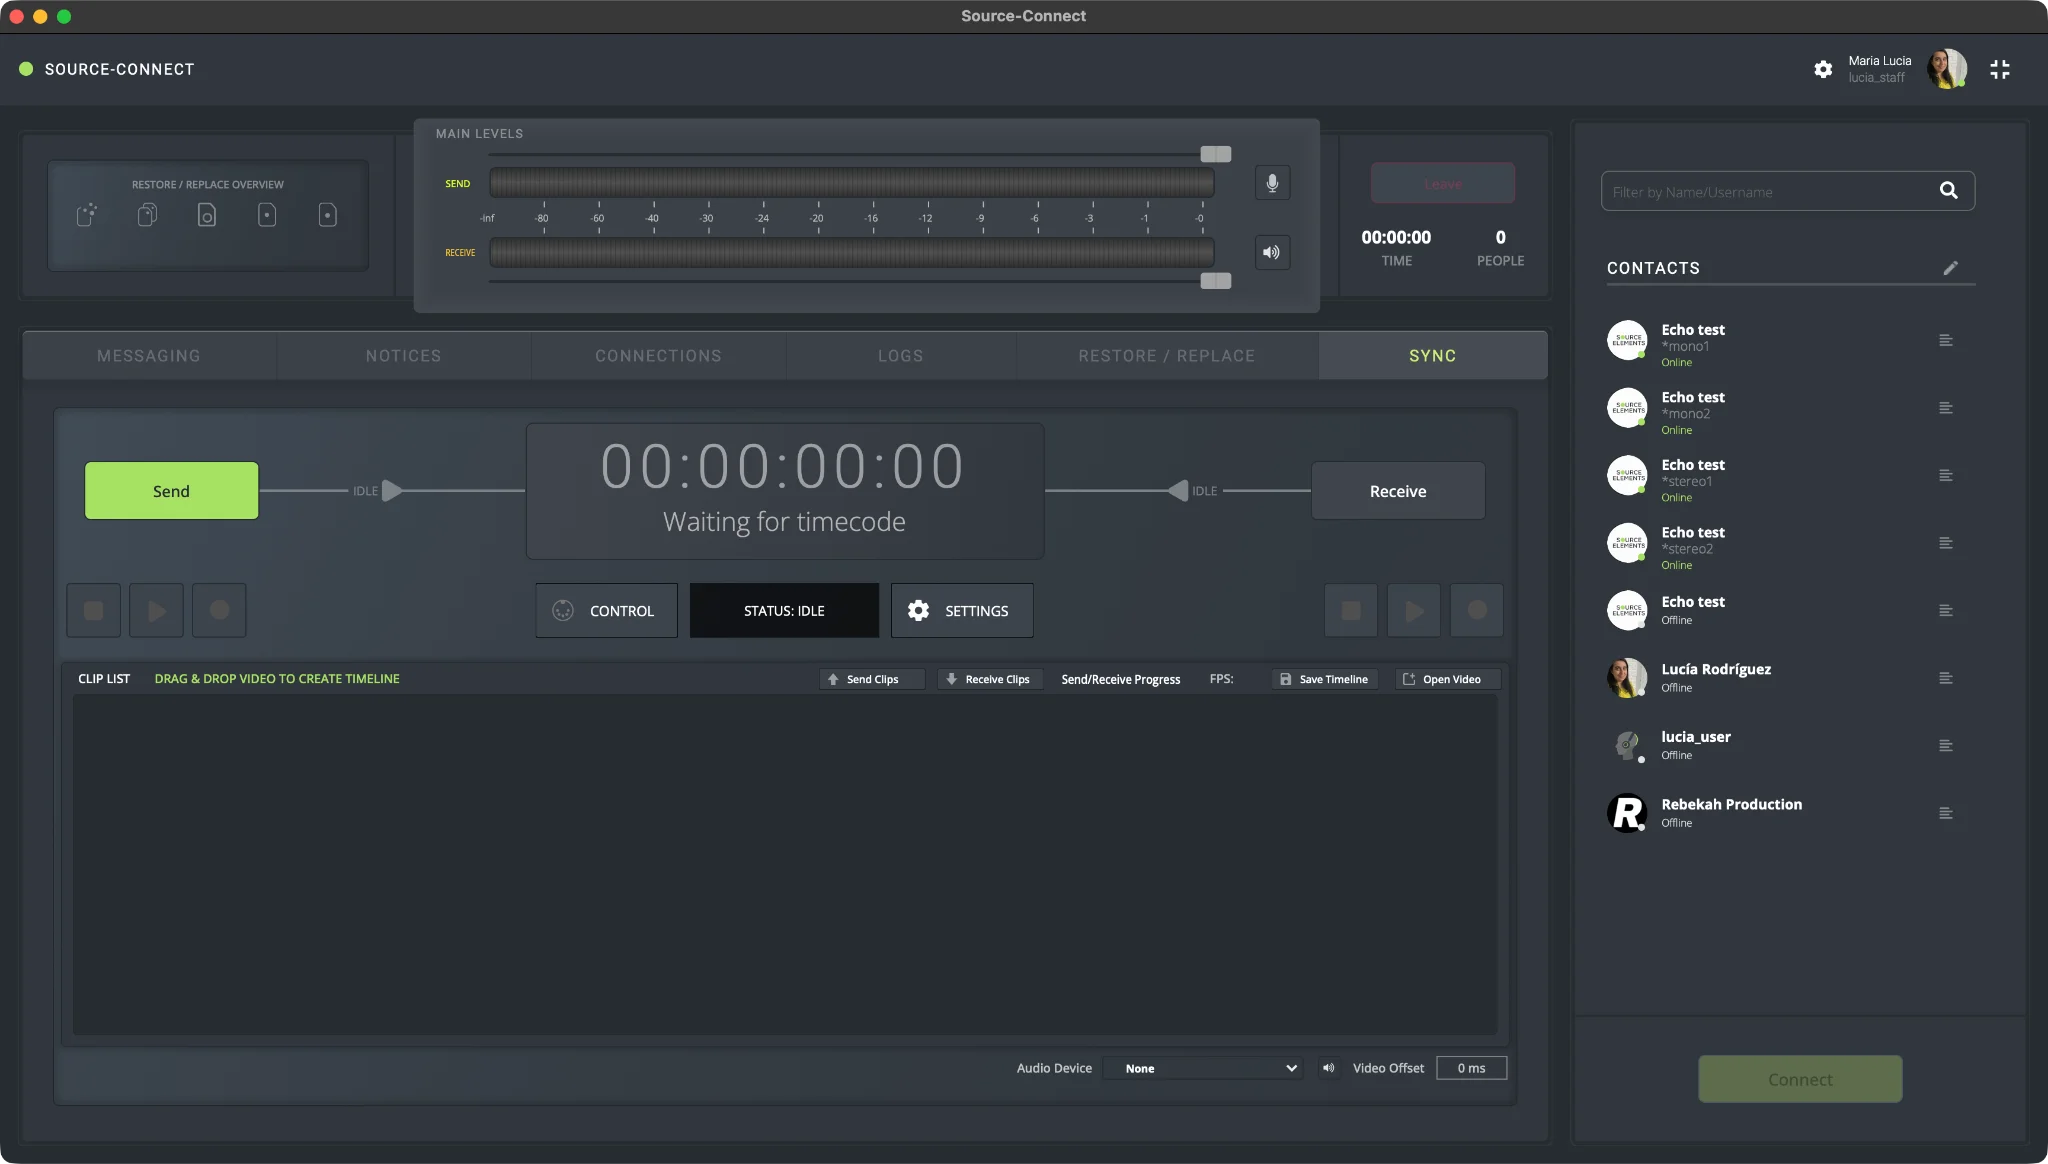
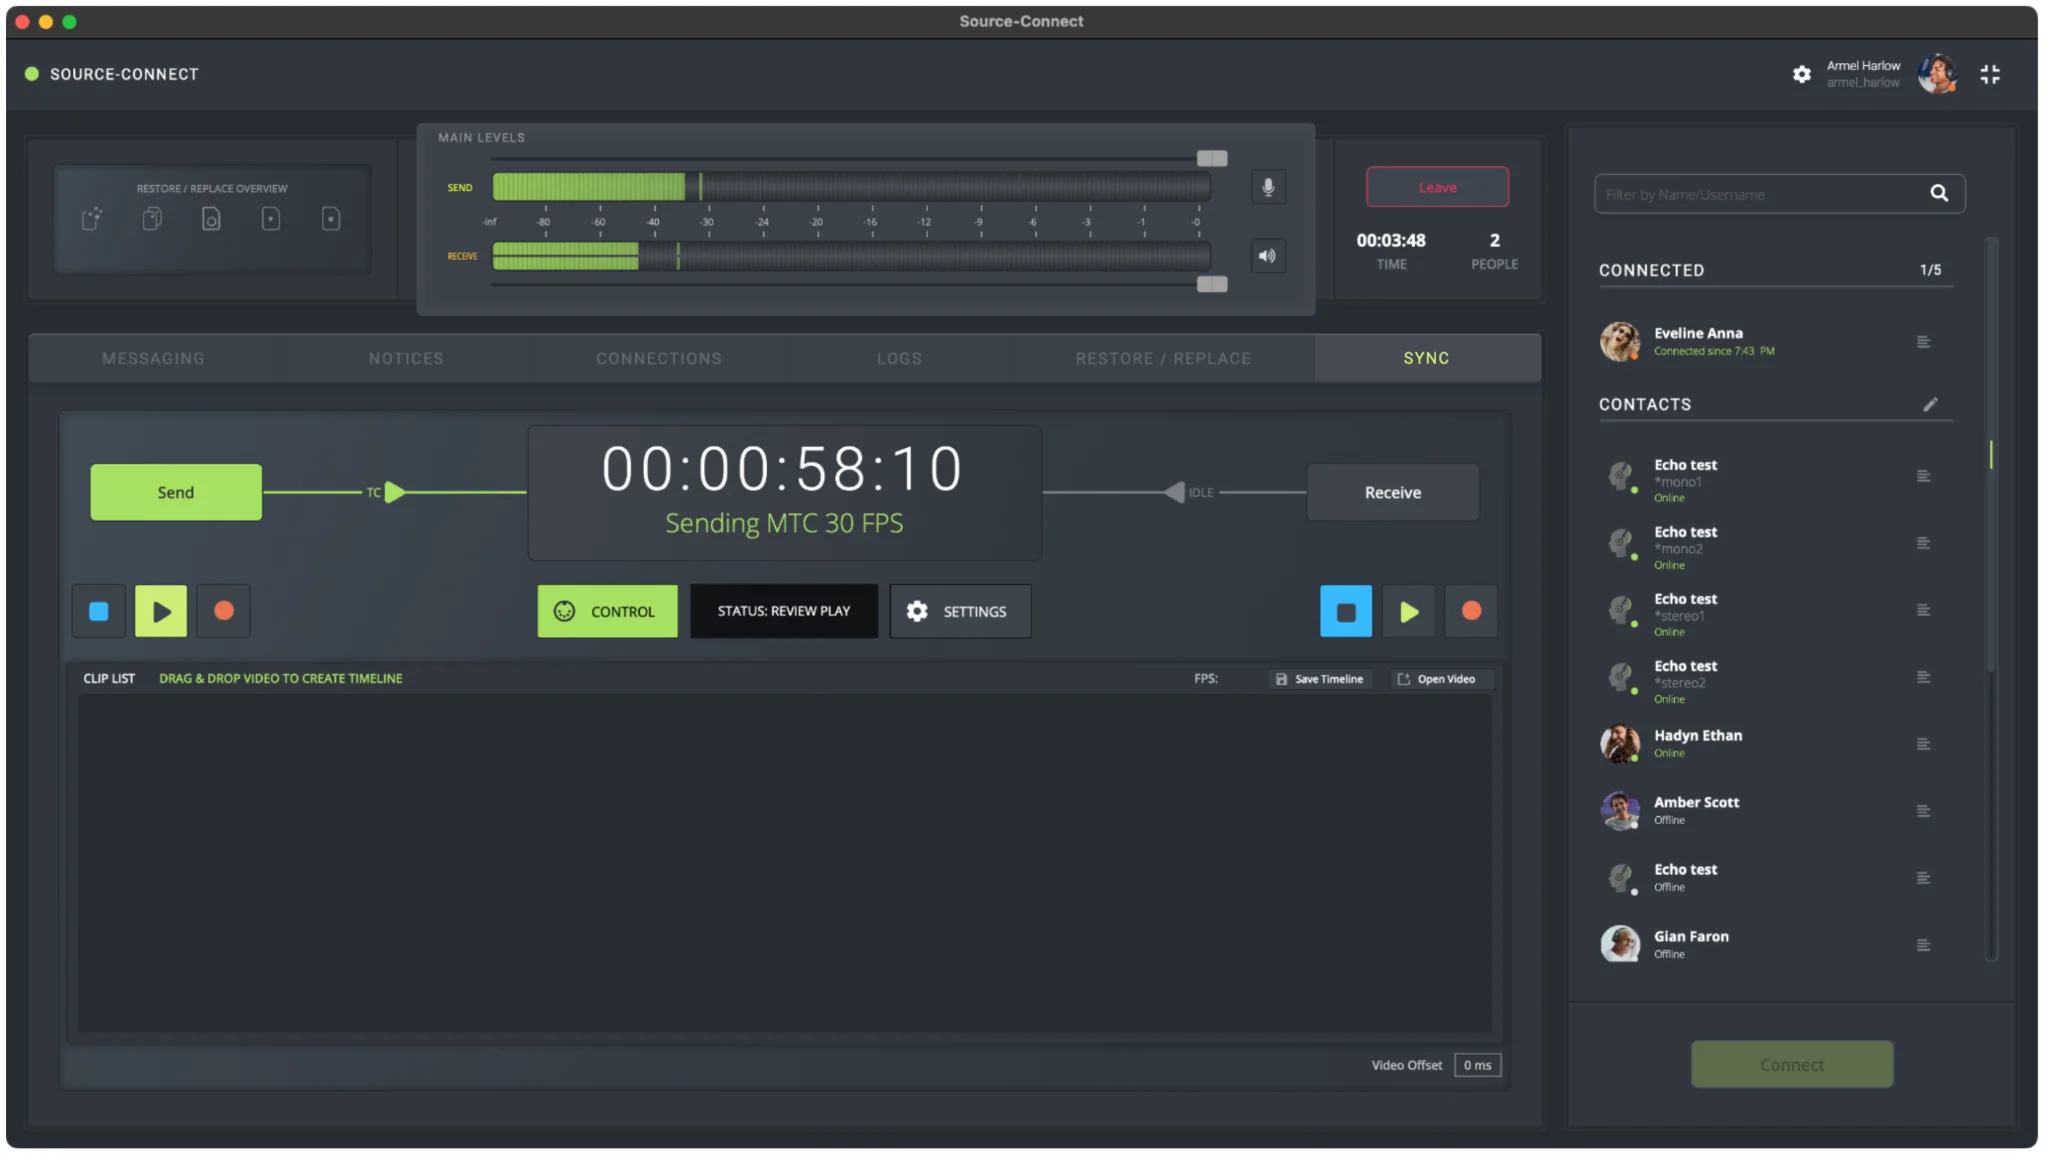
5. New SYNC module and settings
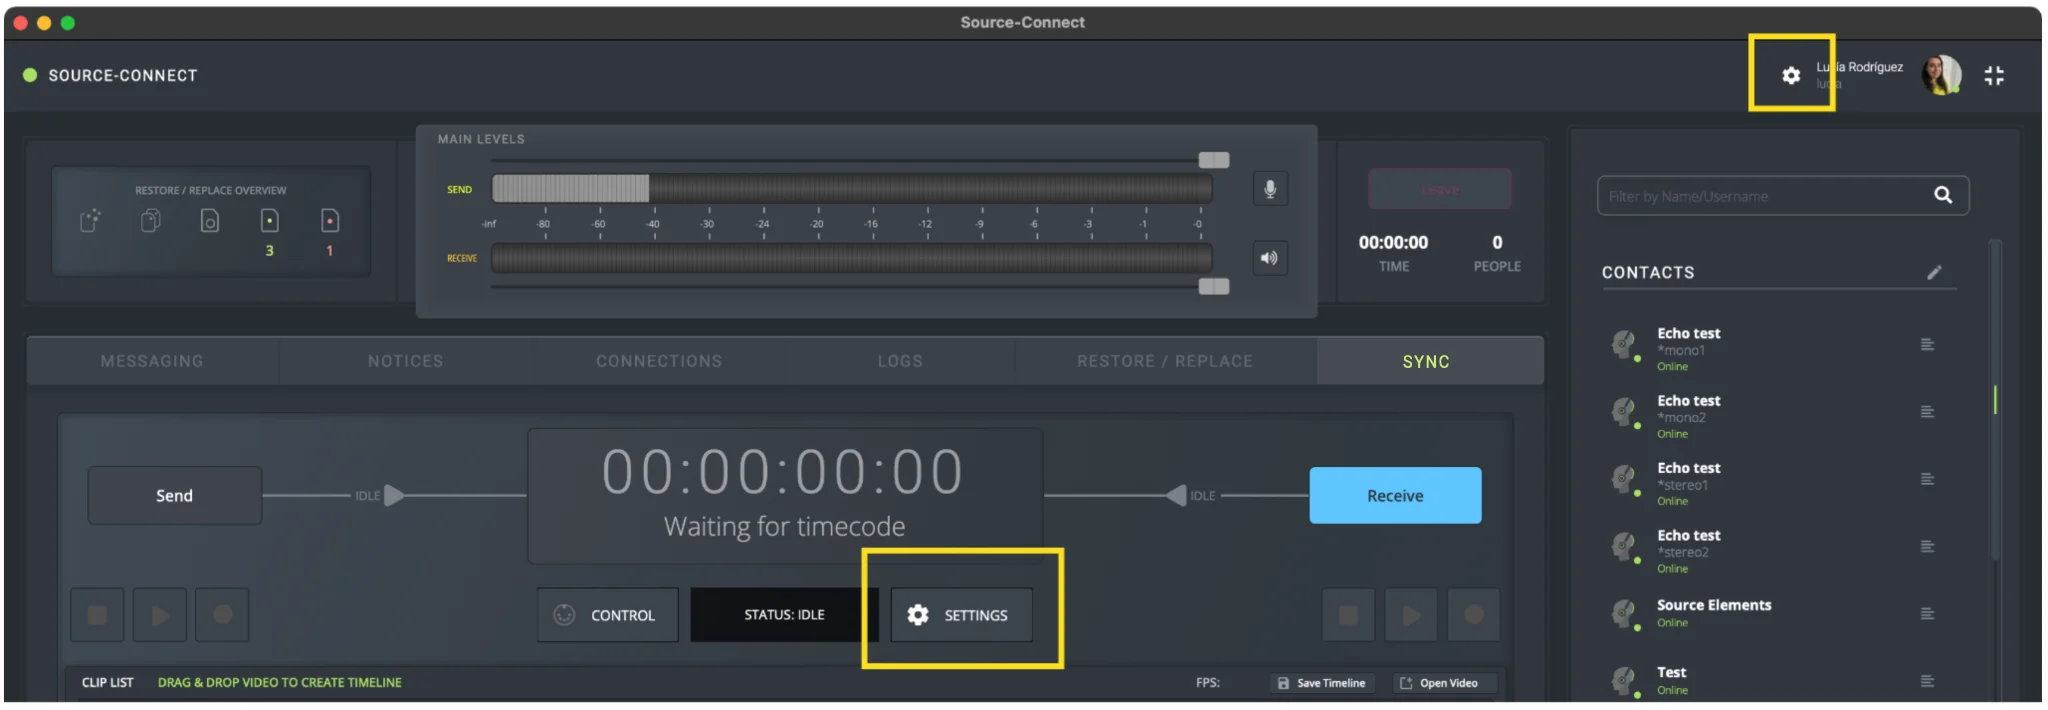
Starting with version 2 of the Source-Connect 4 Labs application, users can set all SYNC-related settings from the Configuration Settings panel access from either the settings cog wheel at the top right-hand corner of the application or the Settings button in the SYNC panel:
The new panel contains the settings necessary for a regular RTS session and additional settings for an RTS with Overdub session. These settings are different in the Source-Connect Talent and the Source-Connect Studio/Facility versions:
Settings in Source-Connect Talent
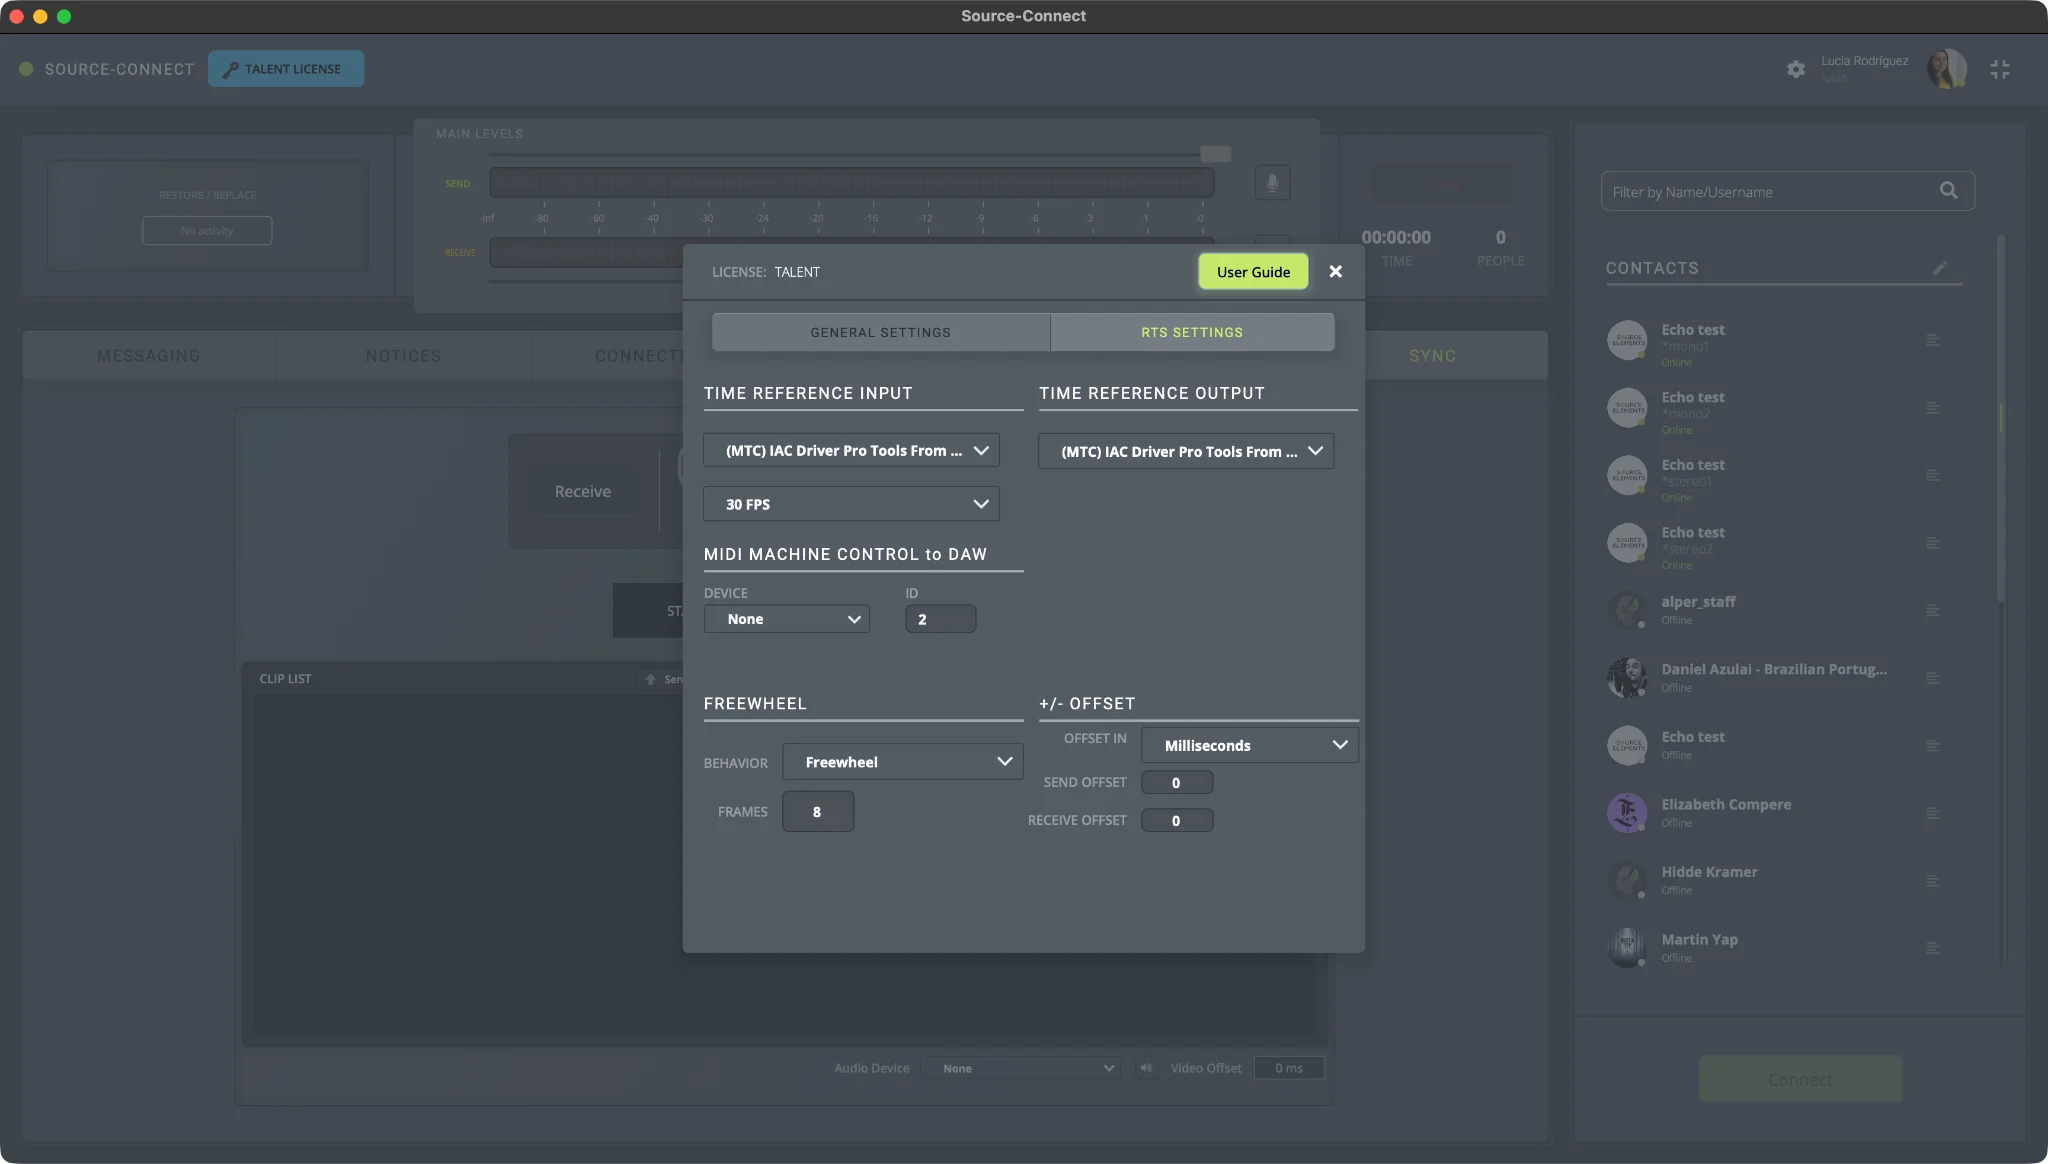
- Time reference input:
- Input device dropdown: the source or audio device that will send MTC/LTC.
- FPS: 23.976fps, 24fps, 25fps, 29.97fps, 29.97 fps drop, 30fps, 30fps drop. The FPS should match the DAW and movie frame-rate.
- Time reference output:
- Output device dropdown: the source or audio device that will receive MTC/LTC.
- MIDI machine control to DAW: the MMC device that will be used to control your local
DAW.
- Device Name: exact device name. You can refer to Appendix 1, section “How to create an IAC device on macOS” for instructions on how to create a device if needed.
- Device ID
Note: if you select both sides of MMC, you will need to use a different device number.
- Freewheel: is the time setting in frames to ignore disruptions in your MTC or LTC
signal.
- Behavior: the available options are Freewheel, Jamsync, Off.
- Frames: the number of frames RTS will wait for until it stops operating when no valid timecode signal is received. By default, it will wait 8 frames.
- Jamsync ignores all breaks in the timecode once timecode is detected so users must manually stop the transport.
- +/- offset: this setting will delay or advance the timecode to adjust for latencies
outside of Source-Connect that are unknown within the entire system. . Negative numbers can be included.
- Offset in: the measurement unit (milliseconds or frames)
- Enter a specific value. By default, it will be set to 0.
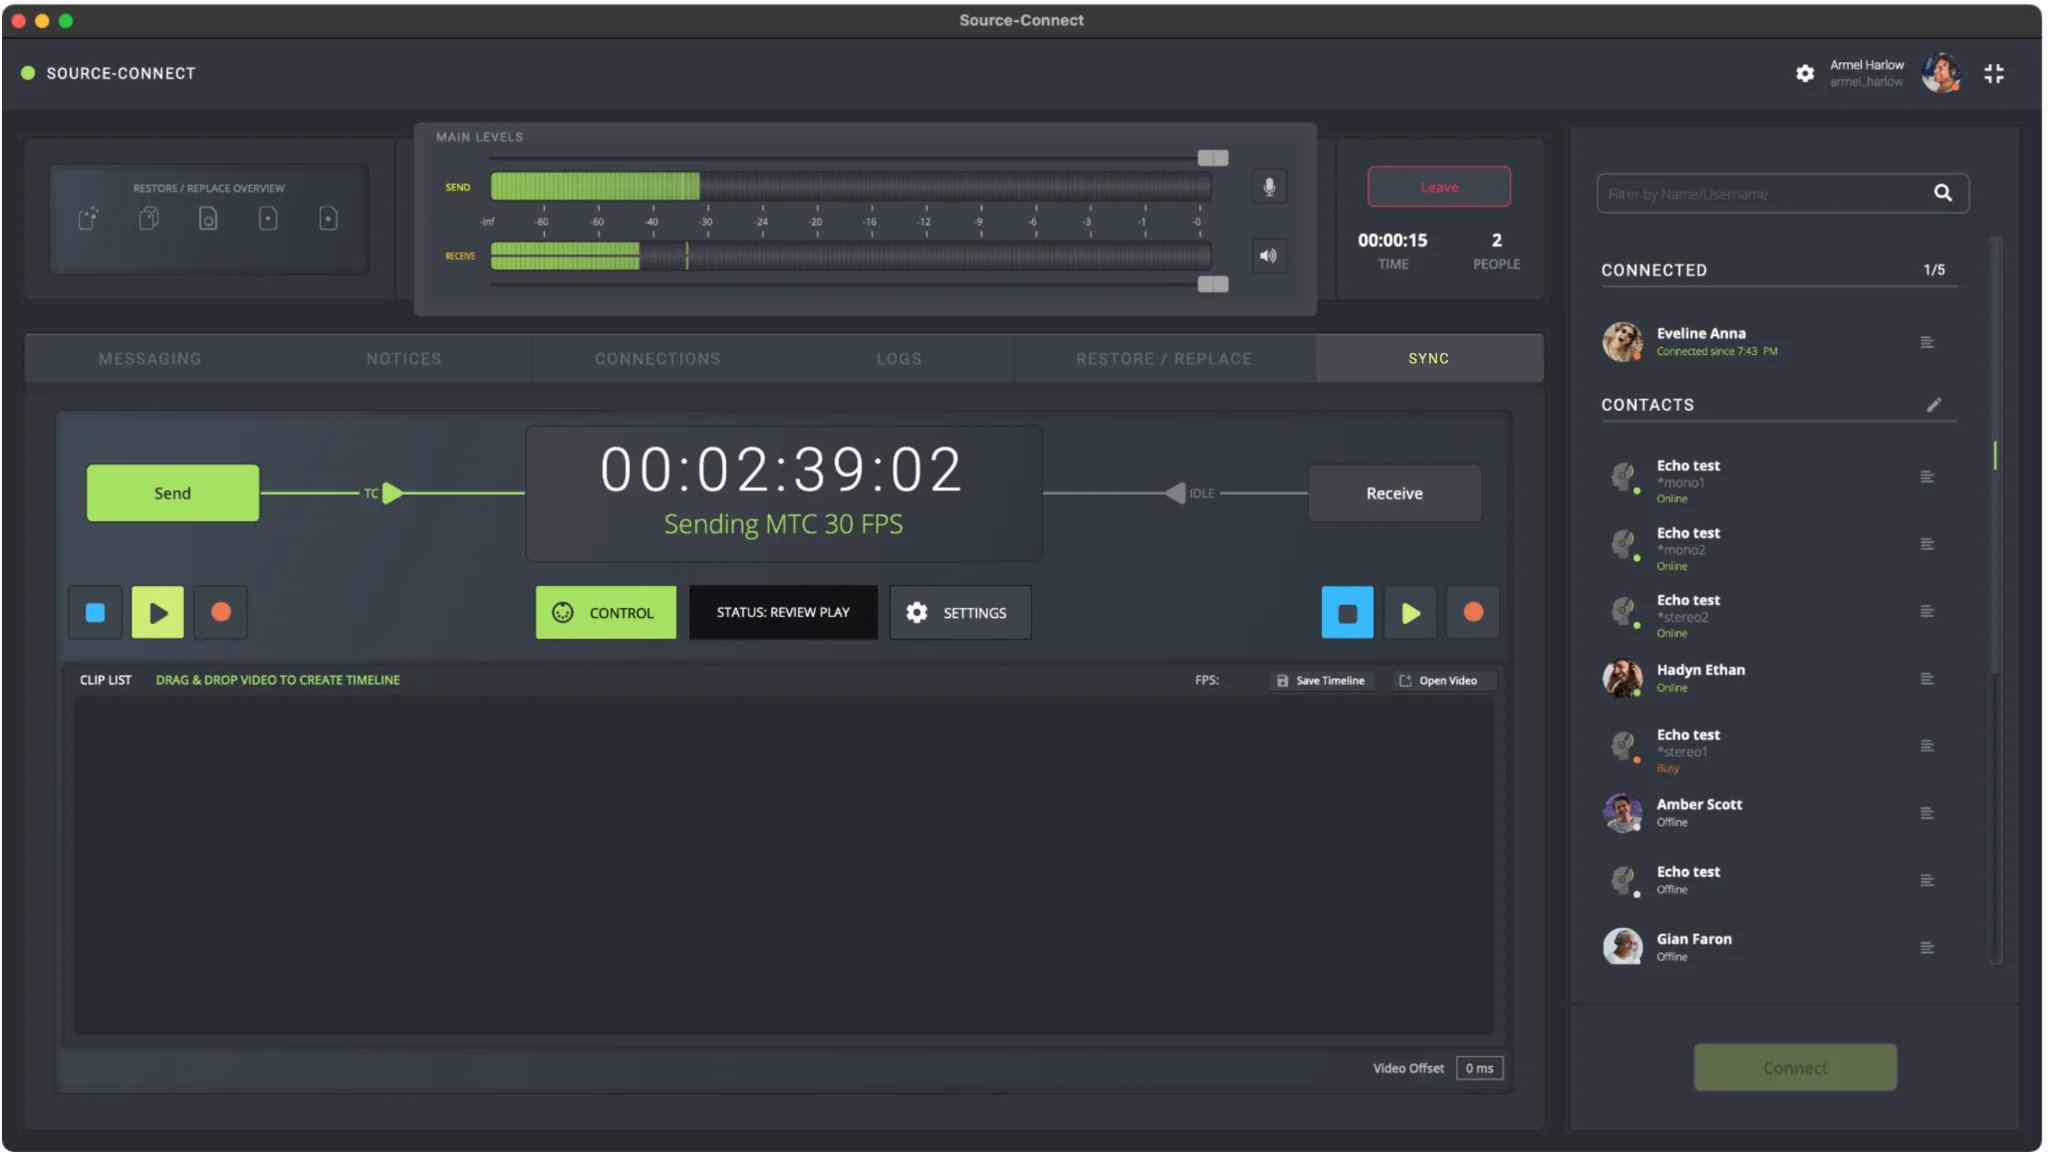
The RTS screen will now display only the MTC/LTC timecode display, status display, settings cog (which will display the Settings menu) and the RTL menu (already included in v1 of Source-Connect 4 Labs).
Settings in Source-Connect Studio/Facility
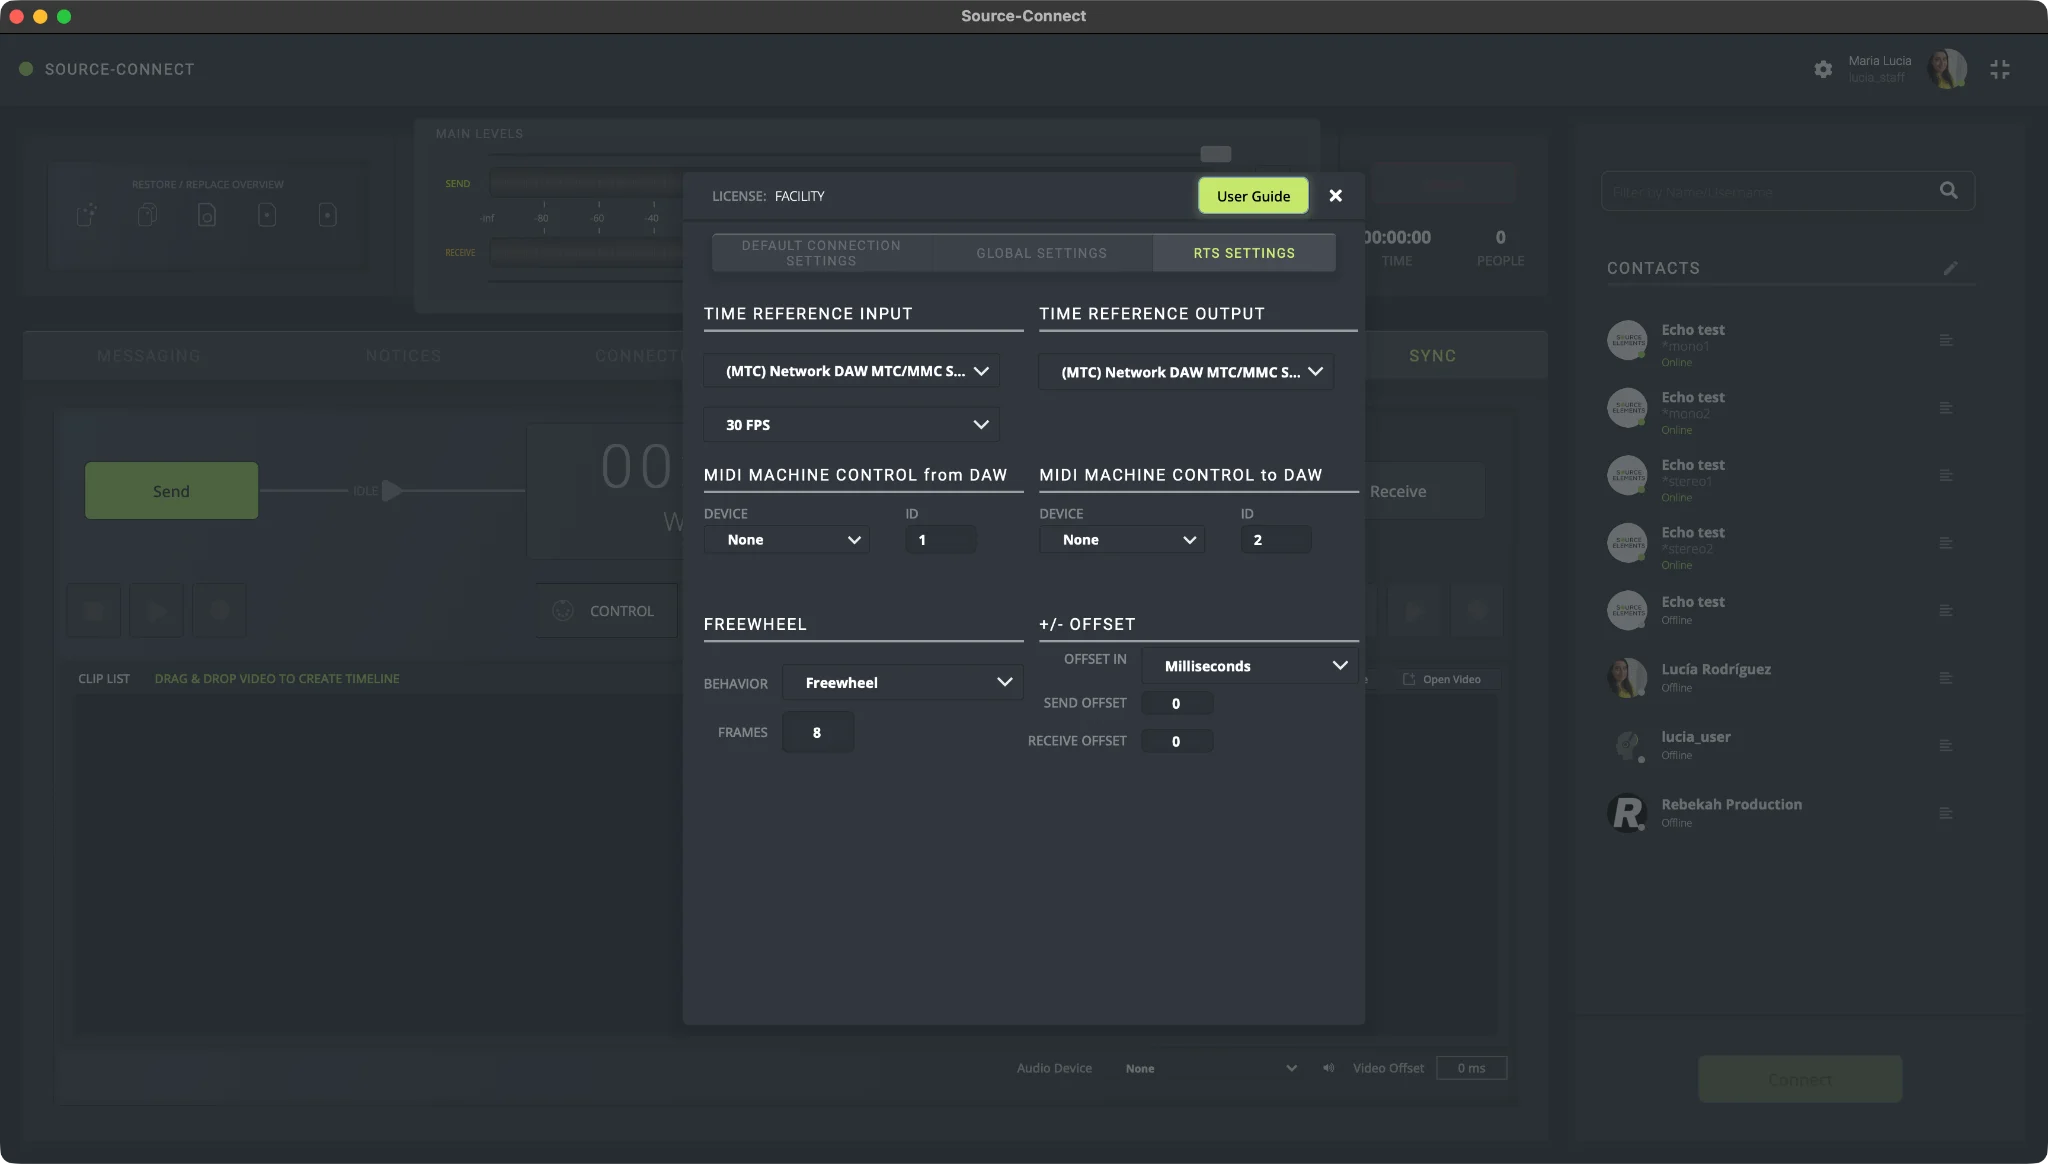
- Time reference input:
- Input device dropdown: the source or driver that will send MTC/LTC.
- FPS: 23.976fps, 24fps, 25fps, 29.97fps, 29.97 fps drop, 30fps, 30fps drop.
- Time reference output:
- Output device dropdown: the source or driver that will receive MTC/LTC.
- MIDI machine control from DAW: the MMC device that will receive timecode from your
DAW.
- Device name: exact device name. You can refer to Appendix 1, section “How to create an IAC device on macOS” for instructions on how to create a device if needed.
- Device ID: first pick the ID on your DAW, then enter the ID number on Source-Connect.
- MIDI machine control to DAW: the MMC device that will be used to control the transport of the local DAW.
- Device Name: exact device name of your MMC device. You can refer to Appendix 1,
section How to create an IAC device on macOS for
instructions on how to create a device if needed.
- Device ID: first pick the ID on your DAW, then enter the ID number on Source-Connect.
Note: if you select both sides of MMC, you will need to use a different device number.
- Freewheel: is the time setting in frames to ignore disruptions in your MTC or LTC
signal.
- Behavior: the available options are Freewheel, Jamsync, Off.
- Frames: the number of frames RTS will wait for until it stops operating when no valid timecode signal is received. By default, it will wait 8 frames.
- Jamsync ignores all breaks in the timecode once timecode is detected so users must manually stop the transport.
- +/- offset: this setting will delay or advance the play command being timecoded to
adjust for latencies outside of Source-Connect that are unknown within the entire system. . Negative
numbers can be included.
- Offset in: the measurement unit (milliseconds or frames)
- Enter a specific value. By default, it will be set to 0.
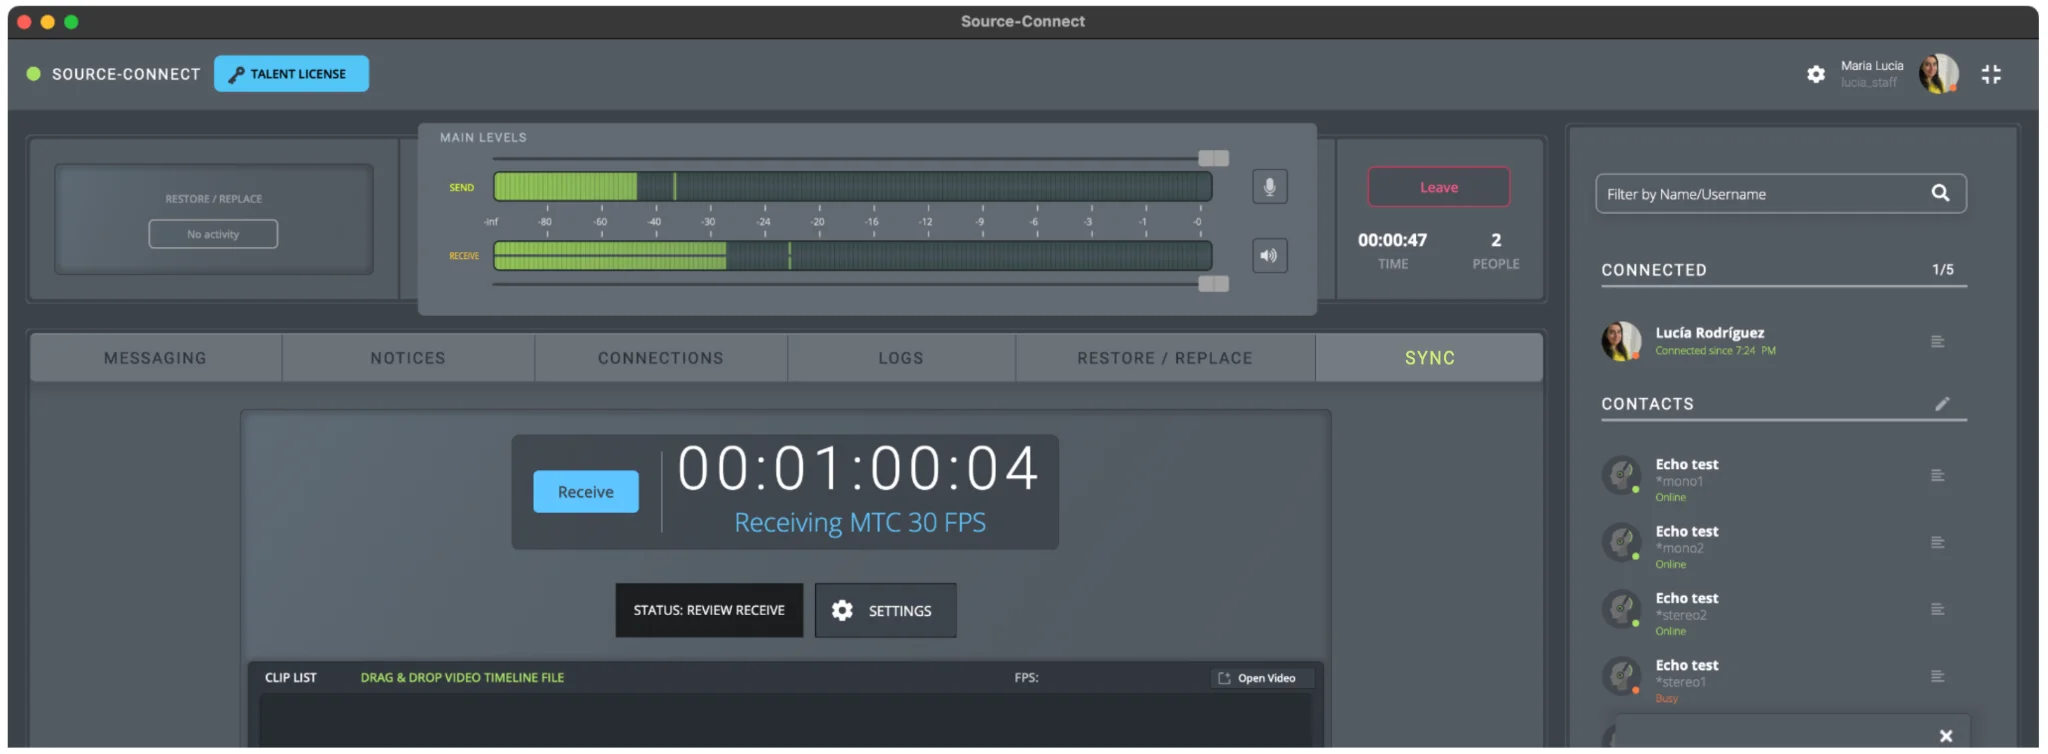
The following controls will be displayed in the SYNC module:
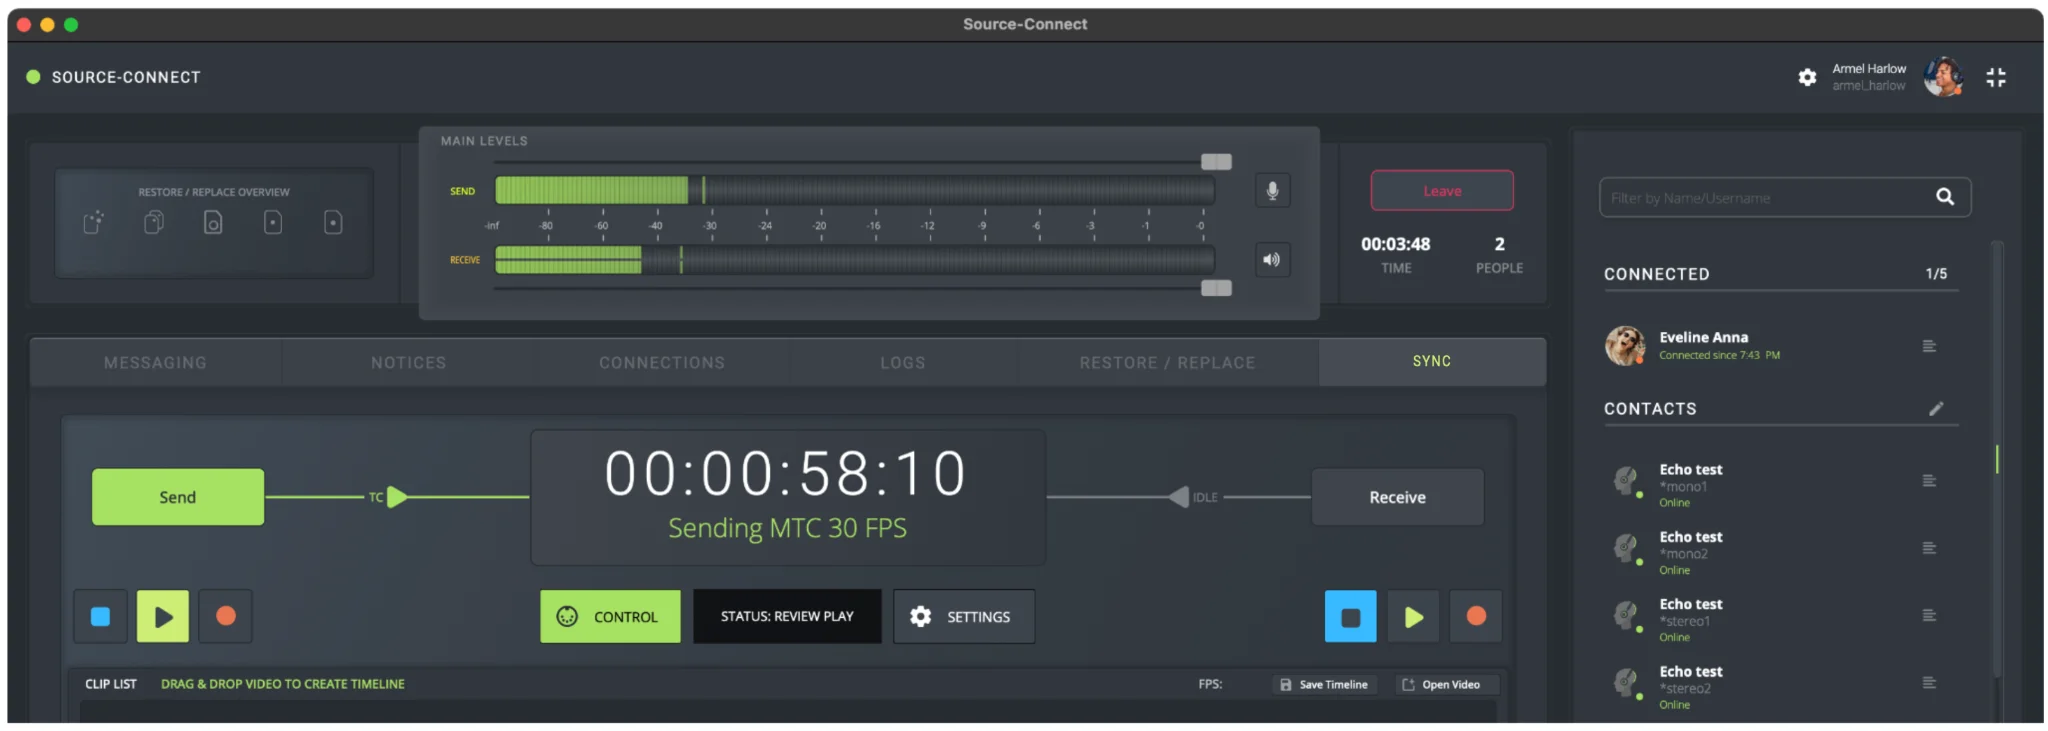
- Send/Receive button for remote timeline.
- Control button to enable stop/play/record overdub controls.
- Status display page.
- Settings cog that will open the Settings menu.
- Display-only buttons to indicate the status of the remote connection.
- RTL menu, already included in v1 of Source-Connect 4 Labs.
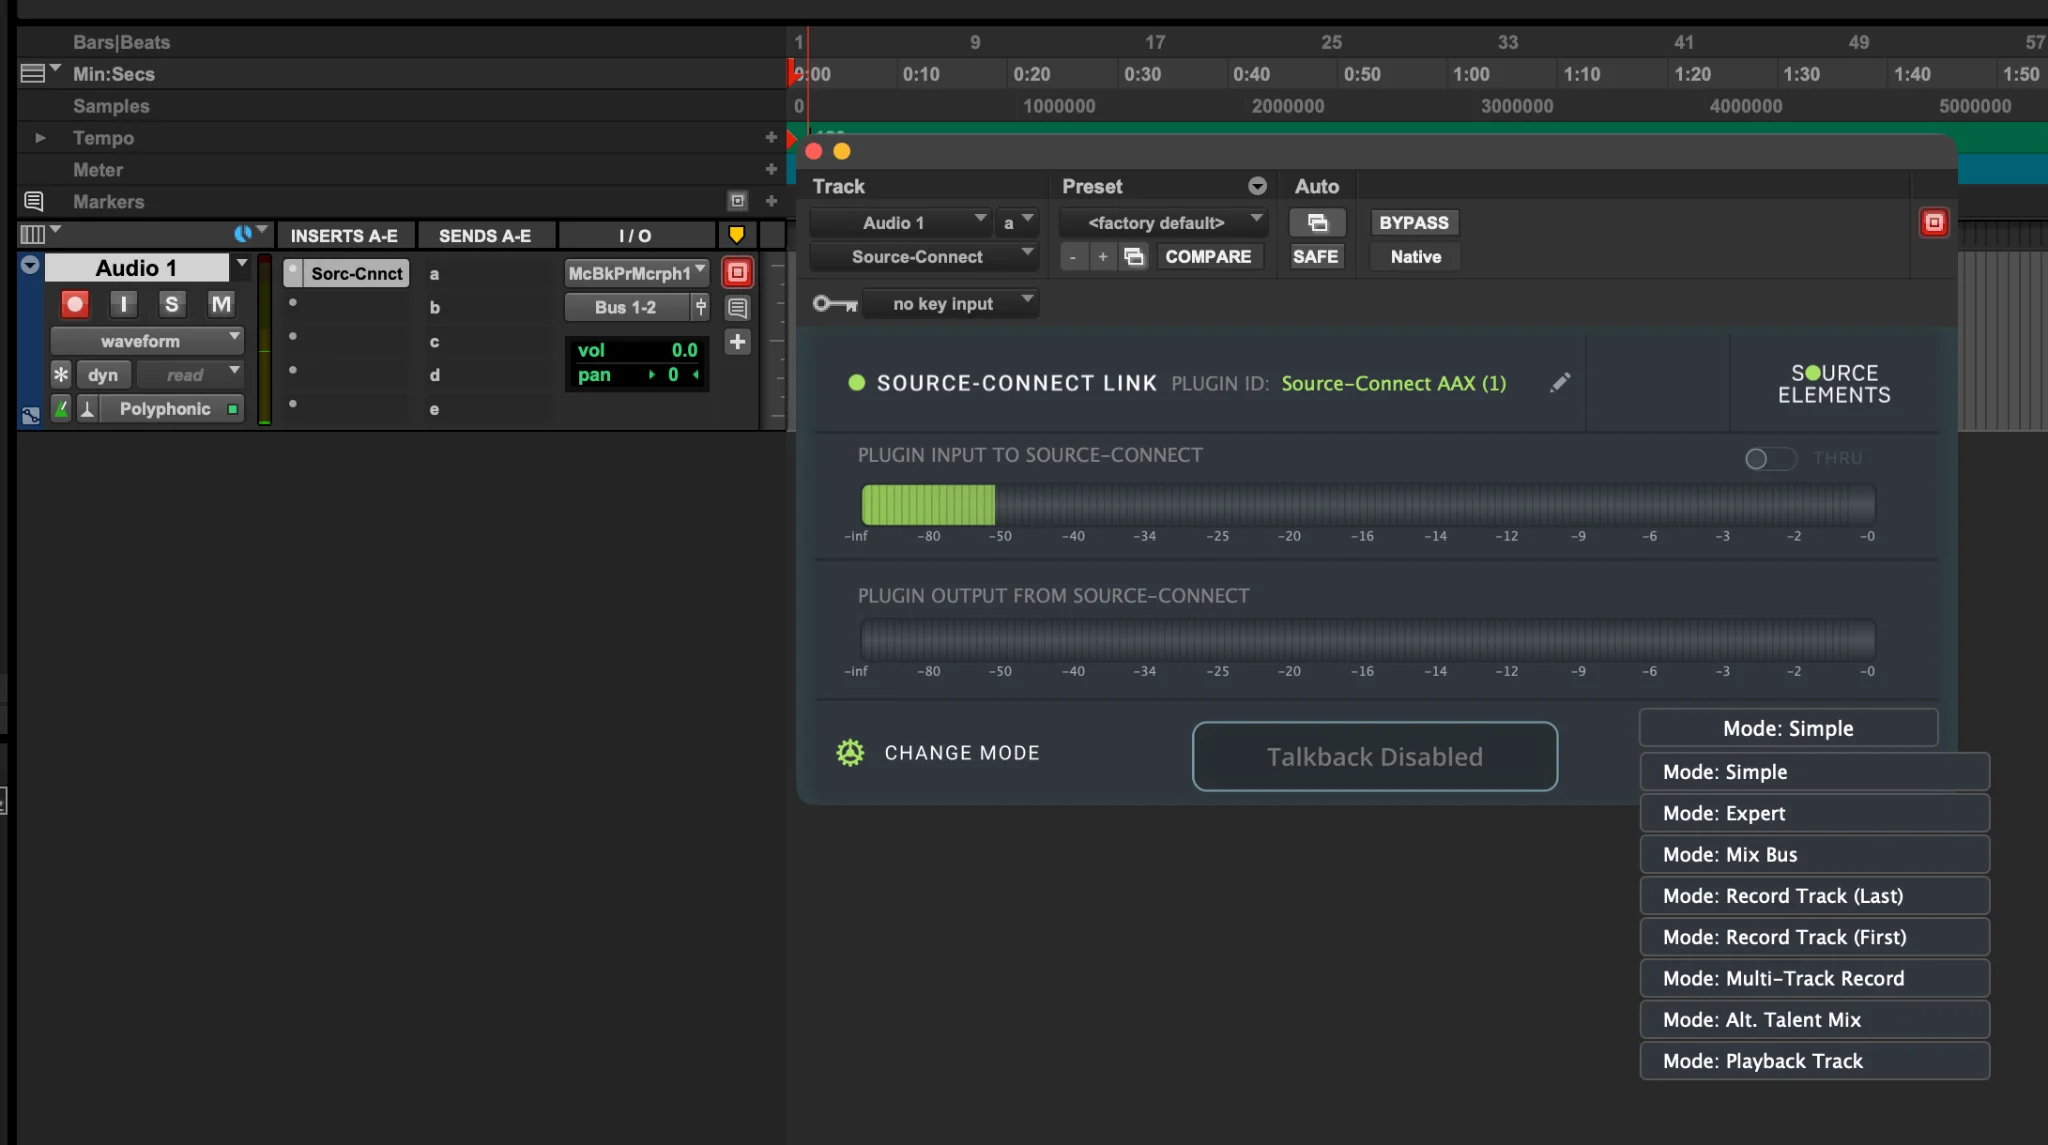
6. Source-Connect I/O Plugin Update
The second version of Source-Connect 4 Labs includes a new companion plugin, Source-Connect I/O, which now features a mode selection that allows you to choose the plugin mode that best matches your workflow for each instance. It can be used in simple mode for basic audio routing, like the previous Source-Connect I/O version, or in any of the Expert dedicated modes for advanced workflows such as Remote Overdub Sync (ROS) and Remote Transport Sync (RTS) with Overdub.
The new Source-Connect I/O plugin can be placed in multiple positions within your DAW simultaneously to facilitate any of these advanced workflows. We recommend you review the available in-app documentation to review how many instances of the I/O plugin are allowed per DAW session.
Clicking “CHANGE MODE” or clicking the mode dropdown will display a list of all available modes:
- Mode: Simple
- Mode: Expert
- Mode: Mix Bus
- Mode: Record Track (Last) - Record Track Mode A
- Mode: Record Track (First) - Record Track Mode B
- Mode: Multi-Track Record
- Mode: Alt. Talent Mix
- Mode: Playback Track
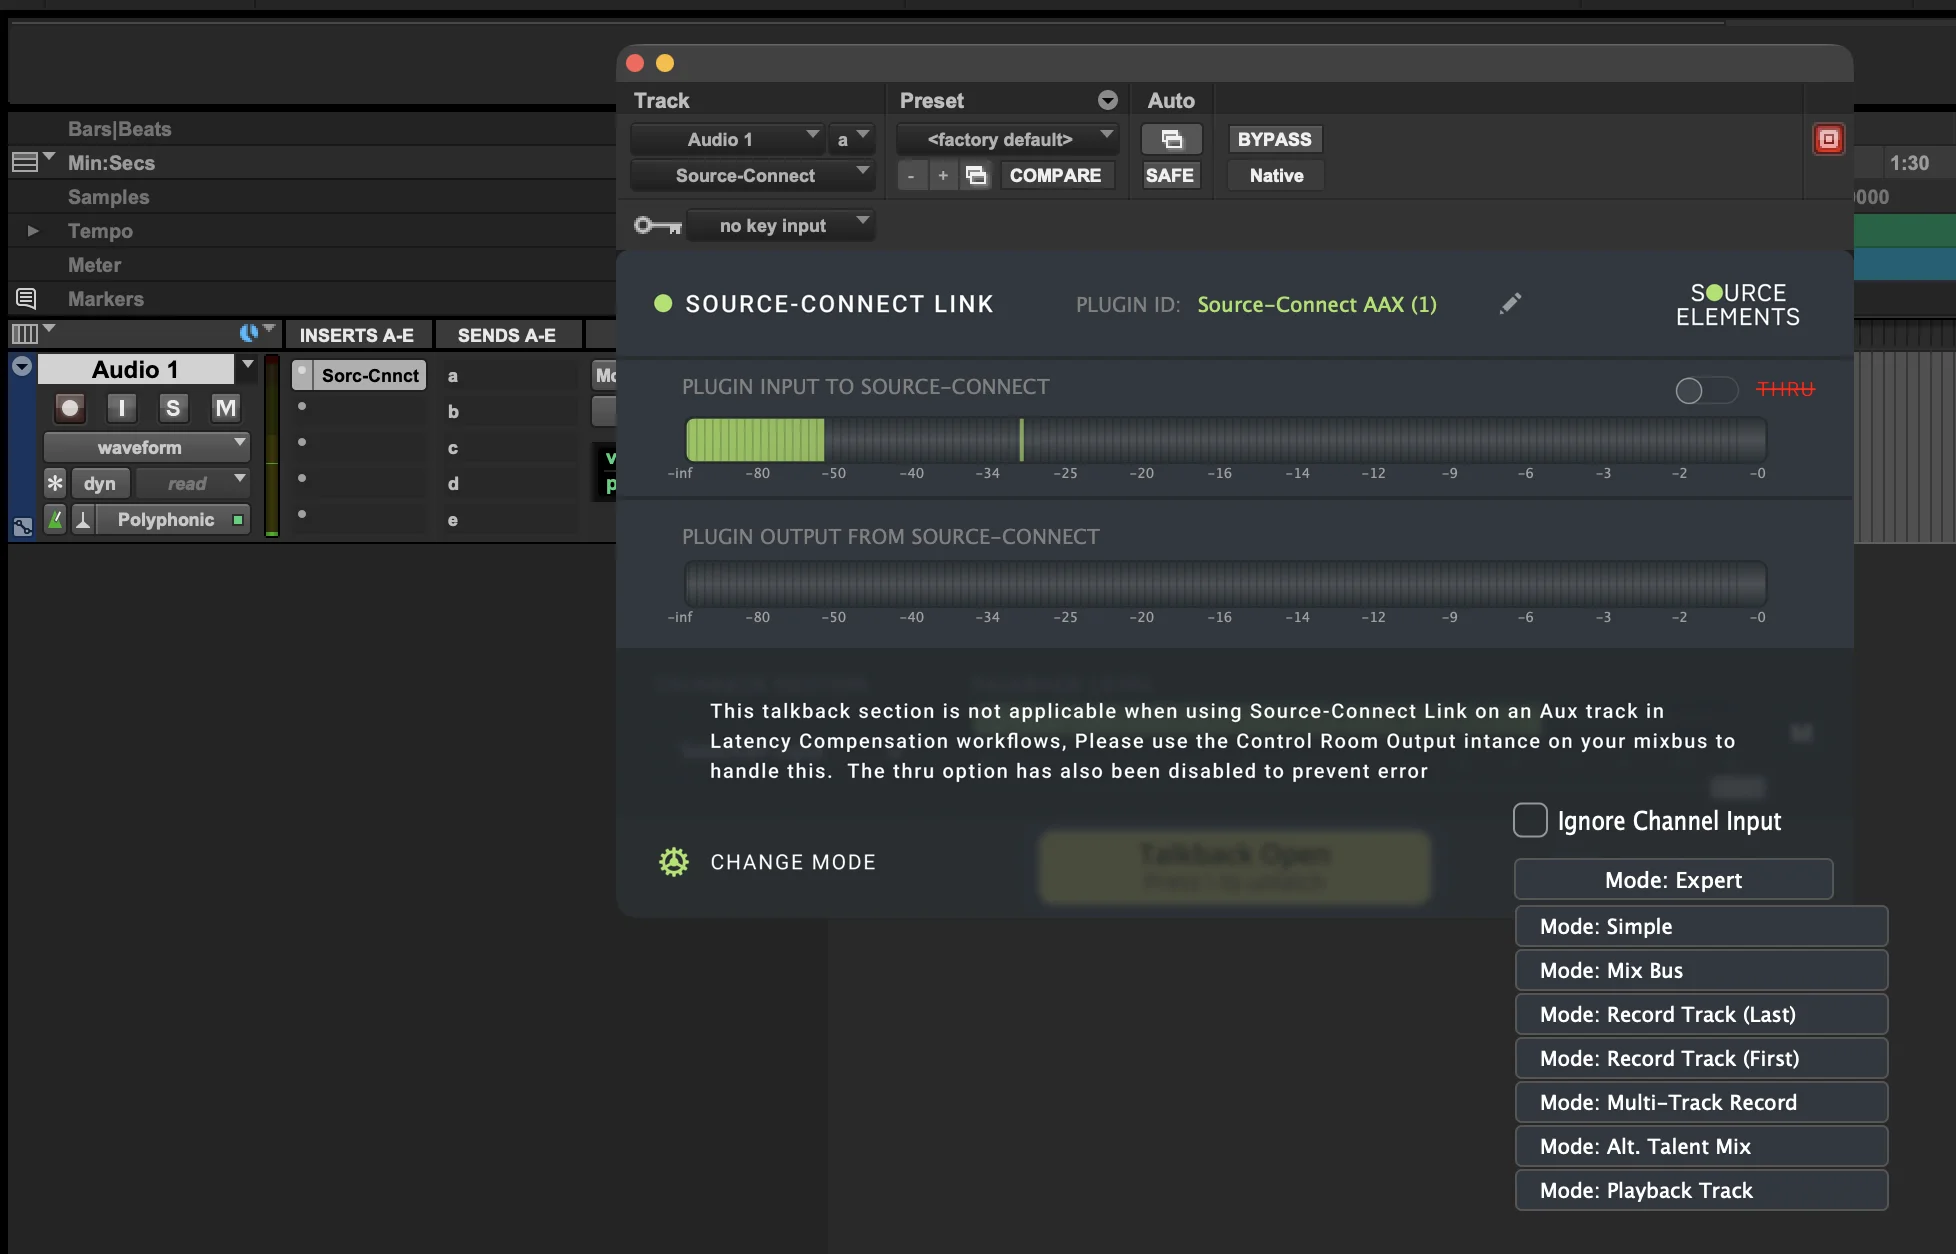
Simple Mode
This is the default and familiar mode for most Source-Connect I/O users, and it will allow you to effortlessly route audio between Source-Connect and an Aux track in your DAW. You can find a list of example use cases of simple mode here if needed.
Simple mode also includes:
- A THRU button in the “PLUGIN INPUT TO SOURCE-CONNECT” section. This disabled the RECV end of the plugin and sends the plugin input signal to the plugin output.
- An “Advanced mode” toggle in the bottom right-hand corner of the plugin which turns on the talkback section.
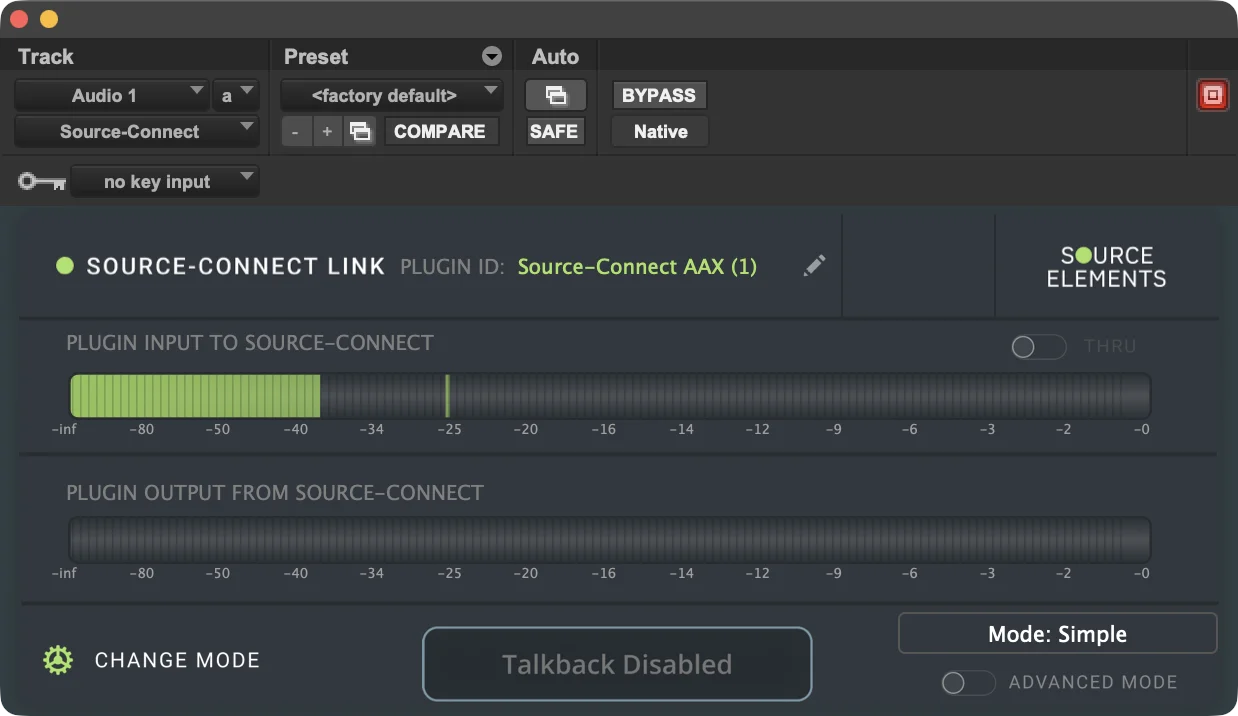
Expert Mode
This mode enables remote latency synchronization to route audio from Source-Connect into your DAW. There can be multiple instances of Expert mode Source-Connect I/O plugins in a session.
As described in the screenshot above, it disables the talkback section in the simple mode because, when used in latency compensation workflows, users can use the “Mix Bus” or control room output instance to act as talkback instead. THRU is also disabled to prevent any errors.
Mix Bus Mode
This is the most feature-rich mode and it acts as the central hub for monitoring and talent communication. It is required for facilitating any ROS sync-based workflows and for integrating the Source-Nexus Suite (for example, the Source-Nexus Review plugin) with Source-Connect.
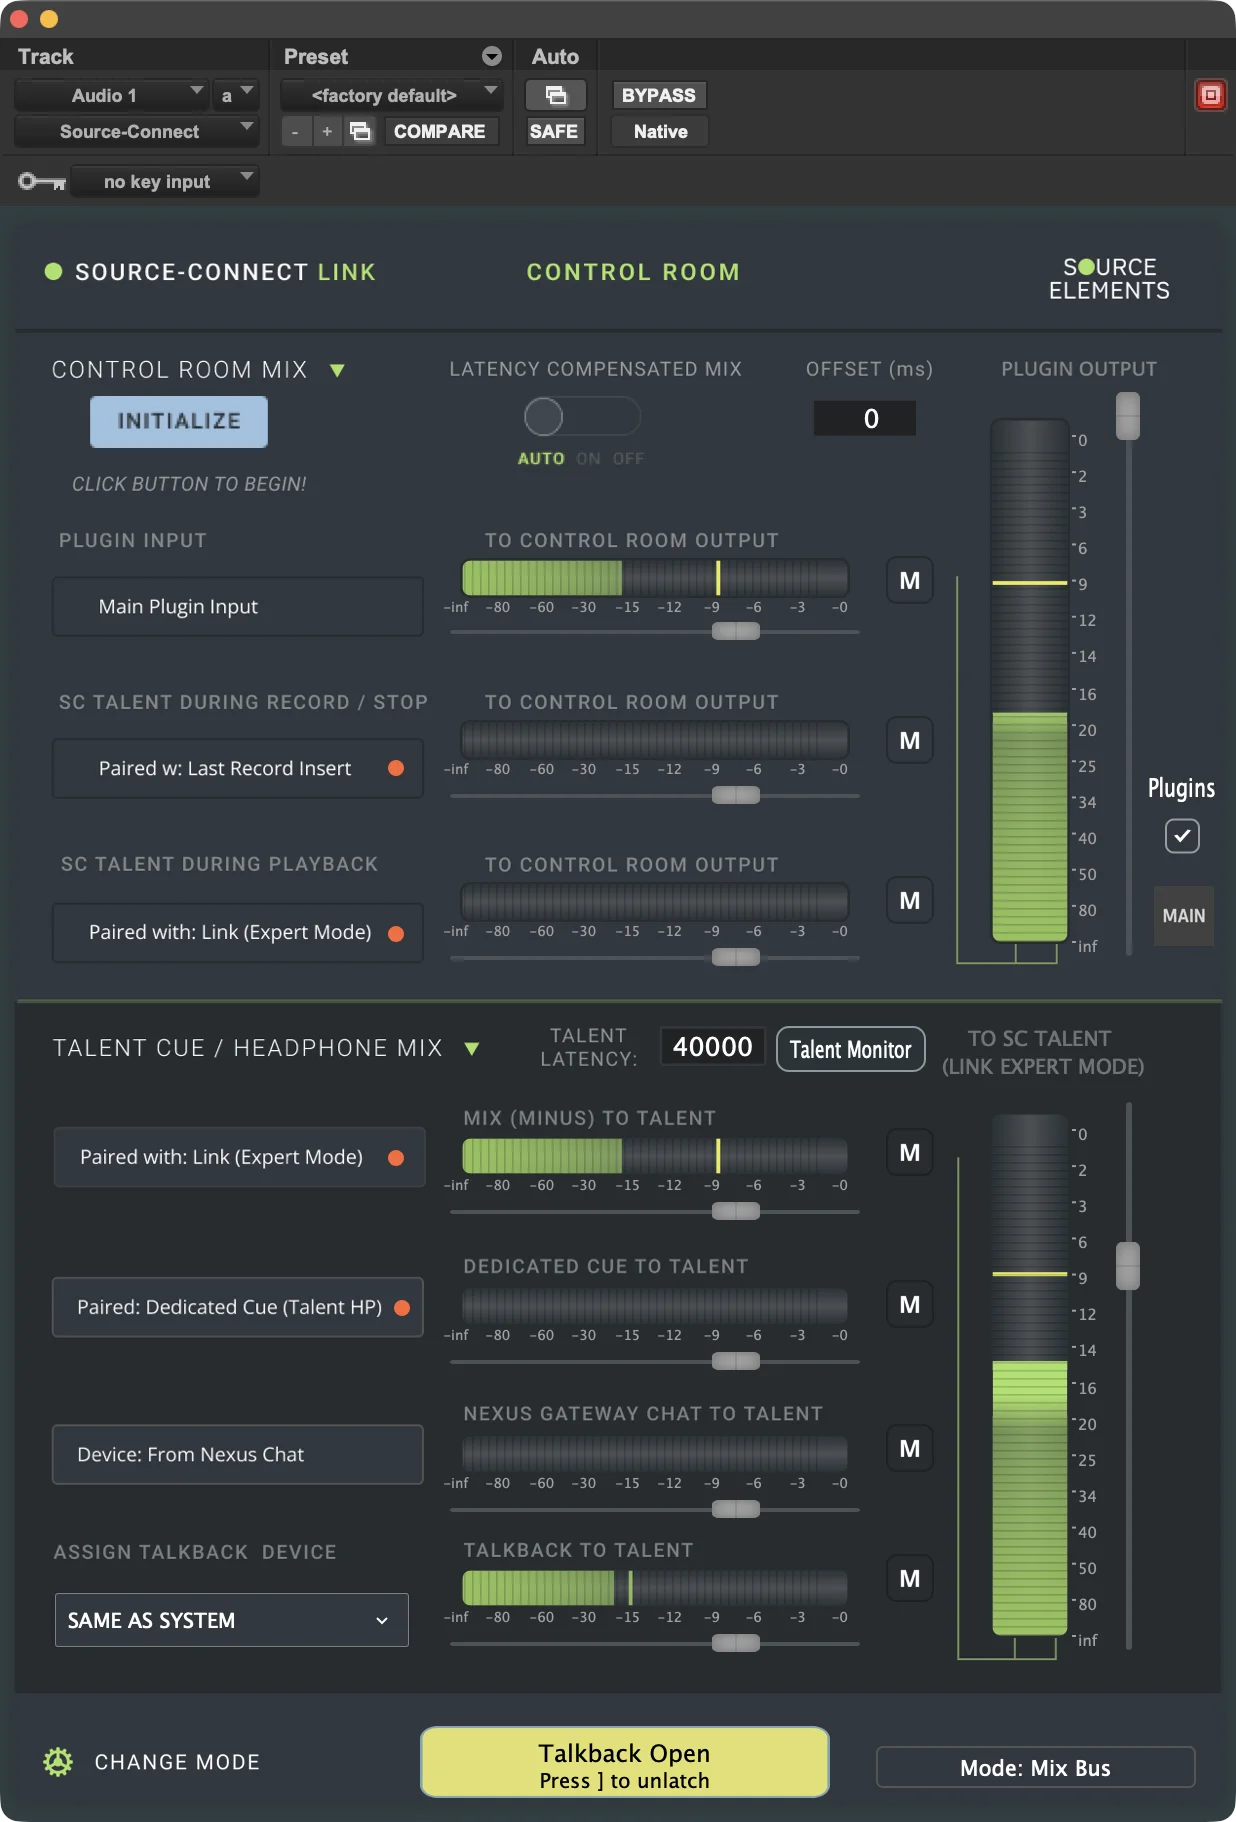
It can be used once per session and should be placed on a MASTER fader. Because the mix mode plugin might be used together with the Source-Nexus Review plugin during Source-Nexus Gateway sessions, the Mix Bus mode plugin should be placed on the second to last slot of the master fader.
The Mix Bus mode interface is divided into two main sections:
- The Control Room Mix: the upper section, which manages the control room monitoring
path and is the output for the plugin.The following actions are available:
- The Initialize button on the top left begins the latency calibration process. It
should only be clicked once the Source-Connect aux plugin and record last plugin are in place, the
routing is set from the Source-Connect aux, and the record track is armed for recording. It will
then update the “TALENT LATENCY” number displayed in the Talent Cue section.
- By default, the button will be light blue.
- Clicking it will display a yellow “SETTING UP” button instead. A button stuck in “SETTING UP” means that there is an error in the mix bus setup or the Source-Connect settings.
- Once the latency has been successfully calculated, the button will turn green and say “COMPLETED”.
- Latency Compensated Mix toggle: this setting manages latency-compensated
monitoring. There are three modes for latency compensation:
- Auto (default), where compensation only occurs during recording.
- On, where the mix is delayed by the latency, making it ideal for punch-ins.
- Off: no latency compensation.
- Offset (milliseconds), a manual offset adjustment for fine-tuning latency compensation.
- Plugin Input - To Control Room output routes the main plugin back to your control room. It includes a level meter, volume slider and mute control button.
- SC Talent During Recording - To Control Room output routes the Source-Connect talent signal to your control room during recording or when stopped. It should be paired with the Mode: Record Track (Last) instance. It also includes a level meter, volume slider and mute control button.
- SC Talent During Playback - To Control Room output routes the Source-Connect Talent signal to your control room during playback, and it’s paired with the I/O plugin in Expert mode.
- Plugin Output, a dedicated output level fader on the right side of the control Room Mix header which controls the overall output level of the plugin.
- The Plugins checkbox, which gives engineers the option to hear any talent plugins (which can be loaded using the “Talent Monitor” button in the “Talent Cue/Headphone Mix” section) during recording and playback.
- The MAIN/TLNT button or toggle allows engineers to hear exactly what the talent is hearing or their own mix.
- The Initialize button on the top left begins the latency calibration process. It
should only be clicked once the Source-Connect aux plugin and record last plugin are in place, the
routing is set from the Source-Connect aux, and the record track is armed for recording. It will
then update the “TALENT LATENCY” number displayed in the Talent Cue section.
- The Talent Cue/Headphone Mix in the lower section, which controls what the talent
hears, and it is the output to Source-Connect when used in a session.
- Talent Latency (read-only indicator), which will display 40000 by default. This will indicate the talent’s latency in milliseconds. After the engineer has completed their setup and clicked the “Initialize” button, the value will be updated with the exact latency during the session.
- Talent Monitor button, which displays a modal with a plugins list. It allows engineers to add a plugin to the talent’s monitor and will load it into their instance of Source-Connect so talents can hear it in their headphones, allowing engineers to both hear and monitor them. These plugins are VST only.
- Mix (MINUS) to Talent sends the main mix to the talent and should be paired with a Source-Connect I/O instance in Expert mode.
- Dedicated Cue to Talent sends a separate cue mix to the talent via a paired dedicated cue with an Alt. Talent Mix Source-Connect I/O instance.
- Nexus Gateway to Talent Chat uses the “To Nexus Chat” Source-Nexus virtual audio device to route audio from a Source-Nexus Gateway session into the talent’s headphone mix.
- Assign Talkback Device selects the talkback input device (or Same as System), with a dedicated Talkback to Talent dedicated fader for the talkback level sent to the remote talent.
At the bottom of the plugin UI, users have a Change Mode button and a Talkback latch (press to latch or unlatch) available, along with the current mode indicator.
Record Track (Last) or Record Track Mode A
The Record Track (Last) plugin is required for calibrating latency and should be placed in the last position of the INSERTS in the most latent record-armed track. It can only be used once per session.
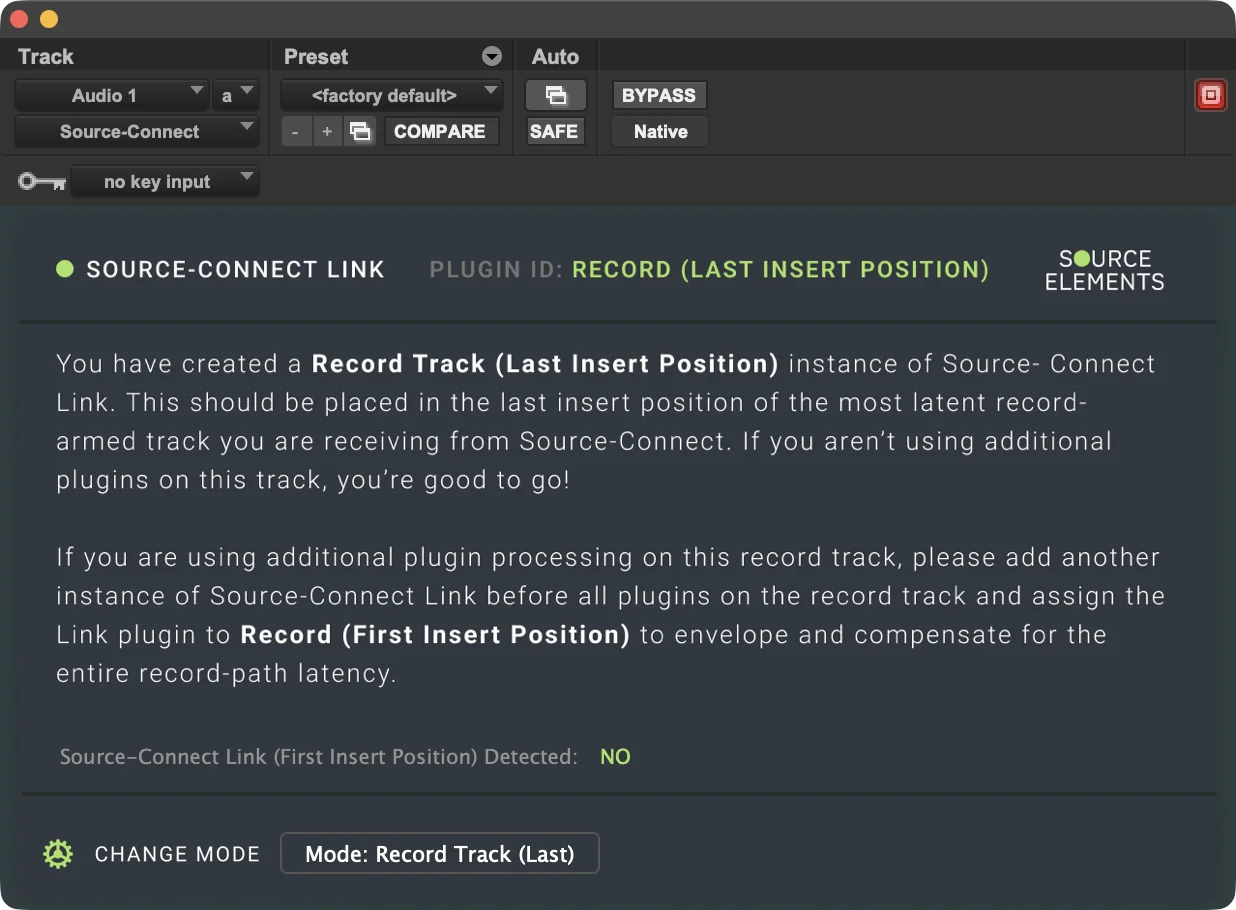
If there are any additional plugins processing on the record track where the “Last” instance is placed, you will need to place another instance of Source-Connect I/O before all plugins on the record track (First Insert) to envelope and compensate for the entire record-path latency.
Record Track (First) or Record Track Mode B
The Record Track (First) plugin is required for calibrating latency and should be placed in the first position of the INSERTS in the most latent record-armed track. It should only be used when additional plugins are being used on the record track. It can be used only once per session.

Multi-Track Record Mode
A Source-Connect I/O plugin in multi-track record mode should only be used when there are multiple record-armed tracks that are receiving audio from Source-Connect and need to be monitored with latency compensation. As with the last and first instances, they should be placed in the most latency record-armed track.
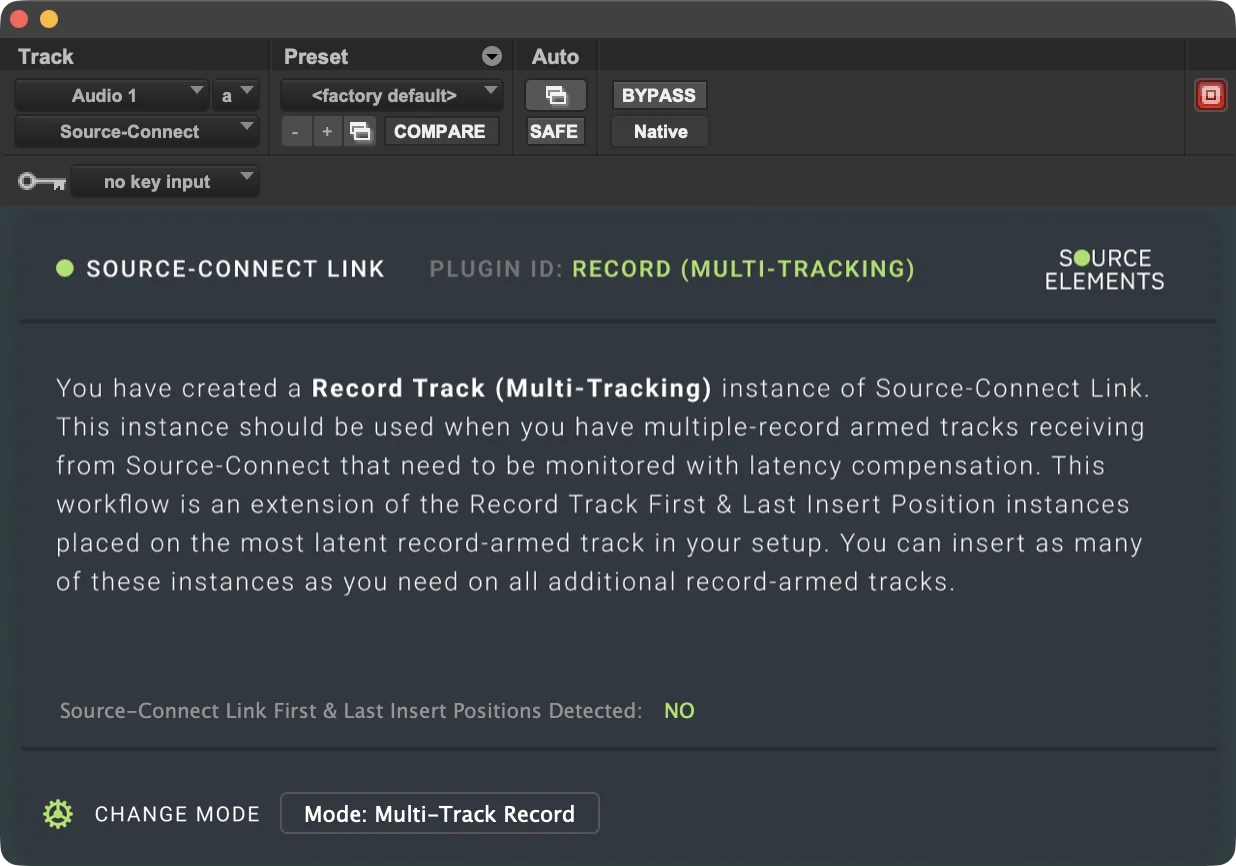
Multiple instances of multi-track record mode plugins can be used, depending on the number of record-armed tracks.
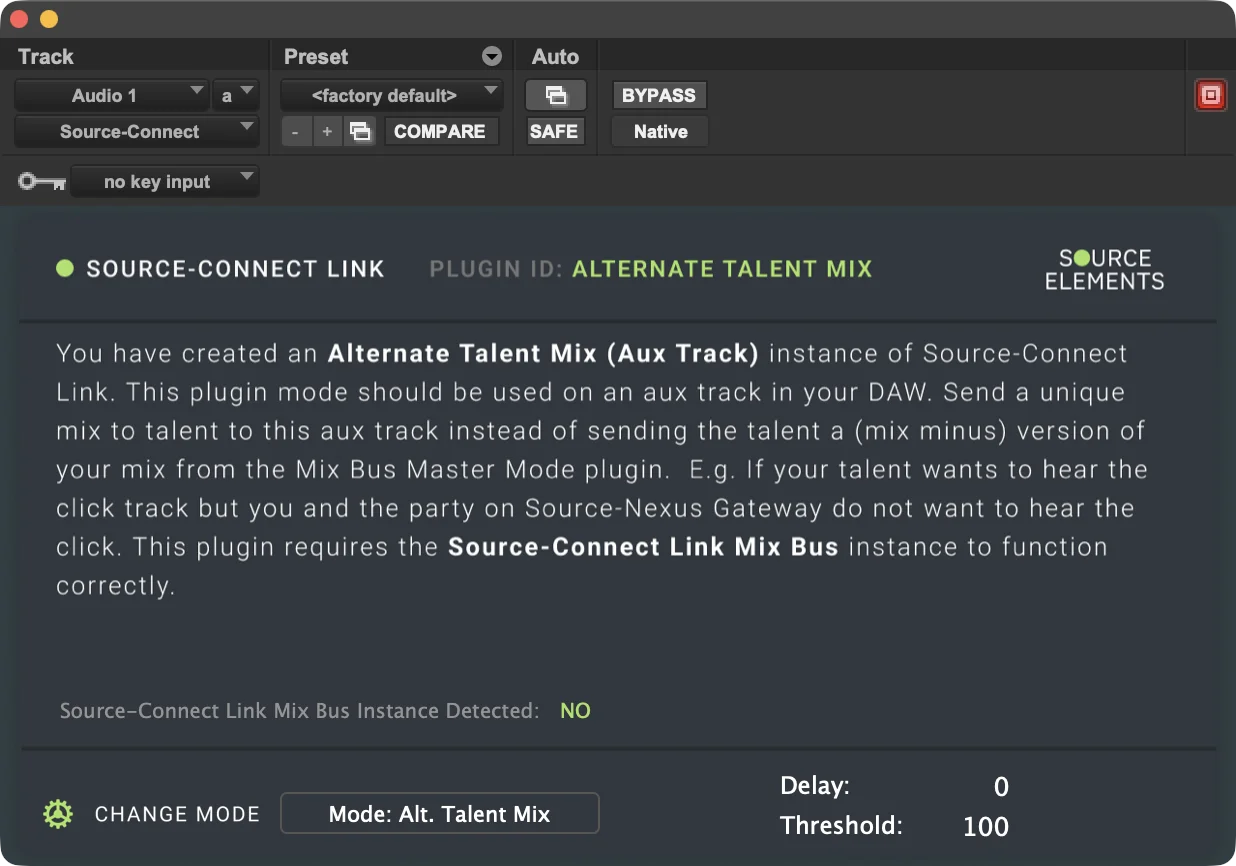
Alternate Talent Mix Mode
This Source-Connect I/O plugin should be placed on an Aux or on a track that is dedicated to cuing the talent with a unique mix separate from the engineer’s monitoring path. A plugin in Alt. Talent Mix mode will send a unique mix to the talent instead of sending them a mix minus version of the engineer’s mix from the Mix Bus master mode plugin.
Playback Track Mode
This mode should be placed on the Playback track on the DAW with the highest latency intended to be heard by Source-Connect connections.
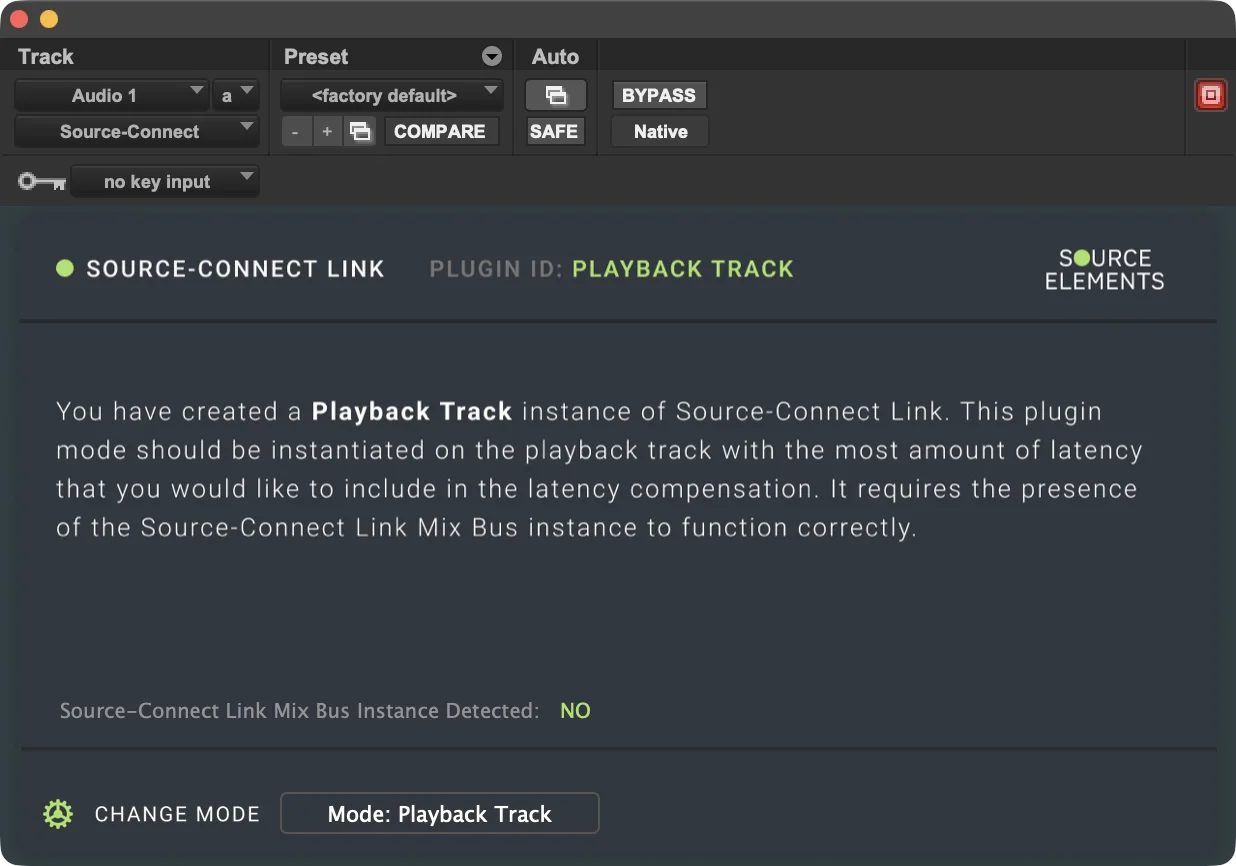
It needs the Mix Bus Source-Connect I/O plugin in order to function correctly.
7. Remote Overdub Sync (ROS)
The second version of Source-Connect 4 Labs brings back the Remote Overdub Sync (ROS) timing-correction system for professional remote recording. Recording over the internet means there’s always a delay - even when a fast connection introduces latency that throws off timing. Without compensation, the final take won’t line up properly with the session timeline.
The Remote Overdub Sync setup in Source-Connect uses Restore/Replace and the Source-Connect I/O plugin to measure that delay and automatically offset playback and recording so the performance lands exactly where it should. The Restore/Replace engine will rewrite the file, moving it prior to any potential restorations or replacements to achieve synchronization in your DAW. Engineers will have full control over the talent’s headphones, which in turn makes the talent’s experience much easier without any need of pre-loaded files or DAWs.
For this first release, the Source-Connect I/O plugin required for this setup is AAX and will work with Pro Tools only.
Engineer Setup
Here’s how to set up a basic ROS session with Pro Tools and Source-Connect on the engineer’s side:
- Add a stereo Master Fader track (or a stereo output for the session):
- Place Source-Nexus Review on the last INSERT place. This will allow you to interact with your clients, but not your talent.
- Place Source-Connect I/O in the second to last place.
- Change the mode to “Mix Bus” or control room mode.
- Assign a Talkback device at the bottom of the plugin screen to interact with your talent.
- The output of the master fader should be a stereo monitor.
- Add a stereo Aux track for Source-Connect.
- Add a Source-Connect I/O plugin in Expert mode.
- The Aux track does not need an input because it will automatically get it from the Source-Connect I/O Mix Bus plugin.
- Set the output use a stereo bus (name it “Rec”)
- For routing purposes, add a mono audio track called “Record”.
- Set the input of the Record track to the stereo “Rec” bus, but select only the left side.
- The output of the record track should be the same stereo monitor as the master fader track set in (1c).
- Add a Source-Connect I/O plugin in the last INSERTS place in “Record Last” mode. This will block the audio from going into the mix and send it to the Mix Bus plugin in the master fader, preventing any echo.
- (Optional) If there are any other plugins in the record track that create latency, you need to add another Source-Connect I/O plugin in the first INSERTS place and put it in “Record First” mode. This would effectively bracket the plugins and ensure that the latency is properly calculated.
On Source-Connect:
- Make sure that you set your input and output to the Source-Connect I/O plugin where the mix bus plugin is placed. Make sure to double check the plugin ID so that it matches the Mix Bus plugin.
- Go to the Restore/Replace tab in Source-Connect and make sure “ROS” is set to “ON”.
- Make sure the watch folder path is correctly set.
Read through the new Source-Connect I/O plugin documentation to learn about other plugin modes to see if they are necessary for your setup.
Once your setup is complete:
- Connect with your talent on Source-Connect.
- In Pro Tools, locate your Mix Bus Source-Connect I/O plugin.
- Click the “Initialize” button. The latency should be automatically calculated.
Talent Setup
Your talent will only need to have Source-Connect on their machine and set their input and output as needed.
Troubleshooting
- When clicking “Initialize”, if the button gets stuck on “SETTING UP”, make sure to double check all of the steps in the Engineer setup have been correctly followed. This might be caused by ROS not being on in the Settings panel.
8. Remote Transport Sync with Overdub
Source-Connect 4 Labs v2 brings back one of the core functionalities of RTS absent from previous releases - the RTS with Overdub Transport feature present in Source-Connect 3. As mentioned in the “What’s new” section, this feature allows studios to record talents in sync with the content in the DAW or timeline that is on both sides of the connection - while allowing the studio to maintain control of the talent’s system.
RTS Settings and Configuration Options
The following settings have been included in the RTS panel in the Source-Connect 4 Labs v2:
- Control button: the control button enables all Overdub settings.
- Status: a read-only indicator to let users know the status of the RST module (for example, “idle”, “overdub play” and “review play”, among others).
- Settings: a shortcut to the SYNC settings tab in the General Settings menu.
- Overdub controls:
- Sender:
- Stop: this button sends a stop message to the talent, thus stopping the timecode returned to the sender. See “Important Considerations” item 7 for specific stop case scenarios.
- Play: also known as Review Play, this play button plays the local DAW from the current cursor position and sends timecode to the receiver.
- Record: this will record-arm the local/operator’s DAW transport. This is done via MIDI machine control for the purposes of recording when transport is triggered to roll from incoming timecode.
- Receiver:
- Stop: this button stops the local playback/recording and stops sending timecode to the sender.
- Play: also known as the Overdub Play, it will start playing the local DAW while simultaneously pushing timecode back to the sender.
- Record: this will arm the receiver’s DAW for recording via MIDI machine control, so that when timecode arrives from the sender, it will trigger the recording automatically.
- Sender:
Quickstart Checklists
Sender
- [ ] Talkback configured with a shortcut key
- [ ] Audio routed into Source-Connect (you can use Source-Connect I/O, Source-Nexus I/O or other plugins, as needed).
- [ ] MTC /timecode output enabled
- [ ] "Send" activated in SYNC tab
- [ ] MIDI machine control master and control remote configured.
Receiver
- [ ] "Receive" checked in the SYNC tab.
- [ ] Ready to receive synchronized playback
Sender Setup
1. DAW Preparation
- Note the timecode start position (e.g., 59:53:00)
- Route audio on your DAW into Source-Connect (you can use Source-Connect I/O, Source-Nexus I/O or any
other plugin, as needed).
- Depending on how you are routing with Source-Connect I/O, you may need to make sure to disable “Mute Through” to hear video audio.
- Set your Machine Control Driver by going to Setup > Peripherals > Machine Control. Under MIDI Machine Control Master, enable the MMC IAC driver and device ID.
- If you will be remote controlling your connection partner’s RTS, check “Enable” under the MIDI Machine Control Remote and enter the device ID.
2. Configure Audio Routing
- Set Input: If you are using Source-Connect I/O then select the appropriate the Source-Connect AAX Plugin (to send DAW mix)
- Set Output: Your hardware output (to hear your connection partner) or route back to whatever monitor output you need.
3. Set up Pro Tools for ROS
- Setup -> Peripherals -> Synchronization
- MTC Reader Port: IAC SC Receive
- MTC Generator Port: IAC SC Send
- Setup -> Peripherals -> Machine Control
- MIDI Machine Control Master: Enabled, IAC SC Send, ID matches in SC RTS settings for MIDI Machine Control from DAW
- MIDI Machine Control Remote: Enabled, ID is different than above and matches in SC RTS settings for MIDI Machine Control to DAW
- Pro Tools -> Settings/Preferences -> Synchronization -> Machine Follows Edit Insertion/Scrub: Enabled
- Options -> Transport Online: Enabled (if PT will be receiving timecode to follow, otherwise Disabled)
- Generate MTC: Enabled (only needed if PT will be sending timecode, doesn’t cause any issues to have it on in either case though)
4. Configure Timecode Settings on Source-Connect
- Set timecode input to MTC Device (for MIDI timecode) or use LTC.
- In the Source-Connect SYNC tab:
- Click Send to enable sending.
- Verify correct input selection.
Receiver Setup
1. Import Timeline
- Receive and unzip the folder from the Sender (your connection partner).
- Drag the .rtl file into the RTL section of the SYNC module (the “clip list”).
- Alternatively, receivers can use the built-in RTL player on their DAW if needed. This walkthrough will describe the RTL/SYNC module only.
2. Enable Receiving
- Click Receive RTS to enable timecode reception
- If the sender decides to control your session, they will click record, stop or play and your timecode will automatically sync with the sender’s transport.
Operating the System
For Sender:
- Press play in your DAW to start synchronized playback.
- Press stop, play or record, as needed.
For Receiver:
- Your timecode will automatically sync with the sender’s transport.
Important Notes and Considerations
- Both the sending and the receiving side of the timecode should have MMC enabled in
their systems and mapped to their corresponding DAWs. Appendix 1, section Creating an IAC device goes into detail about how to
achieve this.
- Both sides of the session should have the ability to send or receive MTC from their
chosen DAW.
- To use Overdub Transport, the talent can only send or receive MTC. Therefore, both
workstations (that of the studio and that of the talent) will need to be configured to chase timecode
via MTC (online mode)
- Talents should never send timecode to the
receiver (even if the Talent presses play in their DAW). The talent should only send timecode
to the receiver when they are put into play using the RTS Overdub play command from a connected user who
is running the Studio or Facility version and who initiates play using the play button in the RTS
panel.
- Only one party in the connection can have the RTS Overdub panel engaged during a call.
- When using the sender record, keep in mind that the operator must record-arm the track they wish to record onto their own.
- If the sender presses stop on Source-Connect, the sender’s DAW will stop first.
- In the case of a review play, the receiver will stop due to the timecode stopping. In this case, the stops will not be synchronized
- For an overdub play, then the receiver’s transport will stop when they receive the stop message.
Troubleshooting
- No timecode received: Verify MMC settings in DAW and Source-Connect. Also make sure to check both parties are using the same sample rate and frame rate in RTS.
- Talkback not working: Check microphone permissions and shortcut key assignment
- Sync issues: Confirm both parties have the same RTS settings.
- ROS initialization error: If you receive an error message saying Remote Overdub Sync
has failed to initialize, make sure you review the quickstart
checklists thoroughly.
- The Talent side of the connection must NOT have the Source-Connect plugin in Expert mode active in their session and ROS off in the Source-Connect general settings.
- The Remote Overdub Sync (ROS) record track needs to be record-enabled for initialization. Input monitoring should never be on.
- The SC Send/Receive cannot be muted on either end for ROS initialization.
- A fixed buffer should be enabled in the Source-Connect settings when using RTS and ROS. This is also a connection-specific setting, so make sure to check the individual connection settings to be ensure it is on for that specific connection.
9. Getting Support
Comprehensive documentation is available on this document. If your question is not answered, please start a new thread in the Source Elements feedback portal.
When posting on the feedback portal, please provide us with the information required to resolve this issue. These include, for example:
- Your computer type.
- Host version.
- Mention that you are on the Labs version.
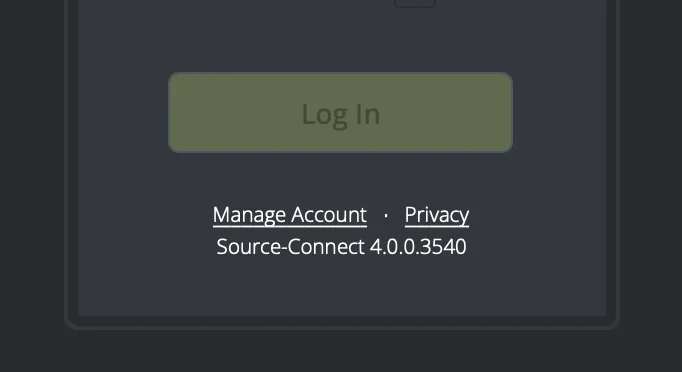
How to find your Source-Connect version
When reporting any issues to the support team, please provide them with the software version you are using (4.0, 4.0.1, etc.).
In order to find the version on both Mac and Windows, open the Source-Connect application and look at the login screen. The application version is included under the “Login” section:
Appendix 1: Configuring Pro Tools to send MTC
MTC (MIDI Time Code) Overview
MTC is a timing protocol that sends SMPTE timecode over MIDI connections, allowing multiple devices and software to synchronize. It transmits quarter-frame messages that reconstruct full timecode positions.
Creating an IAC Device (Mac)
IAC (Inter-Application Communication) creates virtual MIDI ports for routing between applications. For this release of Source-Connect 4 Labs, you will need 2 IAC devices:
- One to handle MTC in and out.
- A different one to handle MMC. This device will be used to send and receive playback commands between Source-Connect and Pro Tools.
In order to create them:
- Open Audio MIDI Setup
- Applications > Utilities > Audio MIDI Setup
- Window menu > Show MIDI Studio
- Enable IAC Driver
- Double-click the IAC Driver icon
- Check "Device is online"
- Create Ports
- Click the "+" button to add ports
- Name them clearly (e.g., "MTC to Pro Tools", "MTC from Pro Tools")
- Create separate ports for each direction to avoid feedback
- Apply Settings
- Click "Apply" to save changes
Pro Tools as MTC Host (Master)
When Pro Tools generates MTC for other devices/software to follow:
Setup:
- Open Session Setup
- Setup menu > Session
- Set your desired frame rate (24, 25, 29.97, 30 fps)
- Configure MIDI Beat Clock
- Setup > MIDI > MIDI Beat Clock
- Enable "MTC Generator Port"
- Select your MIDI output device/IAC port
- Check "Generate MTC"
- Synchronization Settings
- Setup > Peripherals > Synchronization
- MTC Generator Port: Select your output
- Frame Rate: Match your session settings
Operation:
- MTC transmits automatically during playback
- Stop/start sends position updates
- Scrubbing sends continuous position data
- Loop playback maintains sync
Pro Tools as MTC Receiver (Follower)
When Pro Tools follows MTC from another source:
Setup:
- Configure Synchronization
- Setup > Peripherals > Synchronization
- Sync Mode: "MTC"
- MTC Reader Port: Select your MIDI input/IAC port
- Frame Rate: Match the incoming MTC
- Session Setup
- Ensure session frame rate matches MTC source
- Setup > Session > Frame Rate
- Enable Online Mode
- Transport window: Click "Online" button
- Or use keyboard shortcut: Command+J (Mac) / Ctrl+J (PC)
Operation:
- Pro Tools waits for incoming MTC when Online
- Playback follows external transport
- Position updates when MTC jumps
- Maintains frame-accurate sync
Important Considerations
Frame Rate Matching
- Critical: All devices must use identical frame rates
- Mismatches cause drift and sync loss
- Common rates: 24, 25, 29.97 DF/NDF, 30
Offset Management
- Set MTC offsets if devices need different start times
- Setup > Peripherals > Machine Control
- Adjust "MTC Offset" in frames
Troubleshooting Tips
- No Sync/Communication
- Verify MIDI connections and IAC online status
- Check frame rate matching
- Confirm MTC generation/reception enabled
- Monitor MIDI data with MIDI Monitor app
- Drift or Instability
- Ensure consistent frame rates
- Check for MIDI feedback loops
- Use dedicated MIDI interfaces for critical applications
- Avoid Wi-Fi MIDI for MTC
- Latency Issues
- MTC has inherent latency (1-2 frames typical)
- Use hardware sync for tighter timing
- Adjust MTC offset to compensate
Best Practices
- Use Dedicated MIDI Ports
- Separate MTC from other MIDI data
- Avoid sharing ports with notes/controllers
- Test Before Critical Sessions
- Verify sync across full timeline
- Test all transport functions
- Check behavior during loops/punches
- Document Your Setup
- Note frame rates and offsets
- Label MIDI connections clearly
- Save sync presets when possible
- Consider Alternatives
- HUI protocol for tighter DAW integration
- Satellite Link for multiple Pro Tools systems
Table of Contents